


日本語版はこちら
MinecraftConnection is a C# library for sending commands to a Minecraft server via RCON. It can be used for C# programming practice with Minecraft or for automation projects. The library supports not only vanilla Minecraft servers but also Spigot servers with plugins. Before running your program, make sure a Minecraft server that allows RCON connections is running.
First, download the Minecraft Server software and run it in any game directory. A configuration file named server.properties will be generated. In this file, enable RCON access and set a password and port number for the connection.
Example configuration:
rcon.port=25575
rcon.password=minecraft
enable-rcon=true
After editing, save the file and restart the server.
Also, make sure you have started your Minecraft client and logged into the server.
This library targets .NET Standard 2.1 or later. Here’s how to create a sample project using a .NET 9 console application.
Install MinecraftConnection via the dotnet command:
dotnet add package MinecraftConnection --version 3.0.0-betaMore details:
https://www.nuget.org/packages/MinecraftConnection
Make sure both the Minecraft Server and Minecraft client (logged in) are running before executing any code. The following examples use top-level statements.
Starting with version 3.x, the main class name changed from MinecraftCommands to MinecraftCommand.
Since it implements IDisposable, you should either call Dispose() manually or use the using statement to release resources automatically.
using MinecraftConnection;

// You can also use a DNS name instead of an IP address.
string address = "127.0.0.1";
ushort port = 25575;
string pass = "minecraft";

using var command = new MinecraftCommand(address, port, pass);

command.TimeSet(0);using MinecraftConnection;
using MinecraftConnection.Entity;
string address = "127.0.0.1";
ushort port = 25575;
string pass = "minecraft";
using var command = new MinecraftCommand(address, port, pass);
// Define the coordinates to launch from
var pos = new Position(-516, 64, -205);
// Create a firework
var fw = new FireworkRocket
{
Colors = FireworkOption.GetRandomColors(), // Random colors
FadeColors = new List<FireworkColor> { FireworkColor.YELLOW }, // Fade color after explosion
LifeTime = 20, // Time until explosion
Shape = FireworkShape.LargeBall, // Firework shape
};
// Launch the firework
command.Summon(fw, -14, 63, -17);Result:
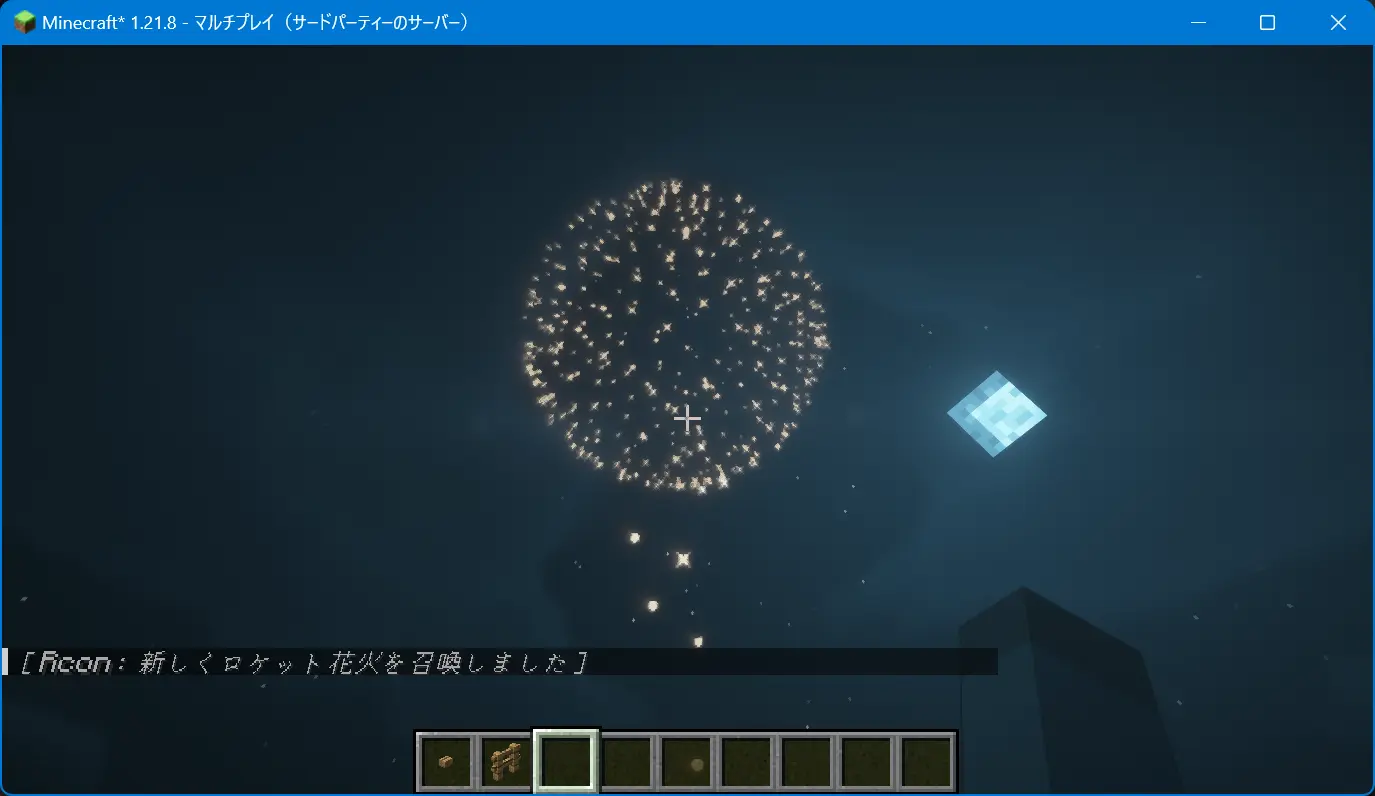
With some creativity, you can create many different firework effects. For more examples, see: https://zenn.dev/takunology/scraps/9462b03d13dd0a
You can write item data directly into a chest. Use the ItemStack type to define the item ID, name, and quantity.
using MinecraftConnection;

string address = "127.0.0.1";
ushort port = 25575;
string pass = "minecraft";

using var command = new MinecraftCommand(address, port, pass);

// Define items
var items = new List<ItemStack>
{
    new ItemStack(0, "minecraft:stone", 64), // 64 stone blocks in slot 0
    new ItemStack(1, "minecraft:diamond_sword", 1) // 1 diamond sword in slot 1
};

command.DataModifyBlock(-14, 63, -21, "Items", items);
The 4th argument of DataModifyBlock() corresponds to the NBT attribute used in the data modify block command.
The 5th argument is the data value to set.
There’s also a DataModifyEntity() method, which works similarly — you can specify attributes like "Pos" or "Motion".
However, since the attributes are represented as strings, an exception will occur if the specified attribute does not exist.
Starting from version 3.x, asynchronous methods are also supported.
For example, the following code demonstrates how you can combine MinecraftConnection with the Windows App SDK (WinUI) Canvas to create an app that maps a player's position in real time.
The retrieved position data is stored in a list and then drawn on the canvas.
<Window
    x:Class="GuiApp.MainWindow"
    xmlns="http://schemas.microsoft.com/winfx/2006/xaml/presentation"
    xmlns:x="http://schemas.microsoft.com/winfx/2006/xaml"
    xmlns:local="using:GuiApp"
    xmlns:d="http://schemas.microsoft.com/expression/blend/2008"
    xmlns:mc="http://schemas.openxmlformats.org/markup-compatibility/2006"
    mc:Ignorable="d"
    Title="GuiApp">

    <Window.SystemBackdrop>
        <MicaBackdrop />
    </Window.SystemBackdrop>

    <Grid>
        <Canvas x:Name="MotionCanvas" Background="White"/>
    </Grid>
</Window>
using MinecraftConnection;
public sealed partial class MainWindow : Window
{
private List<Position> playerMotions = new List<Position>();
public MainWindow()
{
InitializeComponent();
CompositionTarget.Rendering += OnRender;
StartMotionUpdate();
}
private async void StartMotionUpdate()
{
var command = new MinecraftCommand("127.0.0.1", 25575, "your-pass");
while (true)
{
var data = await command.DataGetEntityAsync("player-name");
var info = data.Position;
DispatcherQueue.TryEnqueue(() =>
{
if (playerMotions.Count > 200)
{
playerMotions.RemoveAt(0);
}
playerMotions.Add(info);
});
System.Diagnostics.Debug.WriteLine($"X:{info.X} Y:{info.Y} Z:{info.Z}");
await Task.Delay(5);
}
}
private void OnRender(object? sender, object e)
{
MotionCanvas.Children.Clear();
double canvasWidth = MotionCanvas.ActualWidth;
double canvasHeight = MotionCanvas.ActualHeight;
double scale = 20;
foreach (var motion in playerMotions)
{
var ellipse = new Ellipse
{
Width = 5,
Height = 5,
Fill = new SolidColorBrush(Windows.UI.Color.FromArgb(255, 255, 0, 0))
};
// Set the center of the canvas as (0,0)
double x = canvasWidth / 2 + motion.X * scale;
double y = canvasHeight / 2 - motion.Z * scale; // Convert Y to Z
Canvas.SetLeft(ellipse, x);
Canvas.SetTop(ellipse, y);
MotionCanvas.Children.Add(ellipse);
}
}
}Result:
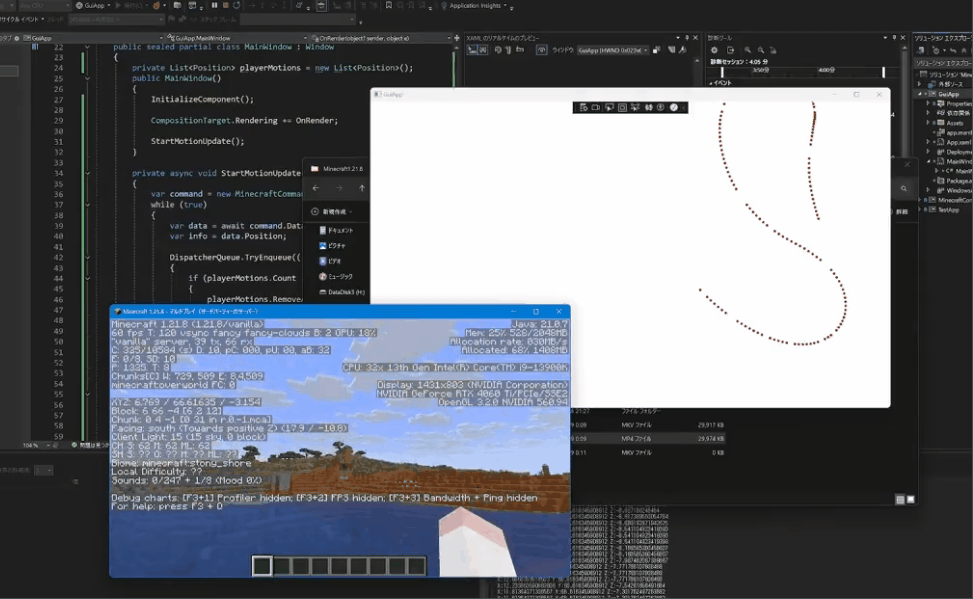
For detailed implementation steps, see: https://zenn.dev/takunology/scraps/075d57bfcc5aaa
For safety reasons, the stop command cannot be executed via RCON, as it may forcibly shut down the server.
If you attempt to run stop using the SendCommand method, an exception will be thrown and the program will halt.
Project website: https://www.mcwithcode.com/