eGuru Server: hosted over e-Mentoring Platform
The tool consists of a Team Dashboard that helps teachers to organise the students into teams and mentor them effectively.
When a student (working on a team project hosted over GitHub) connects with the server, he/she sends the URL of the GitHub repository to the server.
The server stores the team information and team member information in a MySQL database.
eGuru Client: It is a PDE eclipse plugin written in Java Please read the readme file regarding how to intall plugin in eclipse
Tables required for running the project in MySql database: Refer sql queries file for this
=======================================================
Preferred Softwares to run the project to be installed:
- Eclipse
- XAMPP {This will include the MySql database}
Setting up XAMPP
-
Download and install XAMPP software You may use this url or download from other sources too (https://www.apachefriends.org/download.html)
-
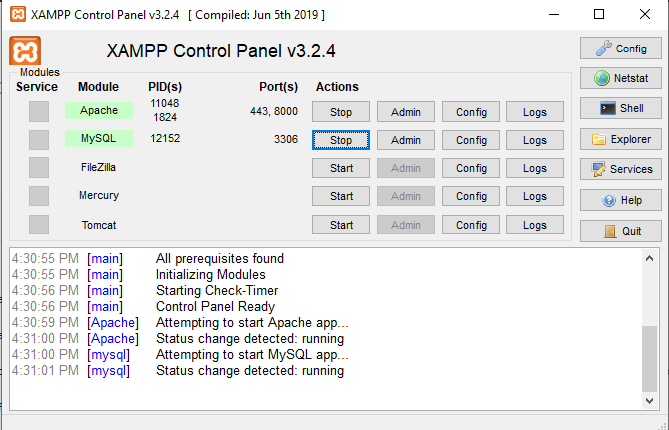
Once you have installed XAMPP, run the XAMPP Control panel and Start "Apache" and "MySQL" Modules as shown in below screenshot
-
After that please open the admin page by clicking on the button "Admin" in front of MySQL in your XAMPP control panel. This will redirect you to the phpMyAdmin page within a new browser window.
-
On the extreme top left of your screen here, you may find "new" button to create a new MySQL database. Use that to create a database named as "eguru" and click on create.
-
Once you have your eguru database created, goto "SQL" from the top meny bar and run the create table queries from the file "sql queries" to create your tables.
-
You may then choose your newly created tables, then click on "Insert" from the top menu bar and also insert dummy data in your tables. Note: The data you insert here in the tables will be displayed to you prepopulated while running the application.
-
You are all set with the backend part of the application now !!!
Setting up Eclipse Project
-
Make sure you have Eclipse downloaded and installed to run this project
-
You can clone the repository from github or download the code in zip format.
-
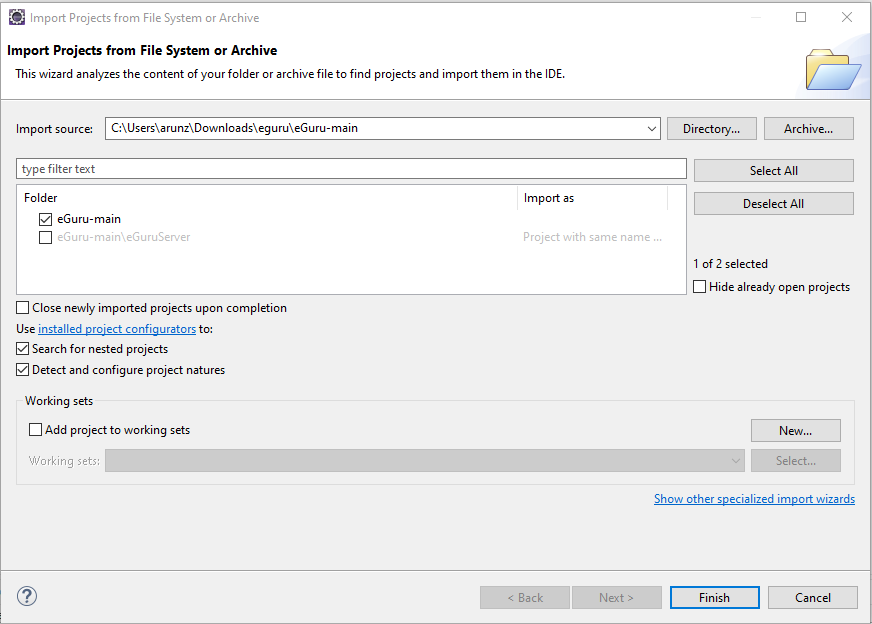
Now if you have the zipped code downloaded then please extract it to some folder. Then from Eclipse goto File > Open Projects from File System. And browse your extracted project folder as shown in the screenshot below.
-
We actually need a Dynamic Web Project here. So we are going to create one from scratch and then copy the source code folders from our extracted project into it.
-
Use File > New > Dynamic Web Project Then copy paste and add the source code into it so that the the folders "src" has all the .java files Copy paste Everything from "WebContent" folder and make sure everything is included/replaced even from "WEB-INF" and "META-INF".
-
Adding your referenced libraries to the project: Right click on your project and select Properties to open the Properties dialog. Click on Java Build Path on the left navigation tree. Select the Libraries tab on the right. Select Classpath and then use the button at the right called as "Add External JAR" to locate the two jar's from your extracted project folder namely mysql-connector-java and servlet-api.jar
Setting up Tomcat Server in Eclipse
- In Eclipse goto File > New > Others and select "Server"
You may select a Tomcat 7.0 version for this application and proceed.

Running your application on Server
- Now right click on your project name in the Project Explorer of Eclipse and select "Run as> Run on Server"
And you have your project running within a browser window within your Eclipse as shown in the screenshot below
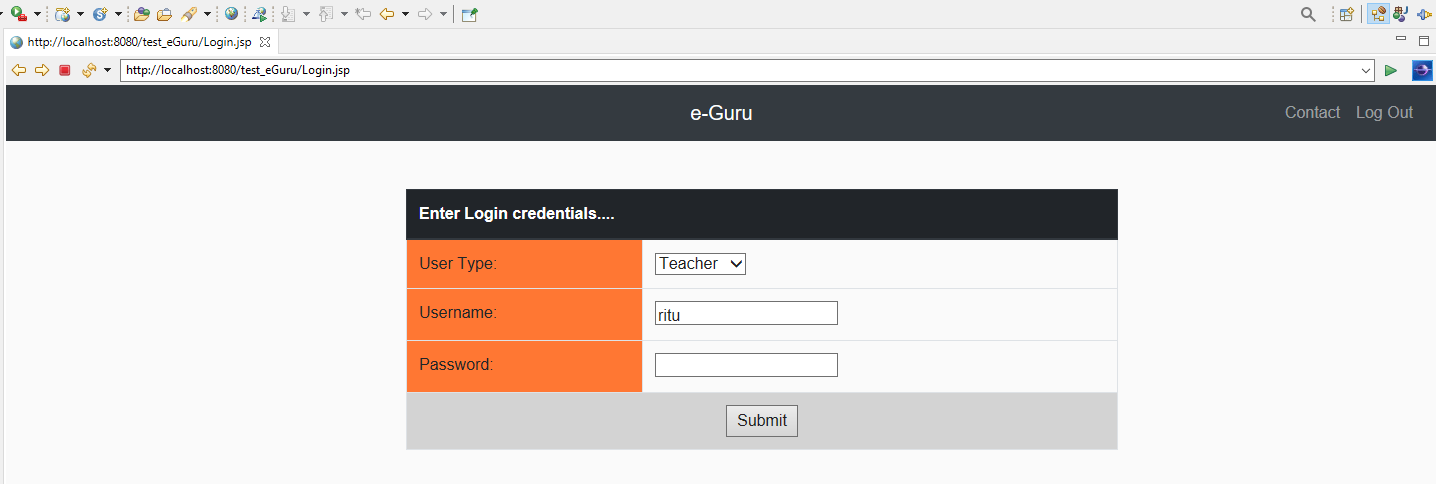
To proceed further from here only after your are sure you have run all sql queries and insert queries, you may login and continue. Once inserted a username and password for the corresponding role (Student/Teacher/Mentor), you can now access the webpage to login and proceed further to use the webapp locally. For eg as shown in the screenshot select Role as Teacher and fill the username: ritu and password: ritu123 And you should be good to go !!!