Expand/Collapse
- Introduction
- Commands: Your cute Session
- Commands: Working with
content - Commands: Running cute as a
server - Commands: Manage Content Types using
type - Configuring cute in Contentful
- Command Structure for v2.0
- Contributing to Cute
cute is a cross-platform CLI tool that brings several advanced features and capabilities including bulk operations, web server mode, AI generation and language translation to working with your content hosted on Contentful.
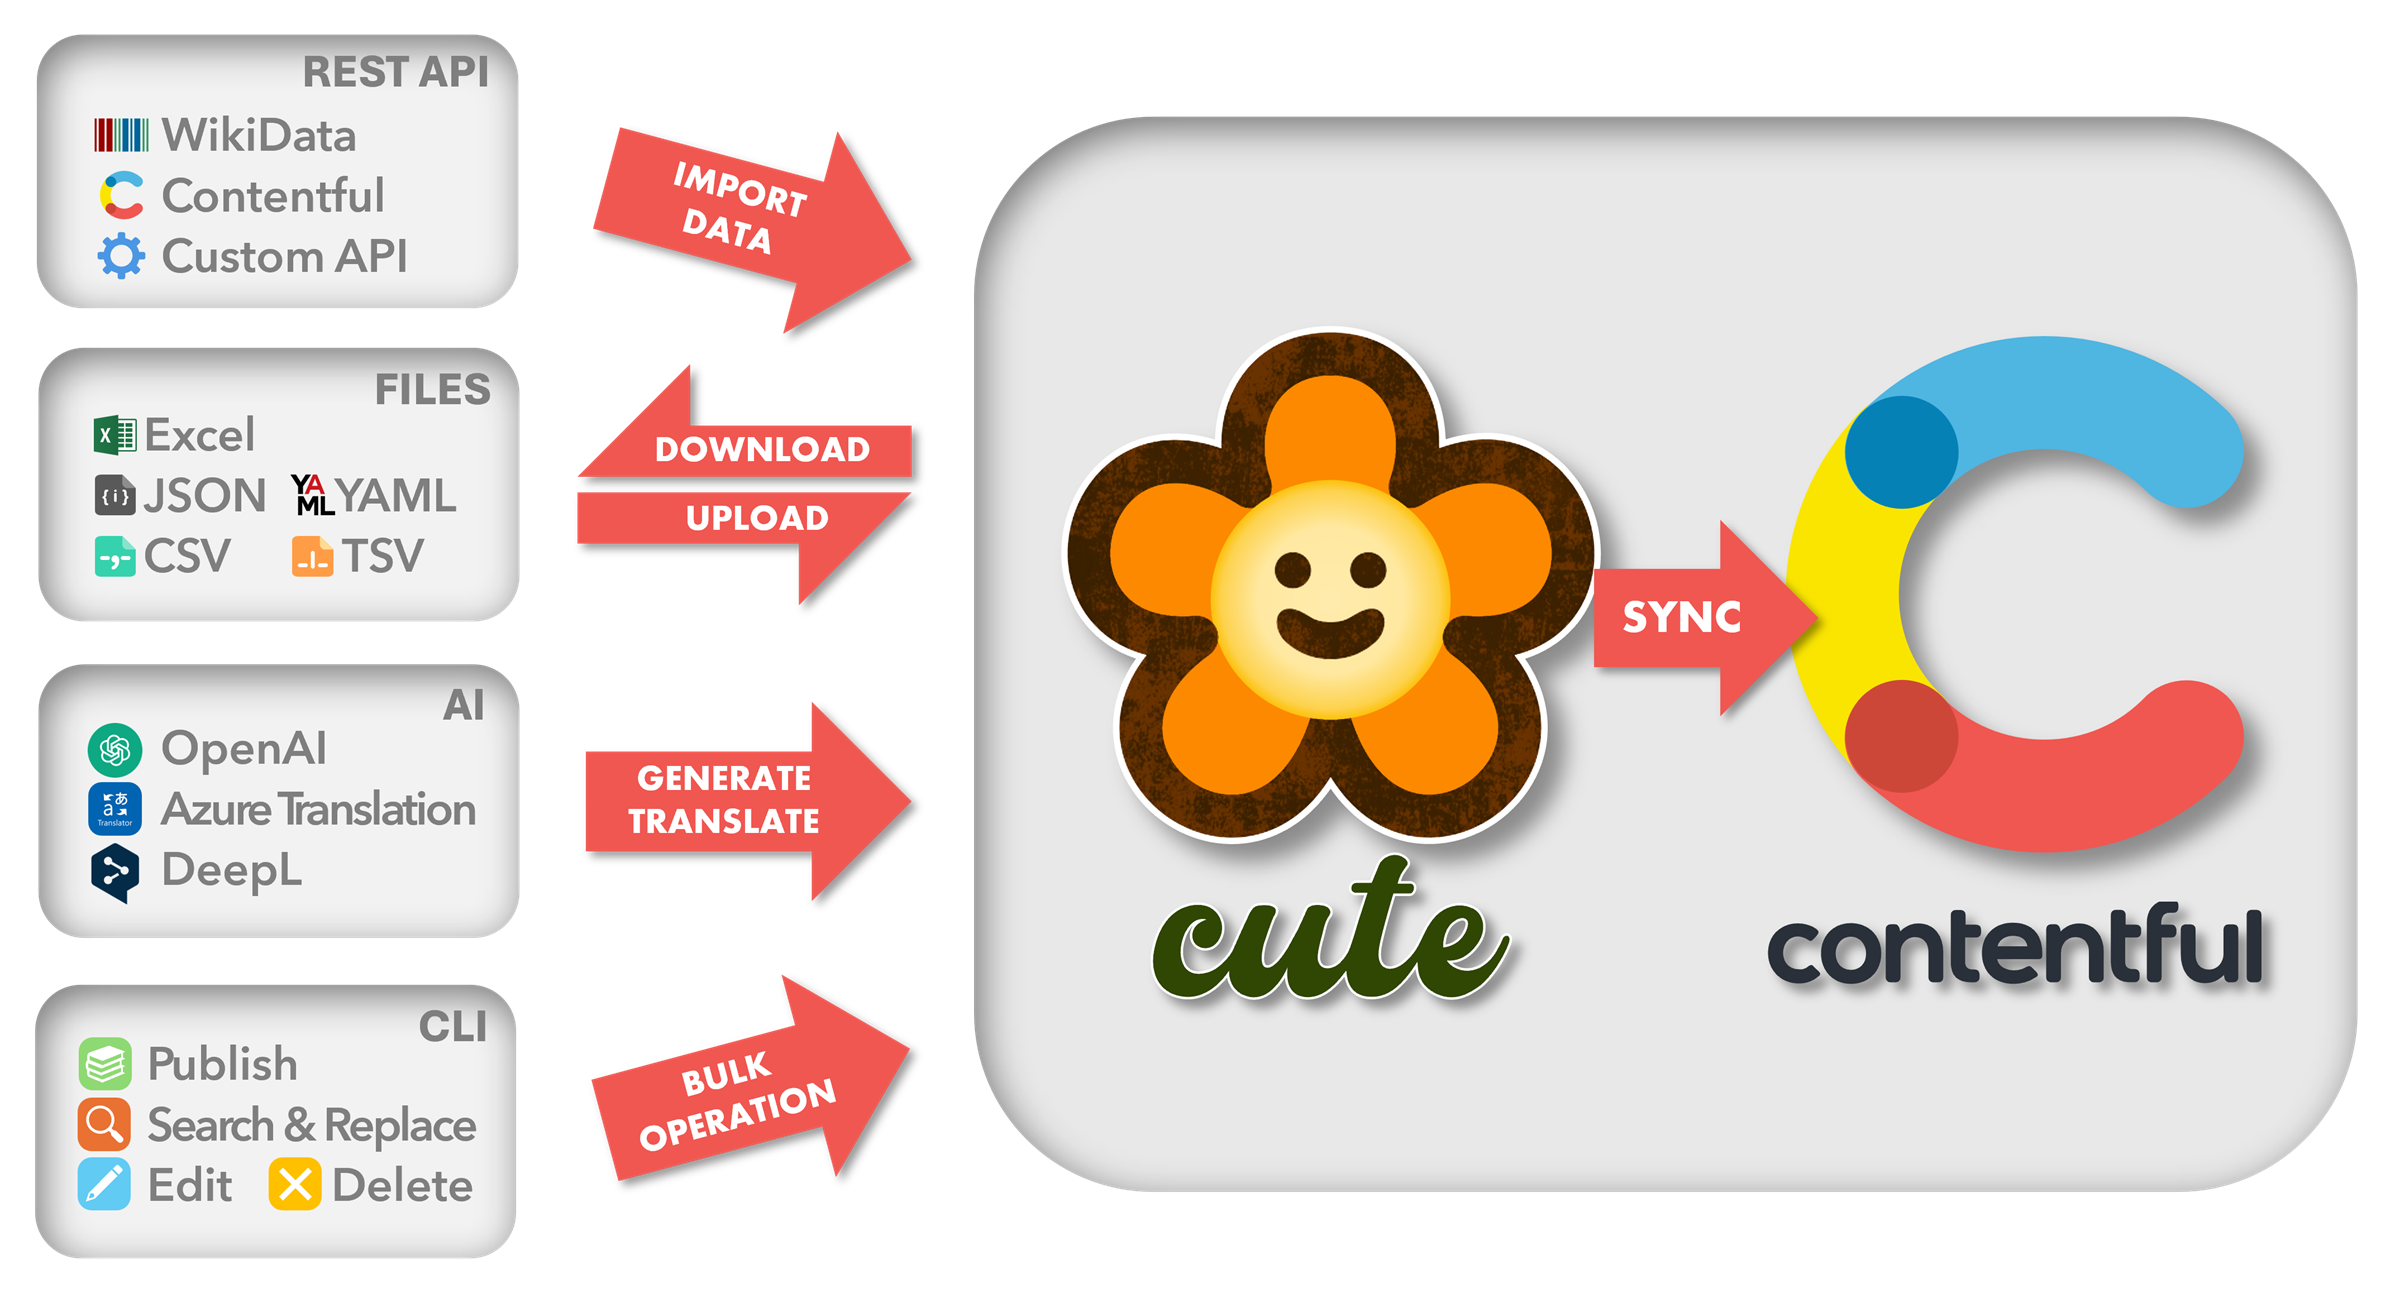
- Download, modify and upload data to your Contentful space in popular formats like Comma delimited files (CSV), Tab delimited files (TSV), MS-Excel workbooks (XLSX), Javascript Object Notation (JSON) and YAML.
- Perform Bulk operations on your content with support for publish/unpublish, edit, search & replace and delete actions.
- Input data can be sourced and synced from many external sources including flat files, databases, webAPIs, your Contentful space and other popular sources like WikiData.
- Generate content from scratch using OpenAI's GPT and reasoning models with comprehensive prompt configuration support.
- Support for content translation using popular AI translation services like Google Translation AI, Azure AI Translator, DeepL and OpenAI.
- Deploy cute as a Web Server in
schedulerorwebhooksmode with OpenTelemetry logging and a service terminal to reflect health, configuration and scheduled tasks. - Support for structural subtyping through the
typegencommand option which exports TypeScript (TS) interface declarations. This feature is especially useful to keep your JavaScript or .NET projects in sync with your content types. - Interact with Douglas, cute's very own AI assistant that will answer questions about your content, or even help formulate queries to interact with your content.
💡 Contentful is a content infrastructure platform that lets you create, manage and distribute content to any platform. Contentful offers a simple UI to declare and manage a content model, independent from the presentation layer.
Start by ensuring you have the required version of the .NET SDK installed by confirming what version cute is currently running on here.
💡 Depending on your operating system, you can also use package managers like WinGet, apt-get and Homebrew to manage your installation from the shell.
Install the cute CLI tool by running the command listed below:
dotnet tool install --global cuteAlternatively, if you already have cute installed but would like to update to the latest version you can simply run the command listed below:
dotnet tool update --global cuteConfirm your installation typing cute and you should see a display similar to the screenshot below listing the installed version and help:
You are ready to go, let's get started! 🚀
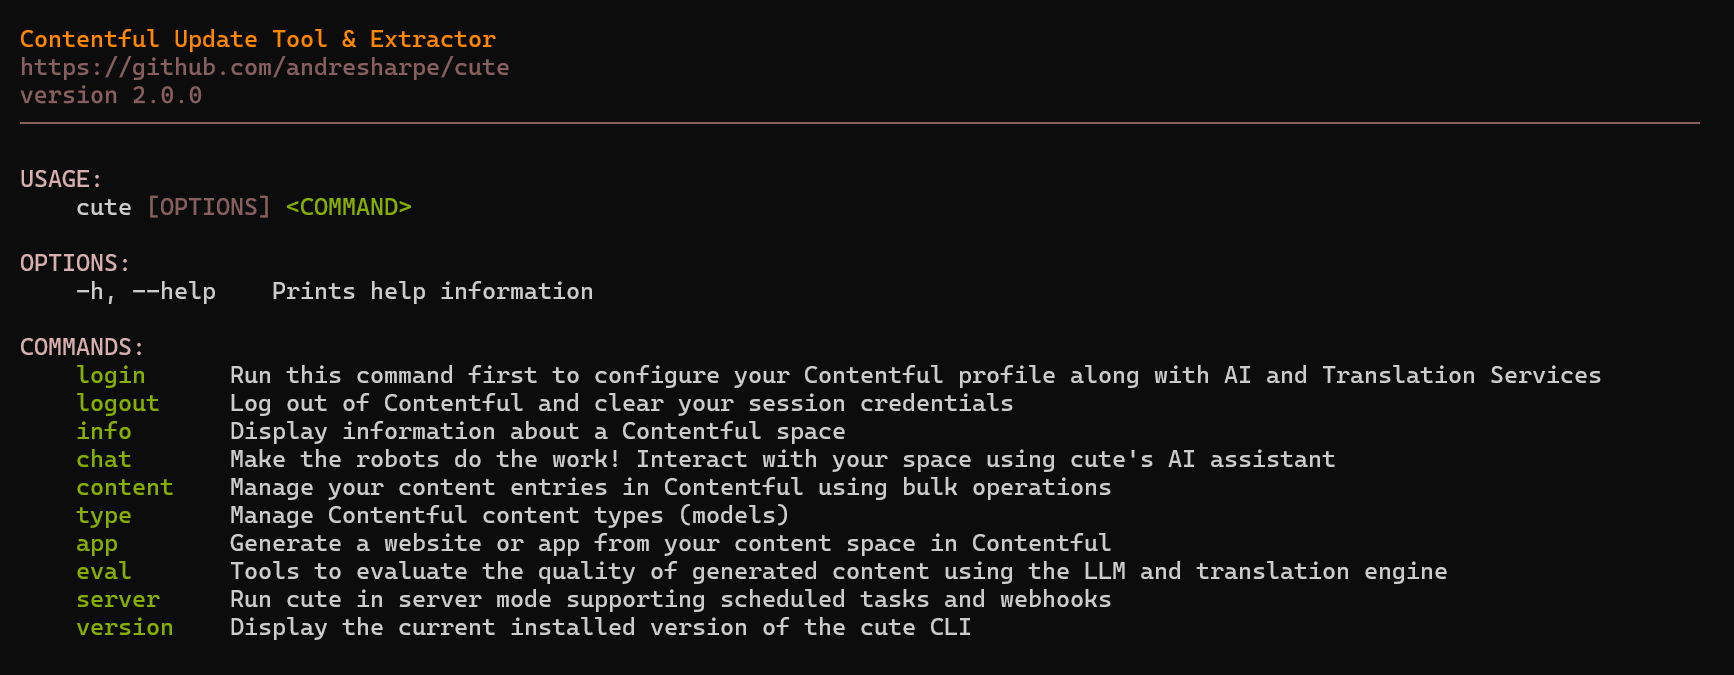
You can easily access help for cute and its various command options by entering the relevant command, followed by -h or --help in the command shell:
cute --help
Start your cute session by running the login command. This will configure your Contentful session profile using the selected space, environment and API keys. You can also enter your AI and Translation service credentials here.
cute login
Display a comprehensive overview of your Contentful session information including space, environment, content types and locales. Info related to CLI display settings is also shown.
cute info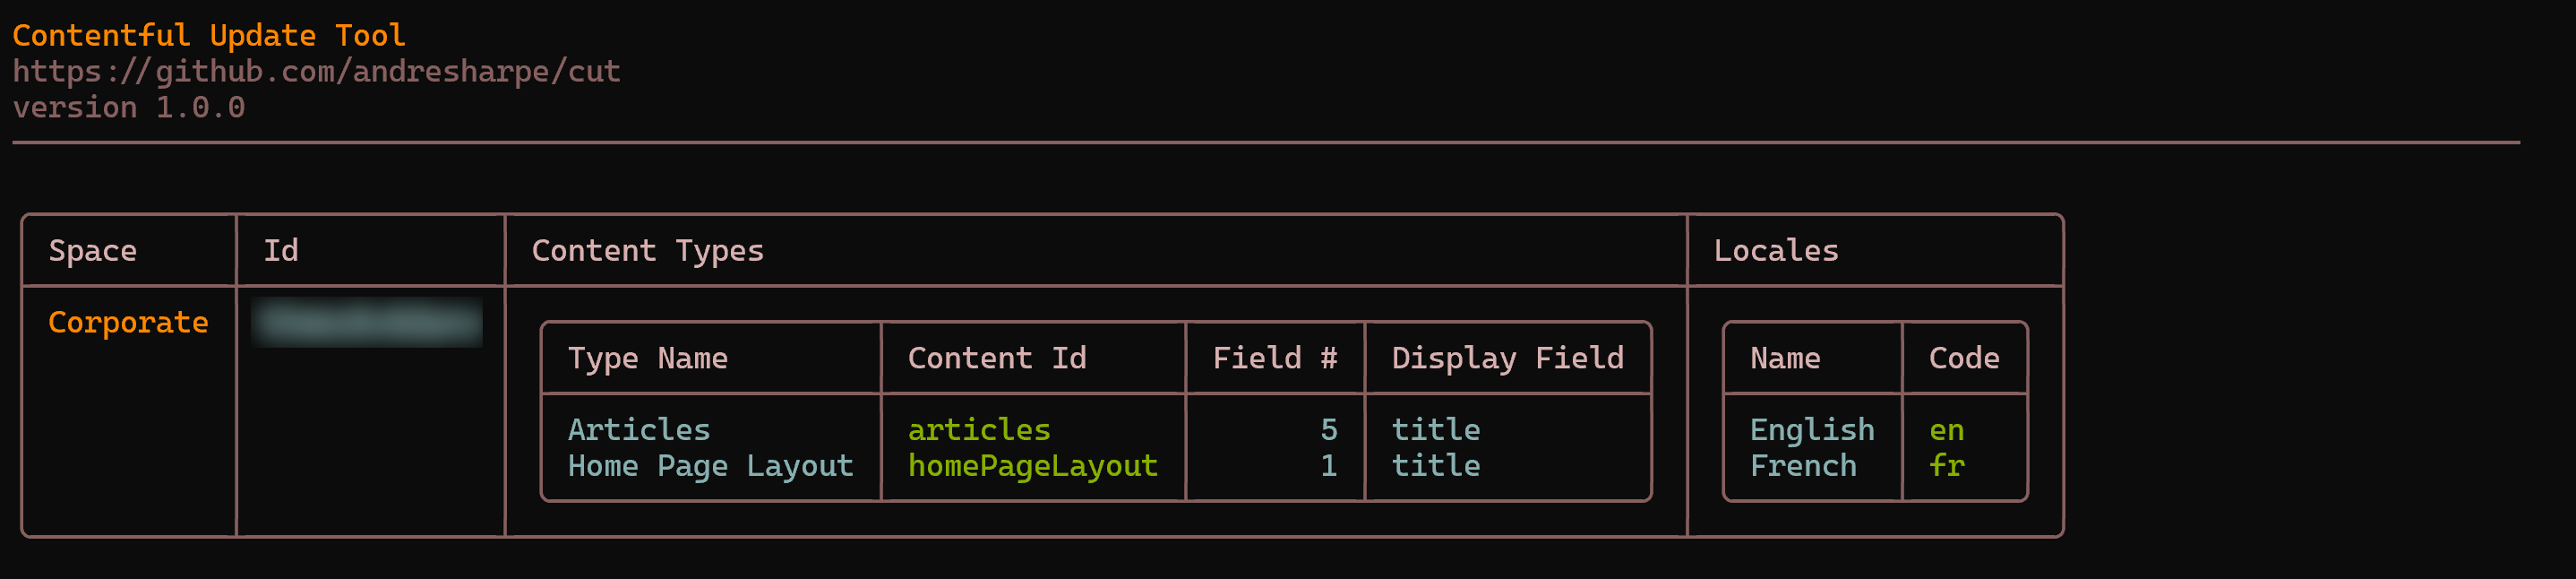
The cute content and its respective command options represents the real workhorse of the cute tool. It essentially presents the user with a suite of bulk operation options to interact with their content in Contentful.
Content can easily be downloaded from your Contentful space in one of several popular formats including Excel, comma separated (CSV), tab separated (TSV), JSON and YAML. If no format is specified, the downloaded file will default to the Excel format.
cute content download --content-type <contentType>
cute content download --content-type <contentType> --format [excel|csv|tsv|json|yaml]
Issuing any content download command will yield a result similar to the display below.

Typing cute content download --help will list all currently available options and usage.
USAGE:
    cute content download [OPTIONS]

OPTIONS:
    -h, --help                  Prints help information
    -c, --content-type-id <ID>  The Contentful content type id
    -l, --locale <CODE>         The locale code (eg. 'en') to apply the command to. Default is all
        --no-publish            Specifies whether to skip publish for modified entries
        --use-session           Indicates whether to use session (eg: publish only entries modified by the command and not all the unpublished ones)
    -f, --format <FORMAT>       The output format for the download operation (Excel/CSV/TSV/JSON/YAML)
-p, --path <PATH> The output path and filename for the download operationYou can upload content from a local file to your Contentful space. The local file can be a previously downloaded and updated Excel, CSV, TSV, JSON or YAML file.
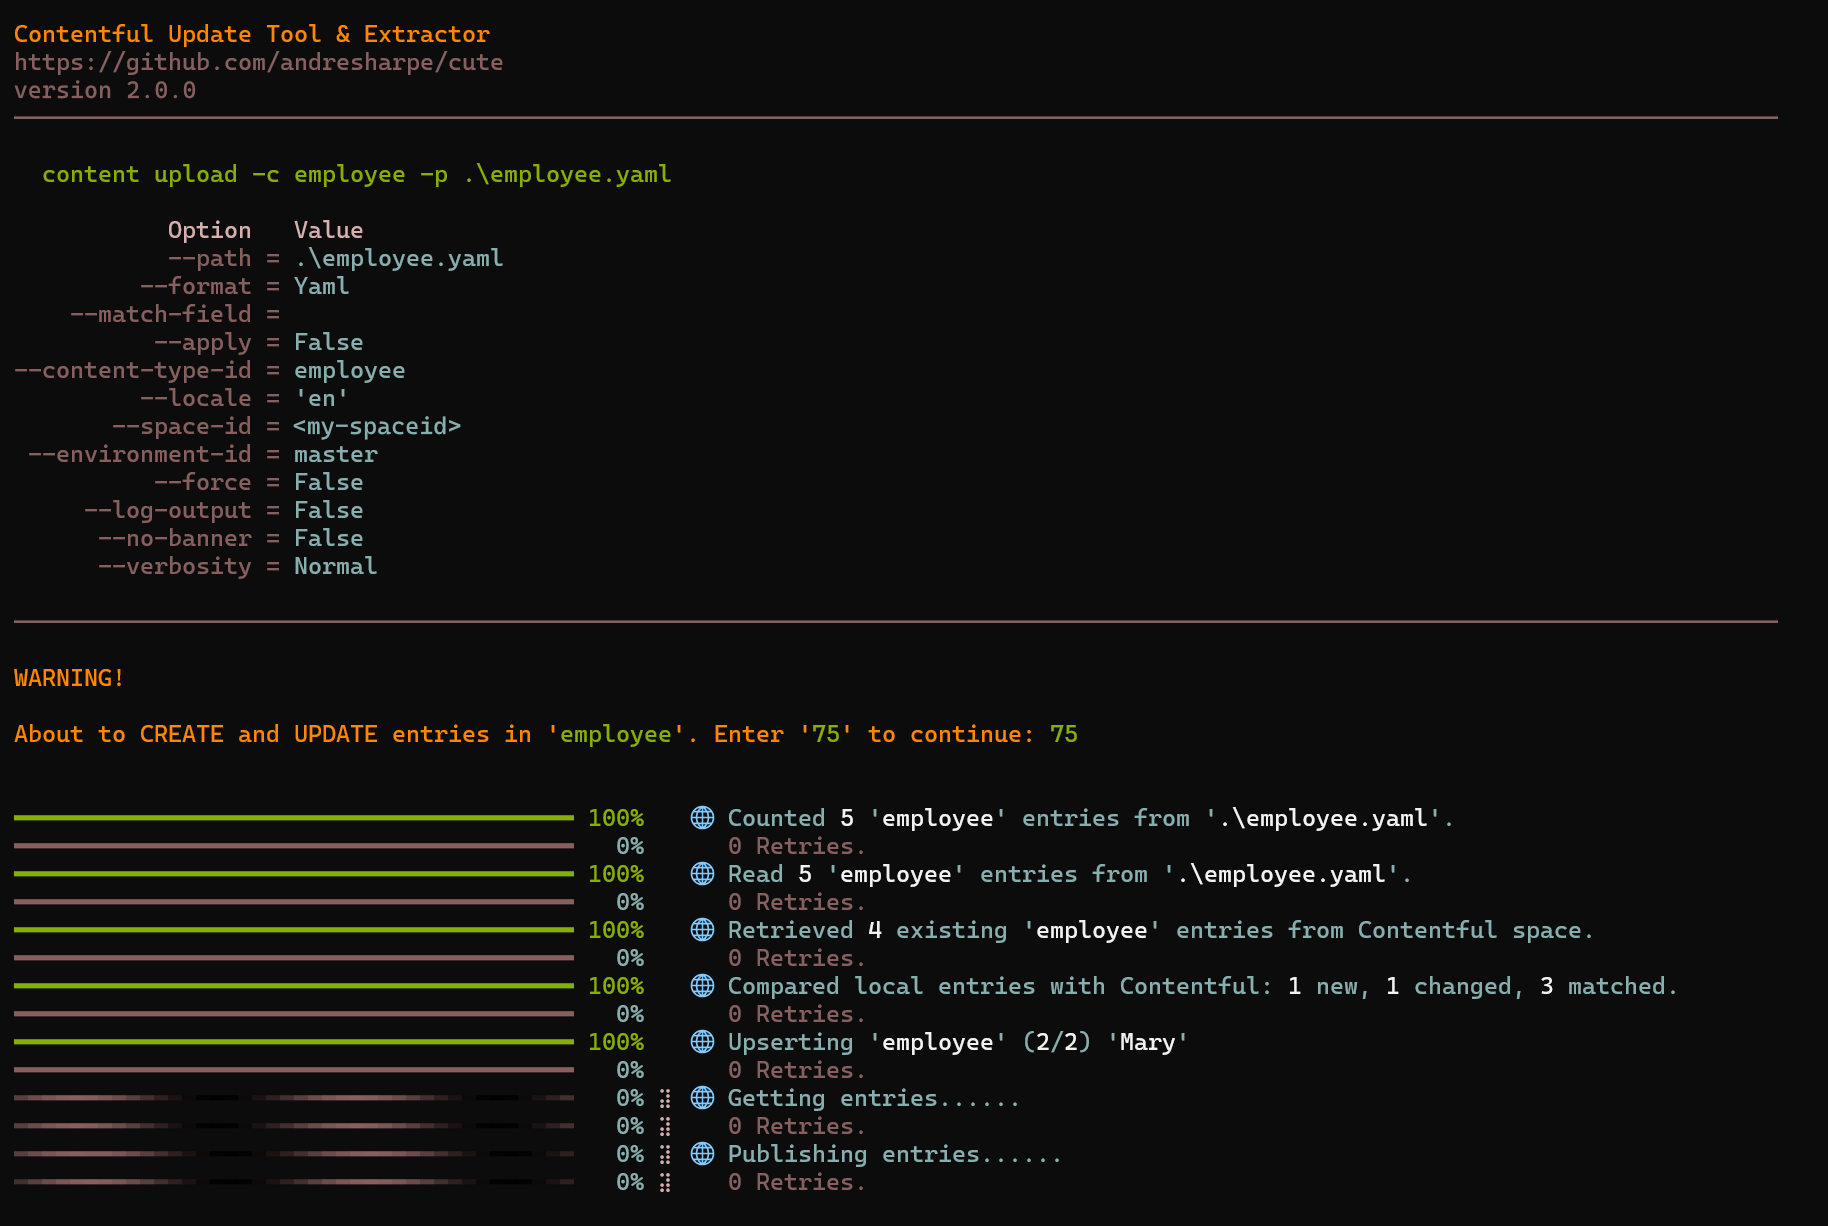
cute will prompt you to confirm a 2-digit code to prevent you from updating your content accidentally.
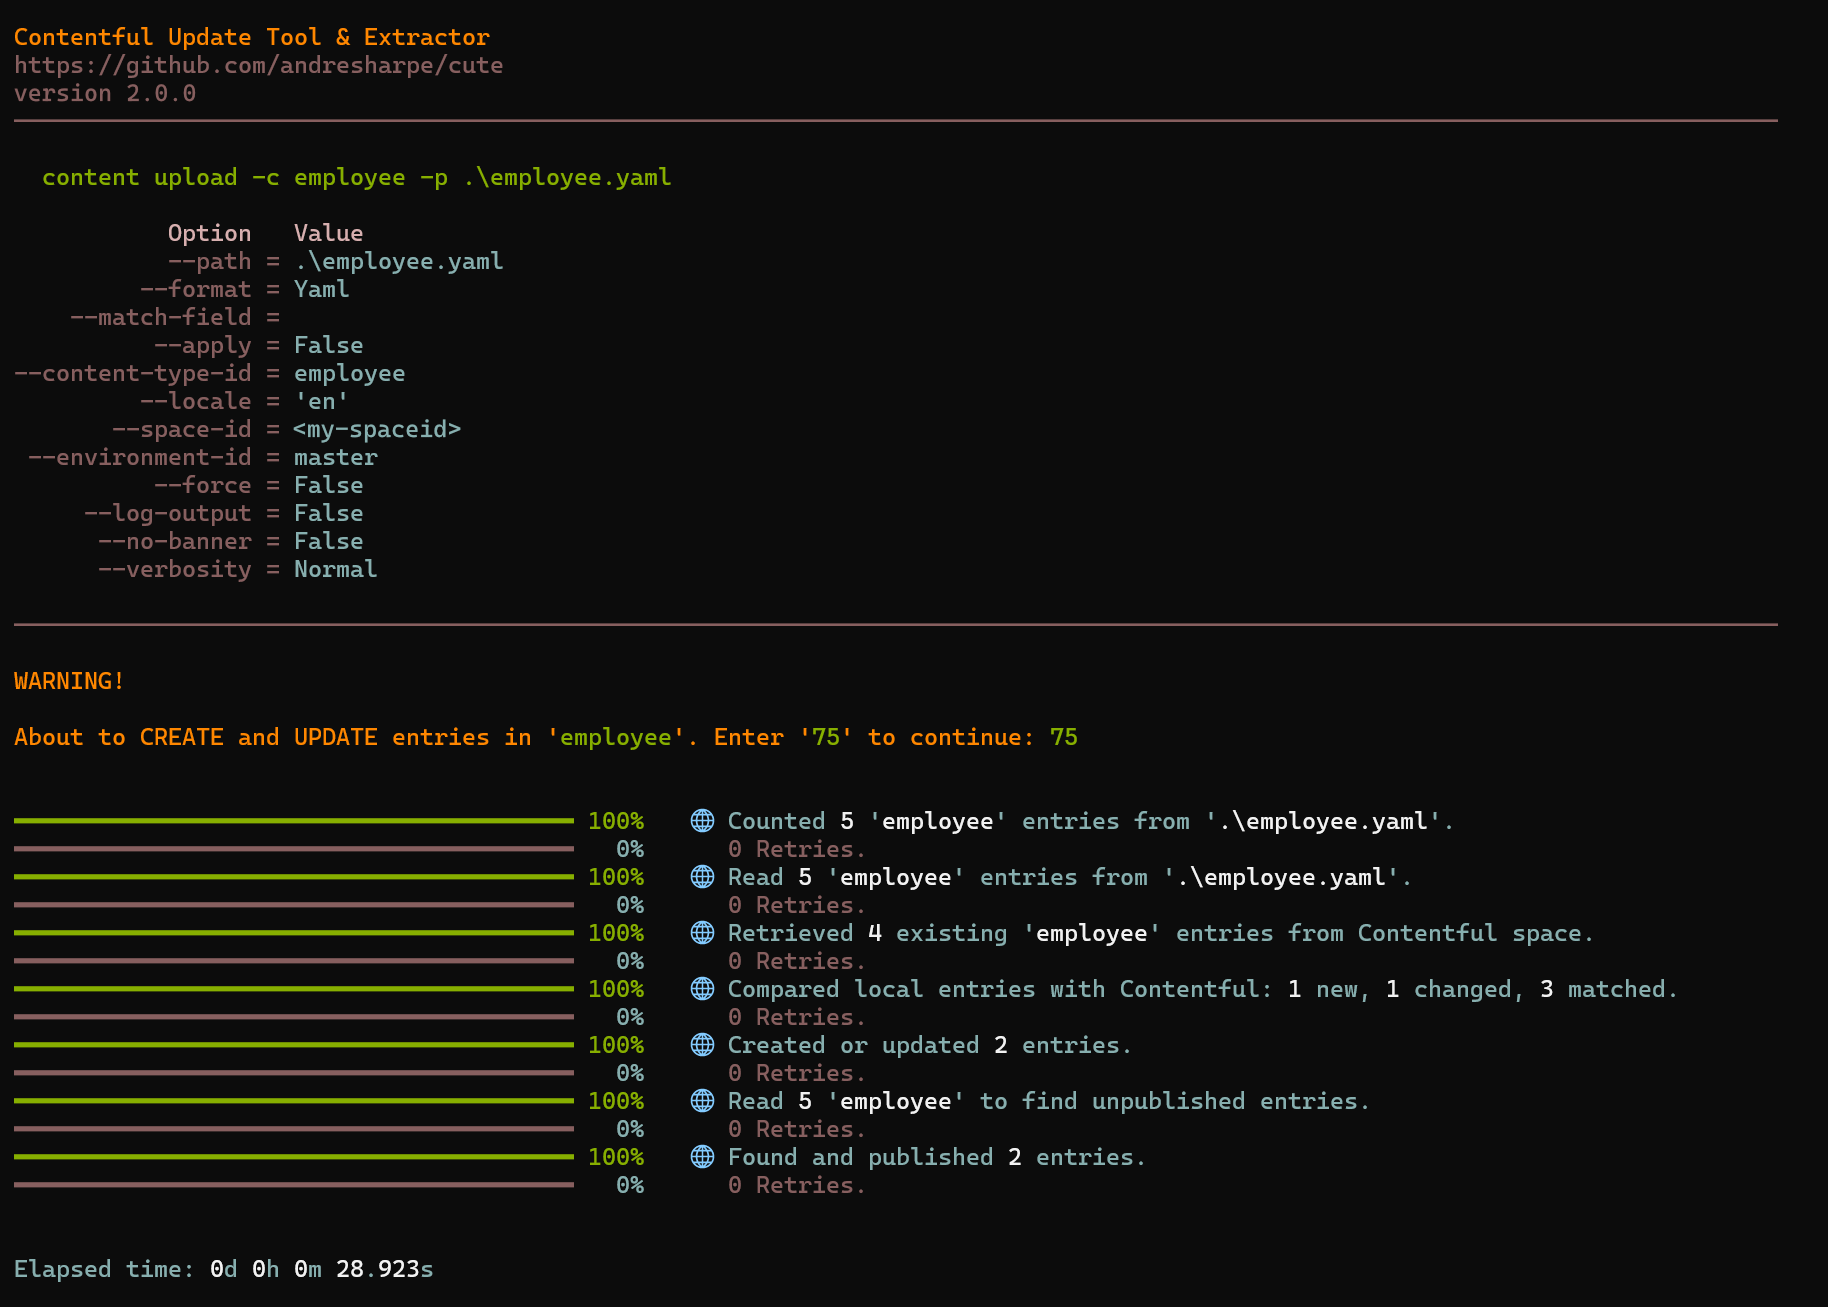
Typing cute content upload --help will show the full usage and options.
USAGE:
    cute content upload [OPTIONS]

OPTIONS:
    -h, --help                  Prints help information
    -c, --content-type-id <ID>  The Contentful content type id
    -l, --locale <CODE>         The locale code (eg. 'en') to apply the command to. Default is all
        --no-publish            Specifies whether to skip publish for modified entries
        --use-session           Indicates whether to use session (eg: publish only entries modified by the command and not all the unpublished ones)
    -p, --path <PATH>           The local path to the file containing the data to sync
    -f, --format <FORMAT>       The format of the file specified in '--path' (Excel/CSV/TSV/JSON/YAML)
    -m, --match-field <NAME>    The optional name of the field to match in addition to the entry id
-a, --apply Apply and publish all the calculated changes. The default behaviour is to only list the detected changescute offers a convenient and simple way of creating aggregated content types from two other content types within your space.
Let's start by having a look at the command options and usage. Typing cute content join --help will show the full usage and options.
USAGE:
    cute content join [OPTIONS]

OPTIONS:
    -h, --help                  Prints help information
    -k, --key                   The id of the Contentful join entry to generate content for
    -i, --entry-id              Id of source 2 entry to join content for
        --no-publish            Specifies whether to skip publish for modified entries
    -a, --apply                 Apply and publish all the required edits
--use-session Indicates whether to use session (eg: publish only entries modified by the command and not all the unpublished ones)We'll start by configuring our content aggregate. We'll use our existing diplomaCourse content type and combine that with a new branchLocation content type in order to create an aggregated content view of viewCourseByLocation.
💡 See this section if you need to define a
cuteContentJoincontent type within your Contentful space if you're using this feature for the first time.
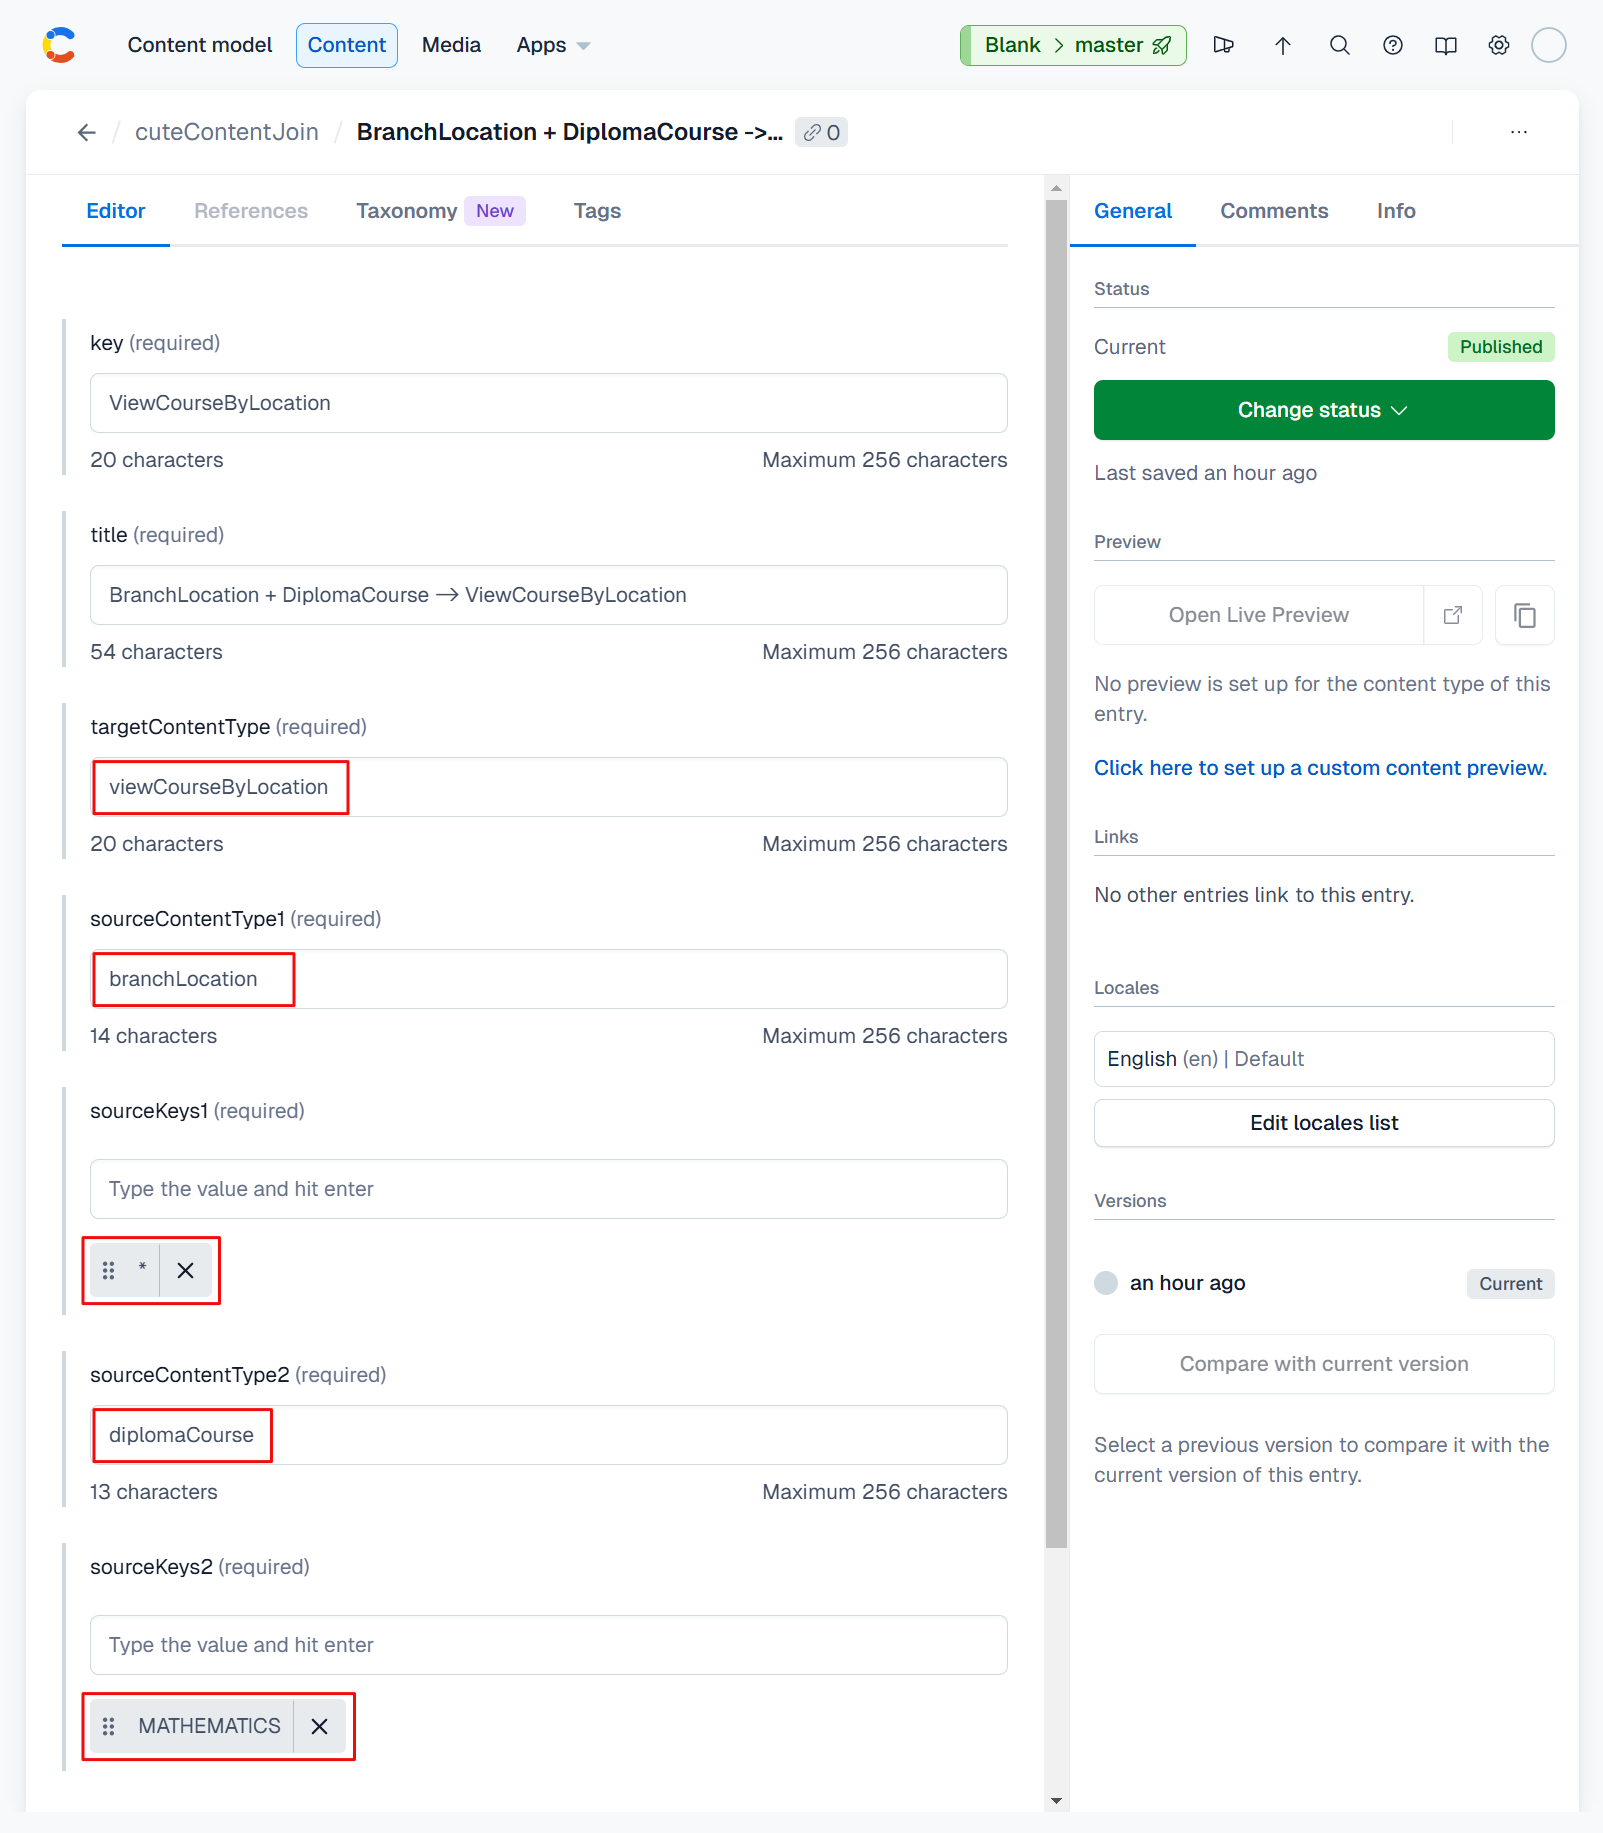
See the attached screenshot below. The targetContentType refers to our new aggregated content type. We can join up to 3 sources, but for this example we'll focus on 2. For source 1 our content type is branchLocation and by leaving sourceQueryString1 empty, we're effectively selecting all entries. For source 2 our content type is diplomaCourse and we're selecting only MATHEMATICS.
💡 Ask GhatGPT for guidance on how you can form your query string parameters. A prompt like
give me an overview on using square bracket notation for web api query parametersshould yield the necessary guidance.The example above uses
fields.key=MATHEMATICS, but you can include multiple values usingfields.key[in]=MATHEMATICS,ECONOMICS,ART
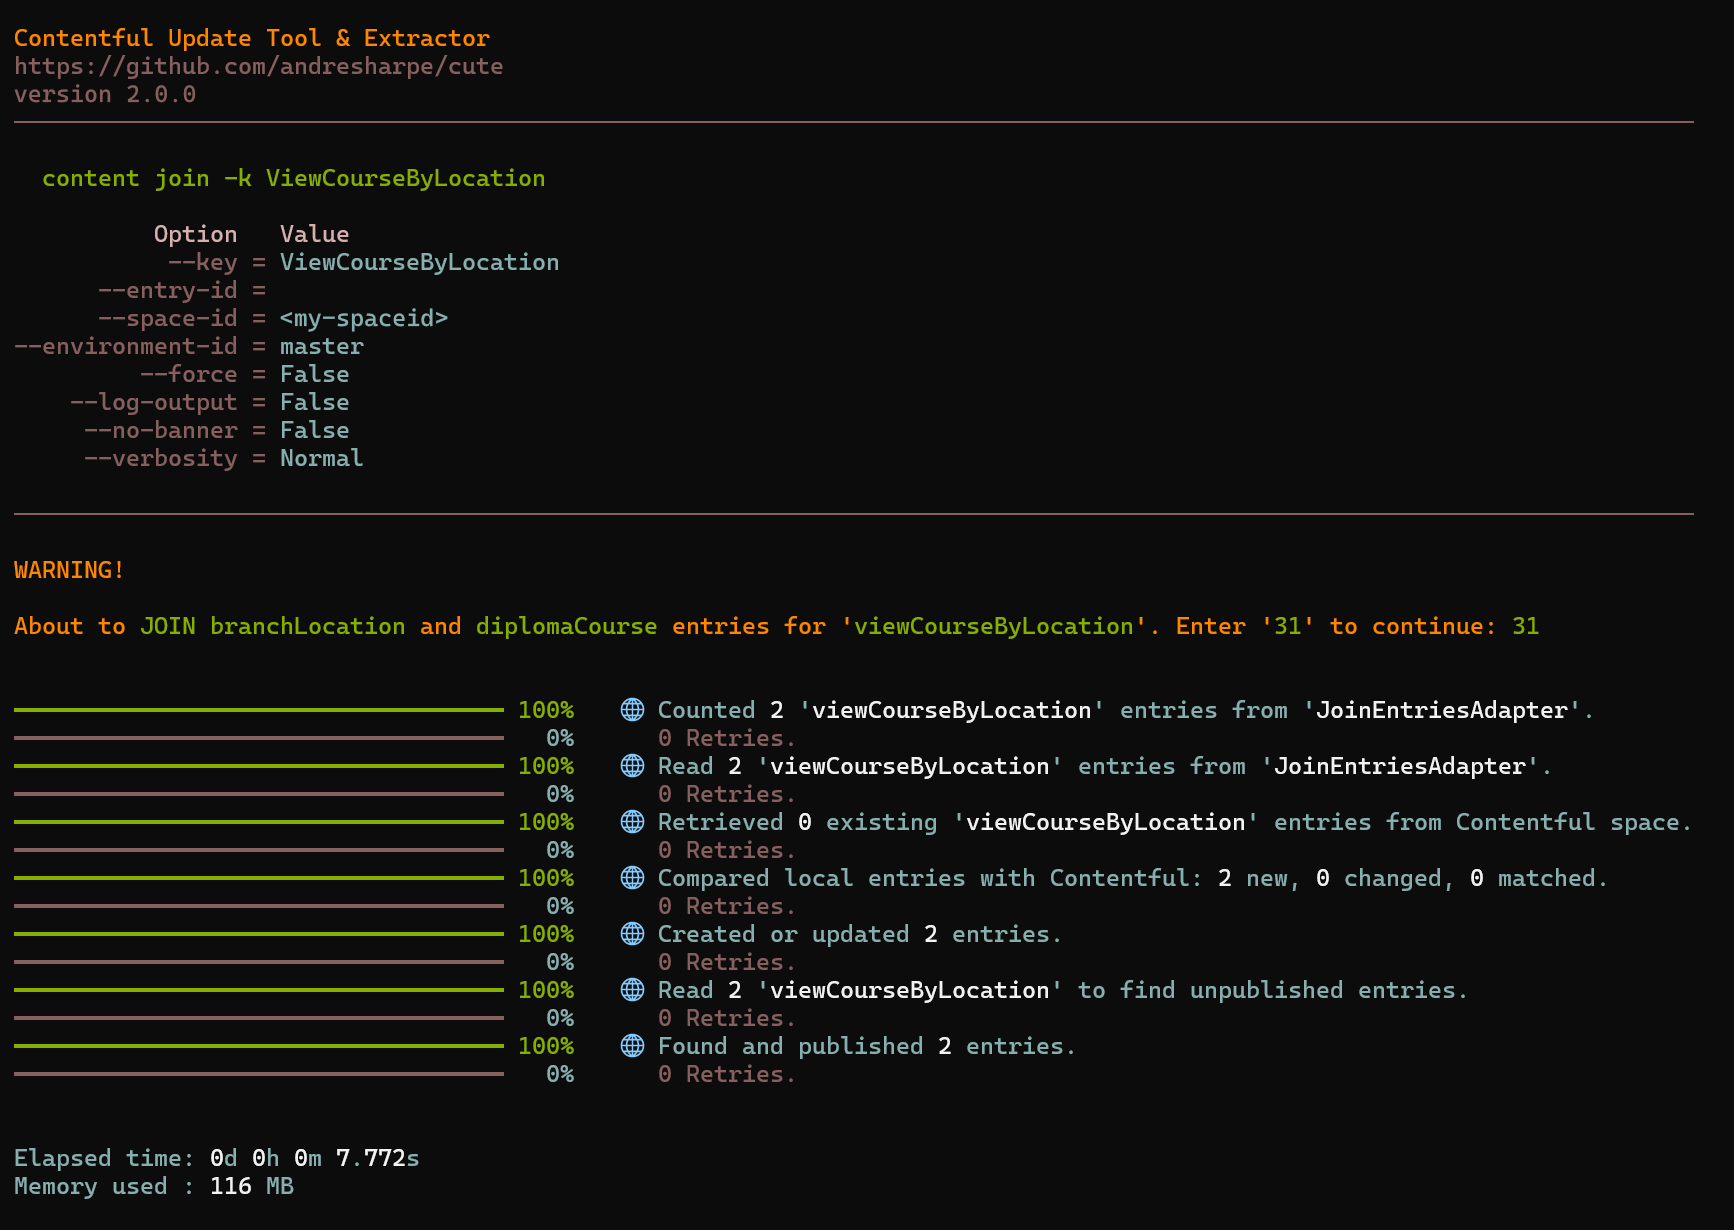
Running the cute content join --key ViewCourseByLocation command yields the following output:
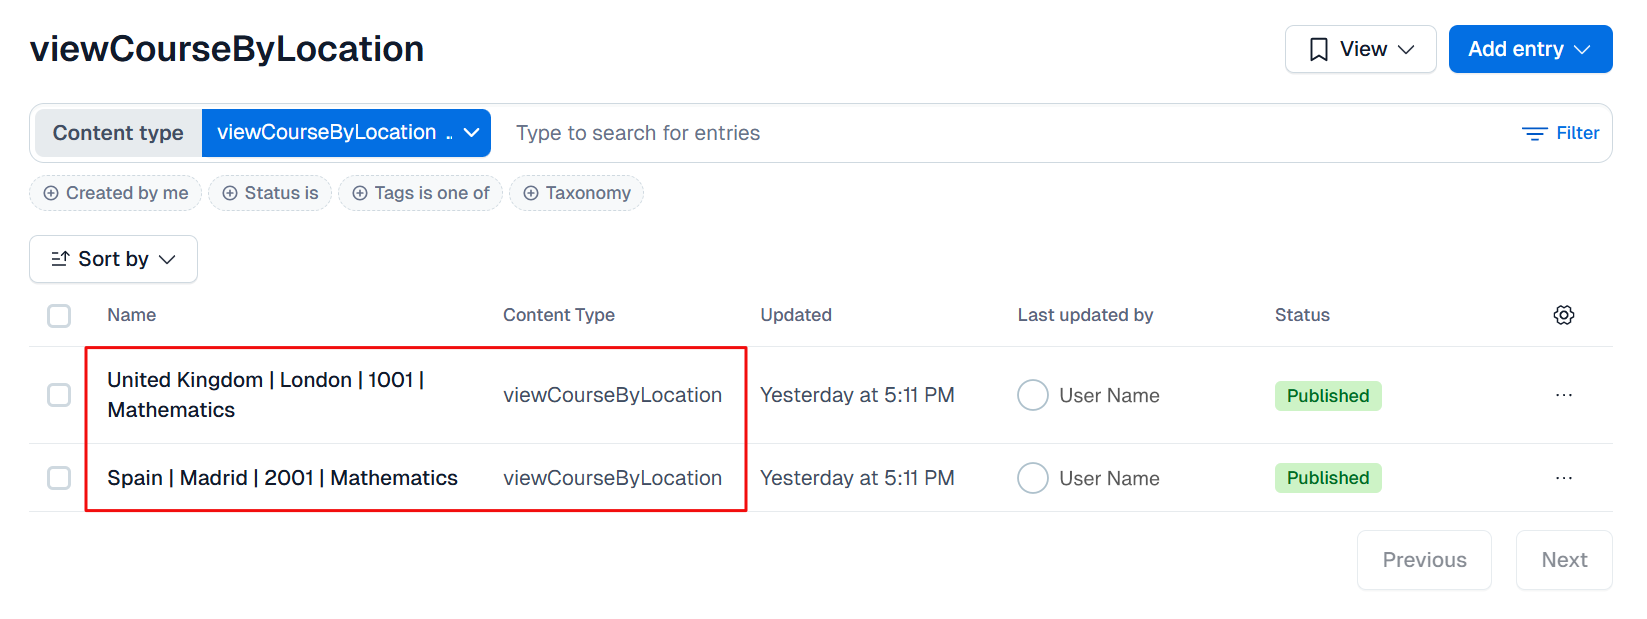
And the following entries are created in the viewCourseByLocation content type:
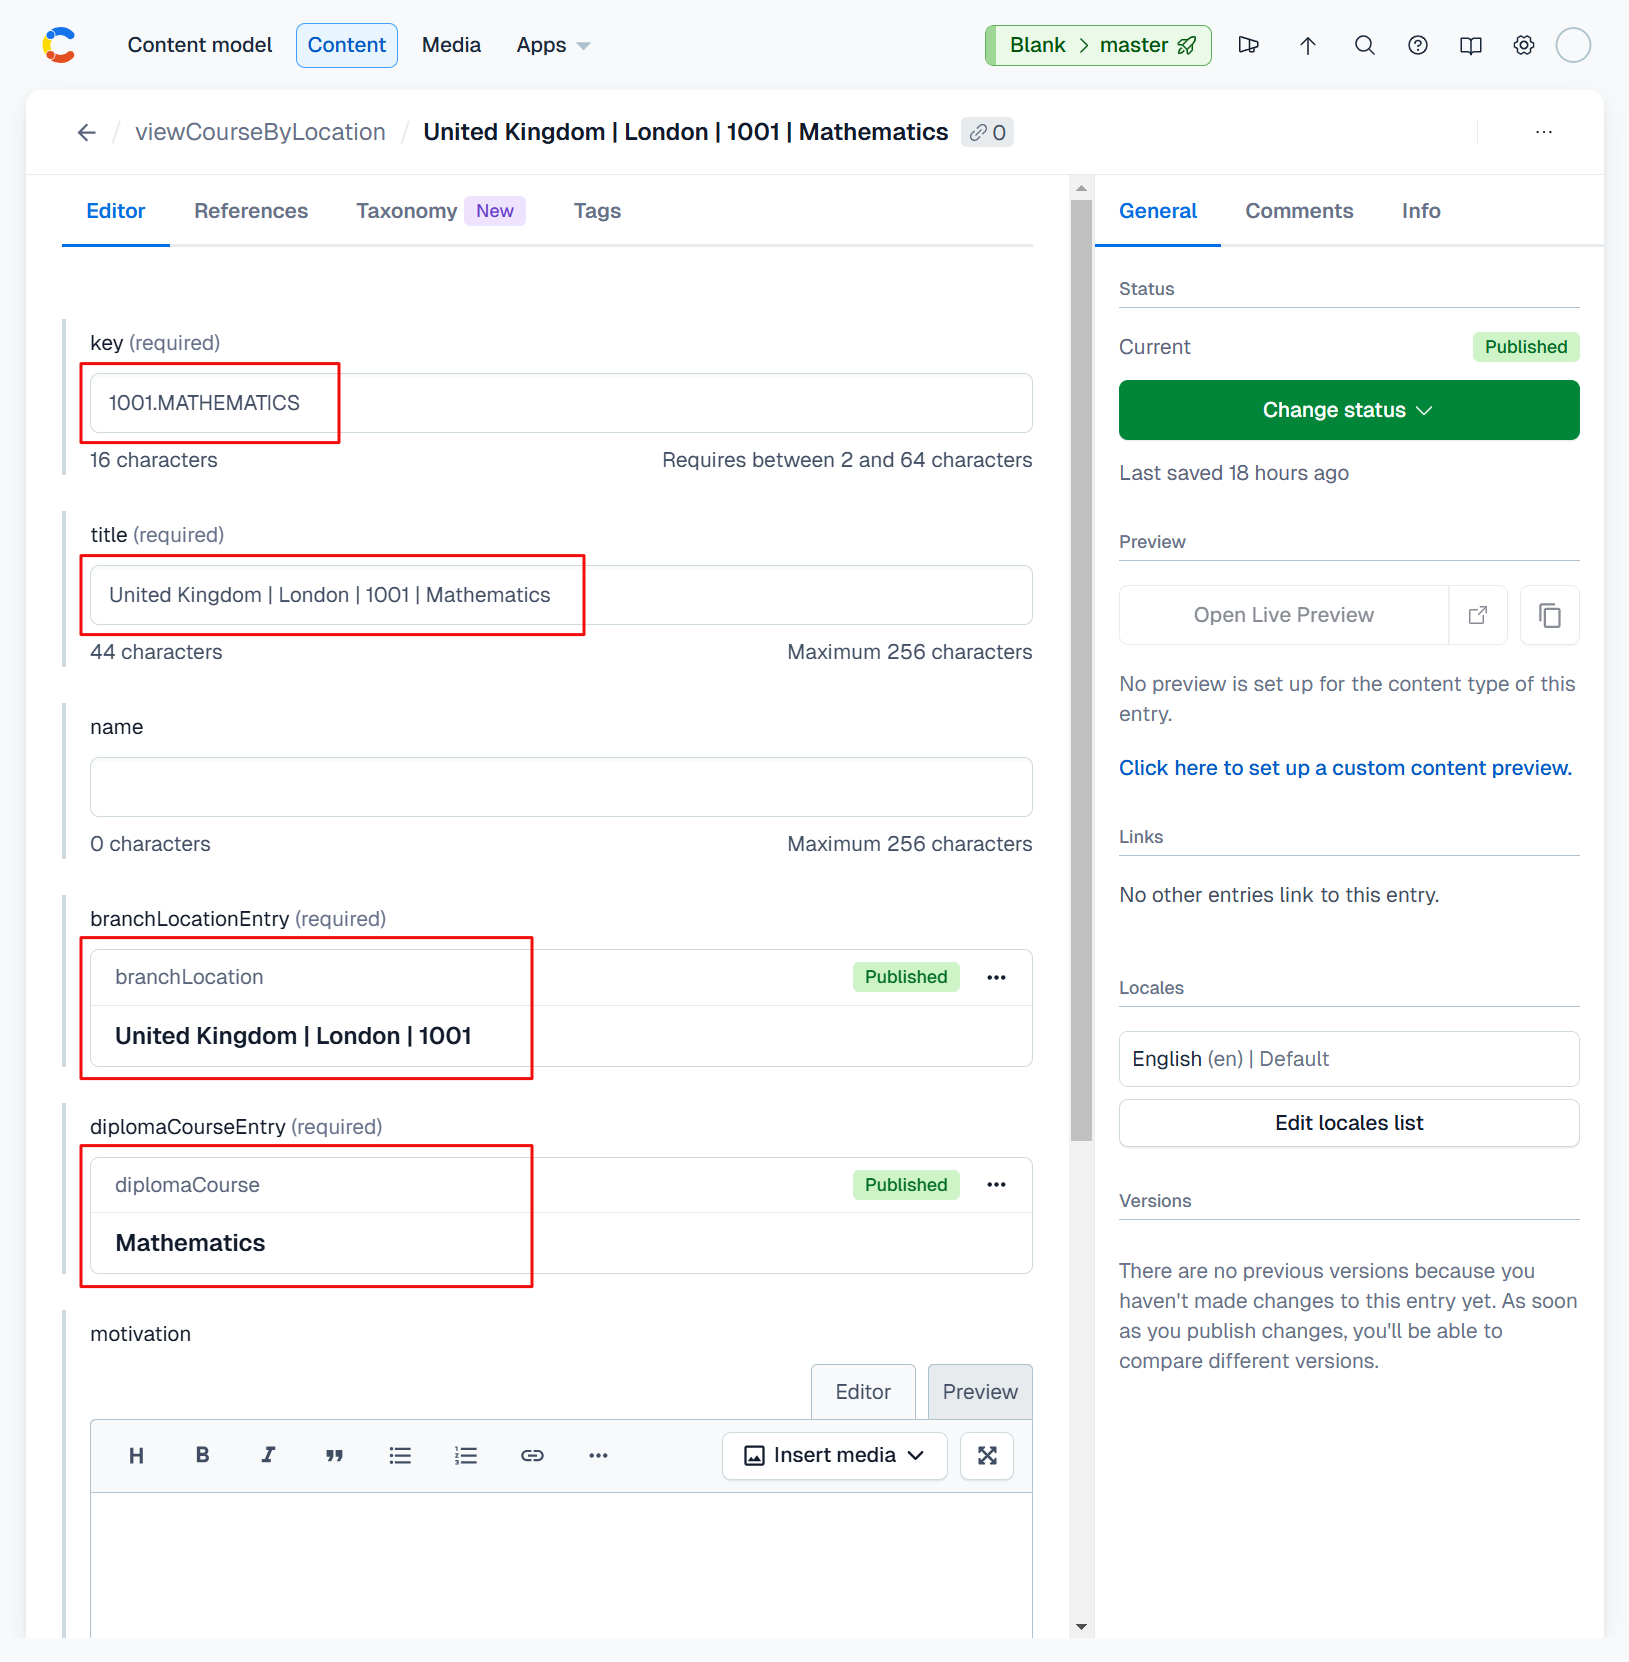
And if we look at one of the entries we can see that it concatenates the key and title fields and provides direct access to the underlying content entries of which the aggregate is comprised.
You can synchronize your Contentful content with an external API or database by using the cute content sync-api command option.
USAGE:
    cute content sync-api [OPTIONS]

OPTIONS:
    -h, --help                  Prints help information
    -s, --space-id <ID>         The Contentful space identifier.
    -e, --environment-id <ID>   The Contentful environment identifier.
        --force                 Specifies whether warning prompts should be bypassed
    -k, --key                   The key of the cuteContentSyncApi entry
    -a, --apply                 Apply and publish all the required edits
    -u, --use-filecache         Whether or not to cache responses to a local file cache for subsequent calls
        --no-publish            Specifies whether to skip publish for modified entries
--use-session Indicates whether to use session (eg: publish only entries modified by the command and not all the unpublished ones)Prior to running the command, you should configure API settings and field mappings in your Contentful space under the cuteContentSyncApi content type.
💡 See this section if you need to define a
cuteContentSyncApicontent type within your Contentful space if you're using this feature for the first time.
Select cuteContentSyncApi and then click the 'Add Entry' button:
Create a new entry for the relevant content as per the graphic below:
We're going to sync to the users endpoint over at {JSON} Placeholder to populate our Users content. A small sample is shown below:
[
  {
    "id": 1,
    "name": "Leanne Graham",
    "username": "Bret",
    "email": "Sincere@april.biz",
    "address": {
      "street": "Kulas Light",
      "suite": "Apt. 556",
      "city": "Gwenborough",
      "zipcode": "92998-3874",
      "geo": {
        "lat": "-37.3159",
        "lng": "81.1496"
      }
    },
    "phone": "1-770-736-8031 x56442",
    "website": "hildegard.org",
    "company": {
      "name": "Romaguera-Crona",
      "catchPhrase": "Multi-layered client-server neural-net",
      "bs": "harness real-time e-markets"
    }
  },
  {
    "id": 2,
    "name": "Ervin Howell",
    "username": "Antonette",
    "email": "Shanna@melissa.tv",
    "address": {
      "street": "Victor Plains",
      "suite": "Suite 879",
      "city": "Wisokyburgh",
      "zipcode": "90566-7771",
      "geo": {
        "lat": "-43.9509",
        "lng": "-34.4618"
      }
    },
    "phone": "010-692-6593 x09125",
    "website": "anastasia.net",
    "company": {
      "name": "Deckow-Crist",
      "catchPhrase": "Proactive didactic contingency",
      "bs": "synergize scalable supply-chains"
    }
  }
]
Our Users content entry has a few matching fields and some which we'll map.

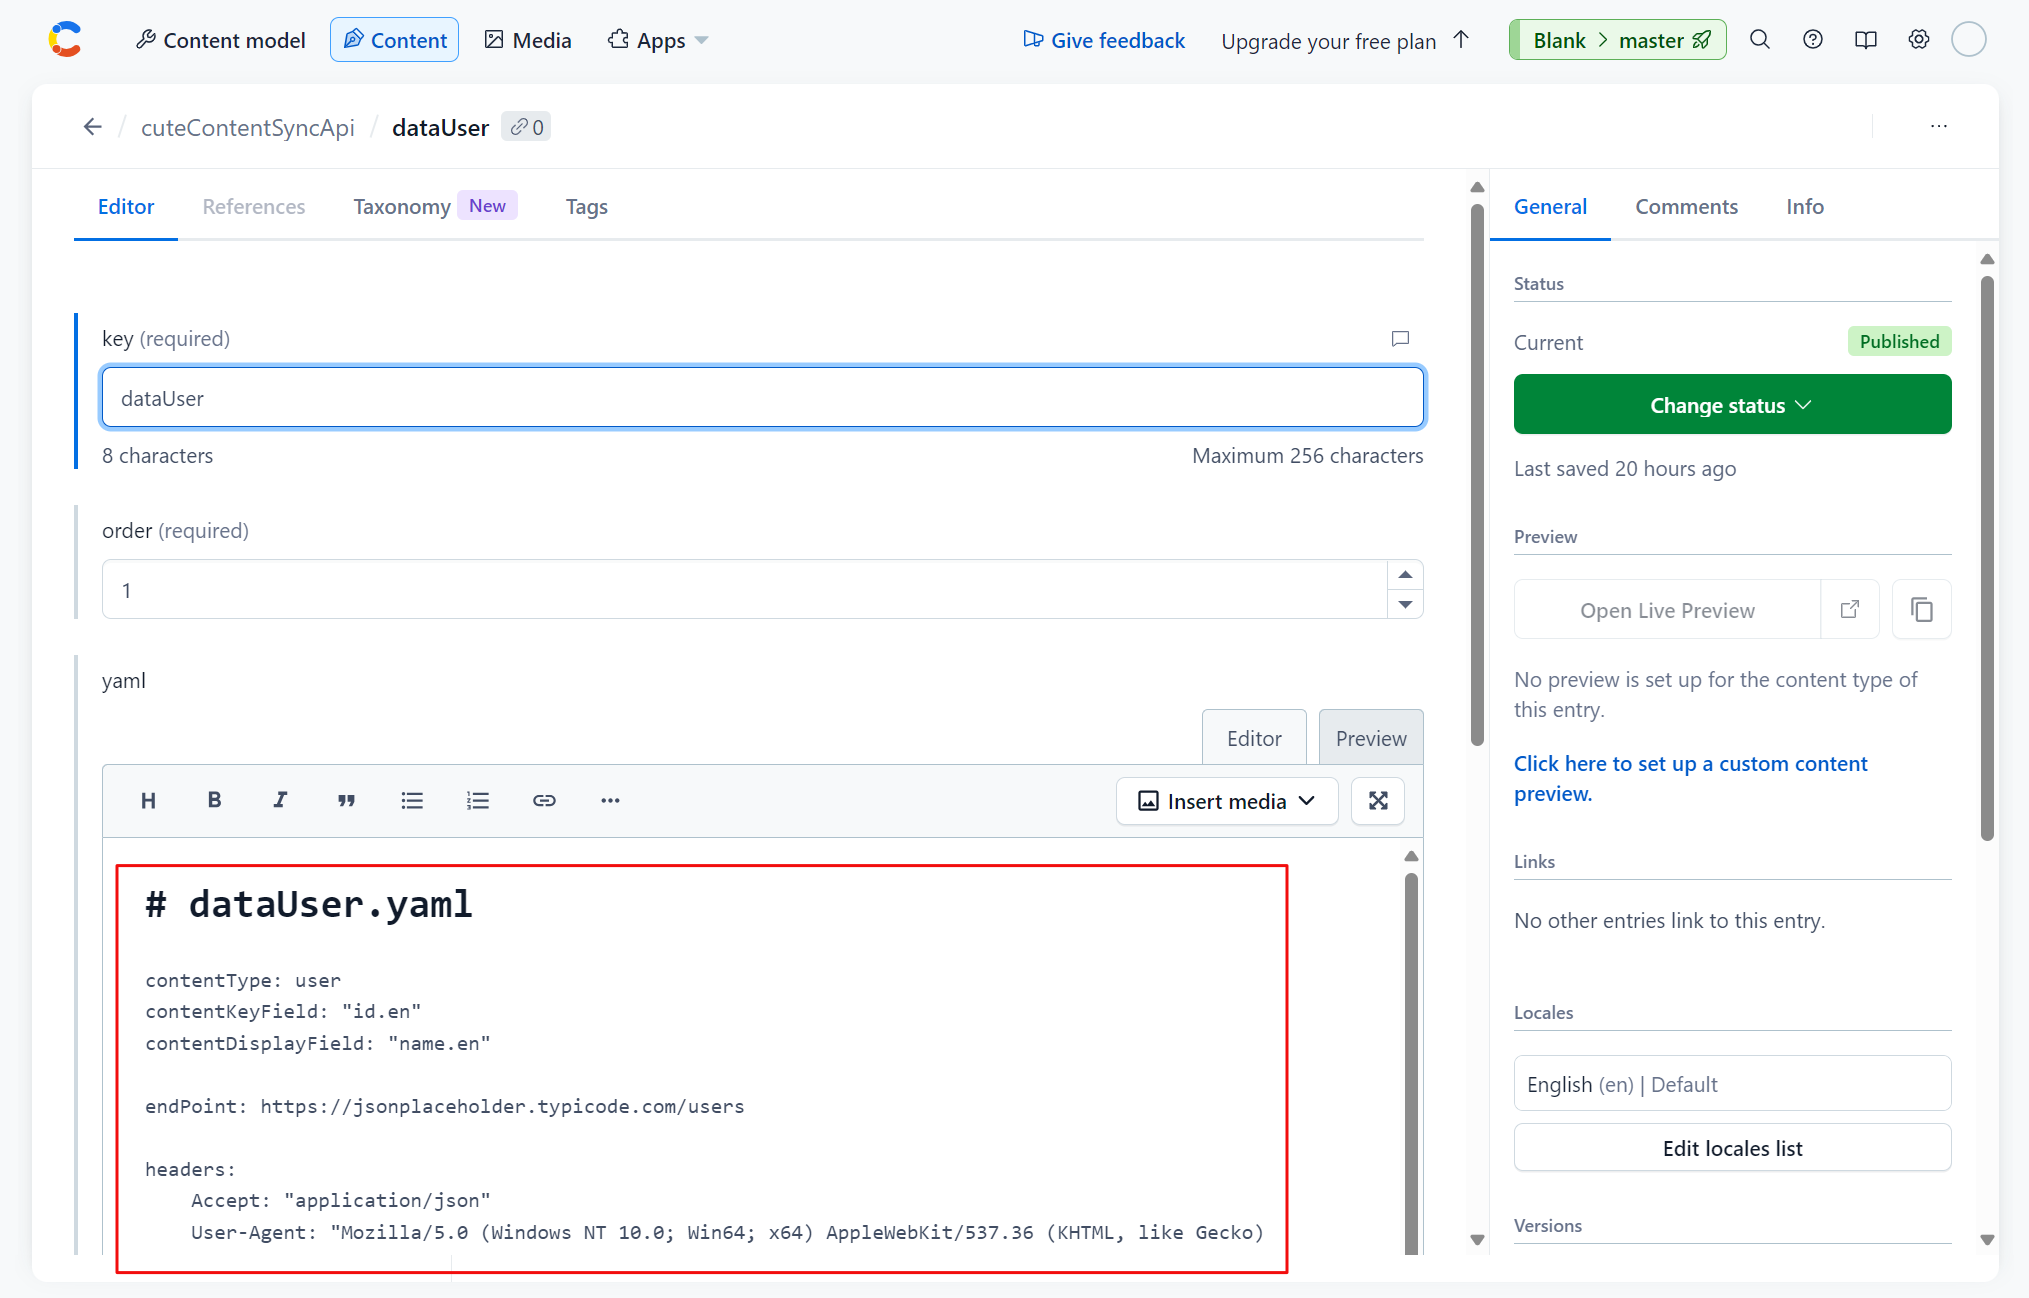
Basic identifiers, API headers and endpoints as well as field mappings can be configured as per the code snippet below.
# dataUser.yaml
contentType: user
contentKeyField: "id.en"
contentDisplayField: "name.en"
endPoint: https://jsonplaceholder.typicode.com/users
headers:
Accept: "application/json"
User-Agent: "Mozilla/5.0 (Windows NT 10.0; Win64; x64) AppleWebKit/537.36 (KHTML, like Gecko) Chrome/126.0.0.0 Safari/537.36"
mapping:
- fieldName: id.en
expression: '{{ row.id }}'
- fieldName: userName.en
expression: '{{ row.username }}'
- fieldName: name.en
expression: '{{ row.name }}'
- fieldName: email.en
expression: '{{ row.email }}'
- fieldName: phoneNumber.en
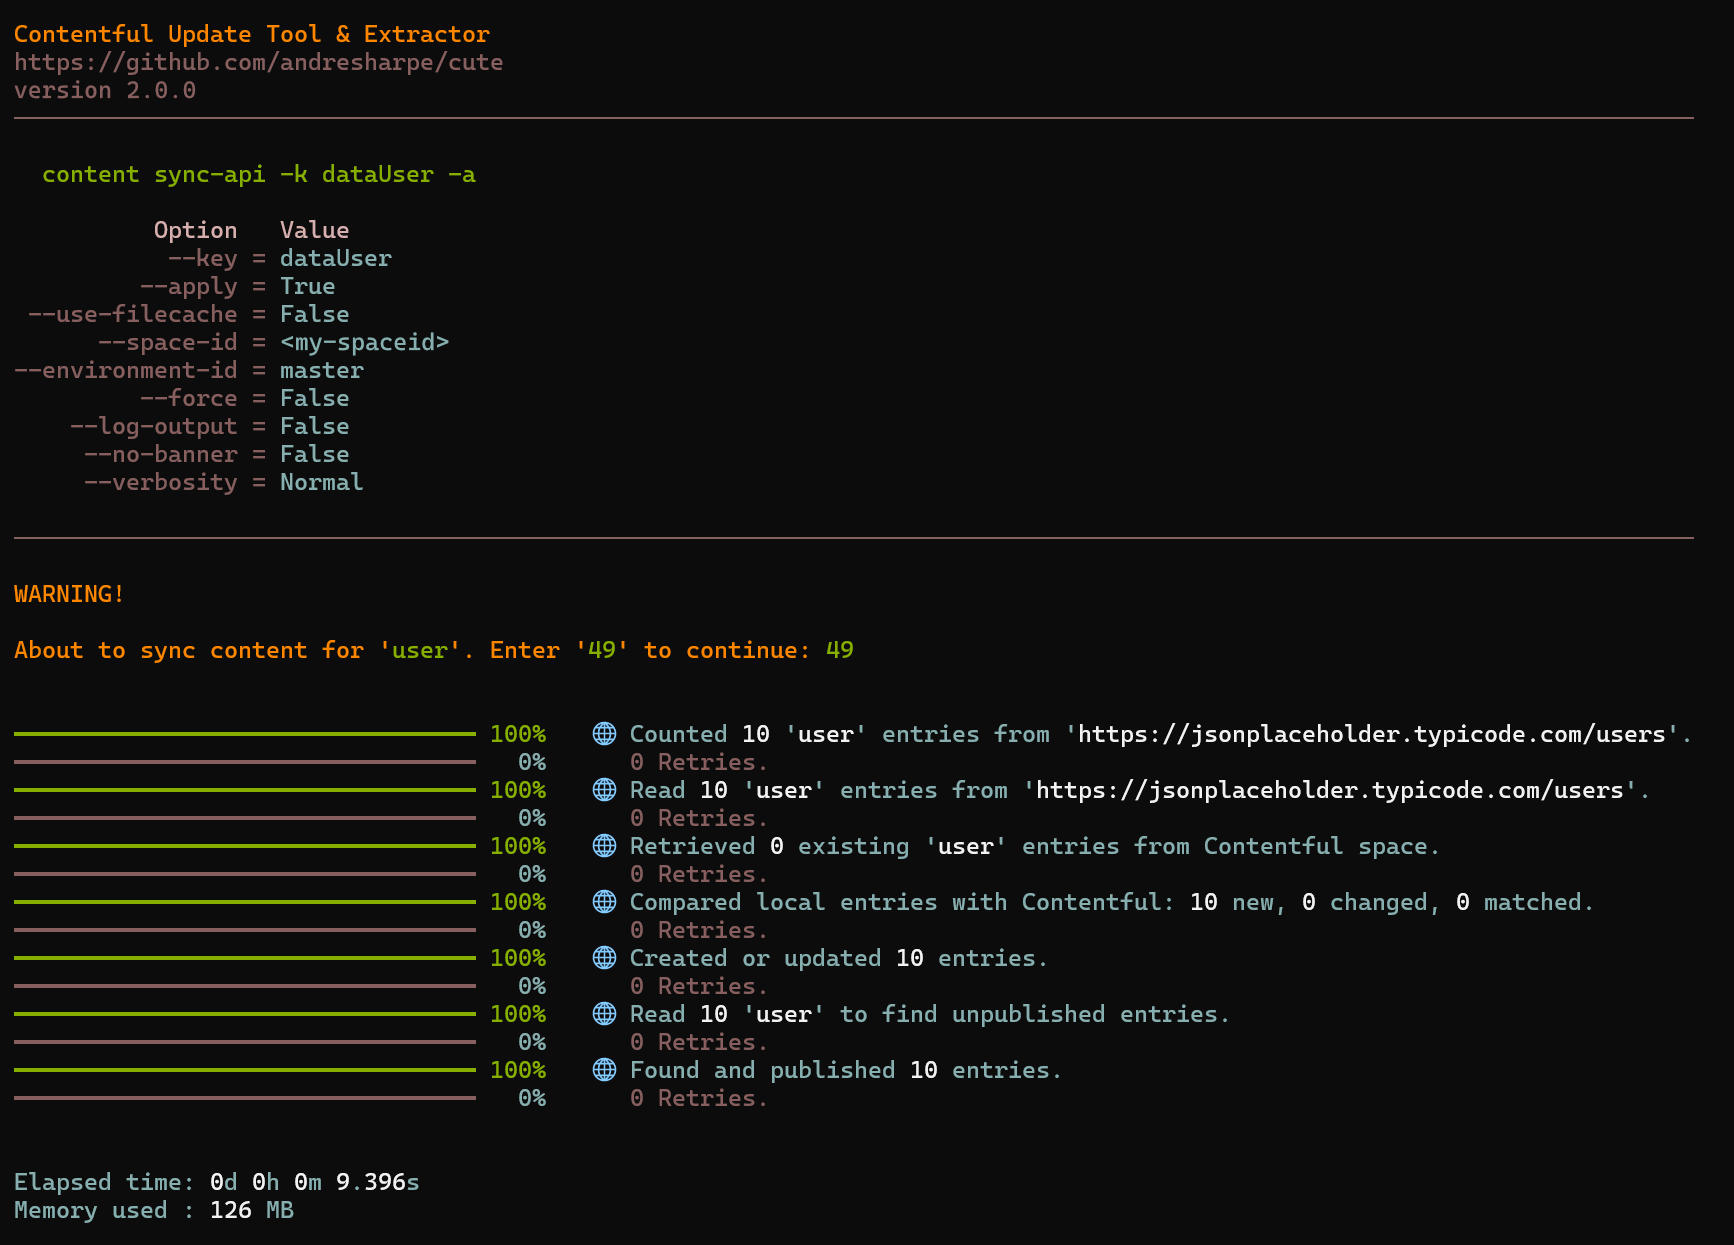
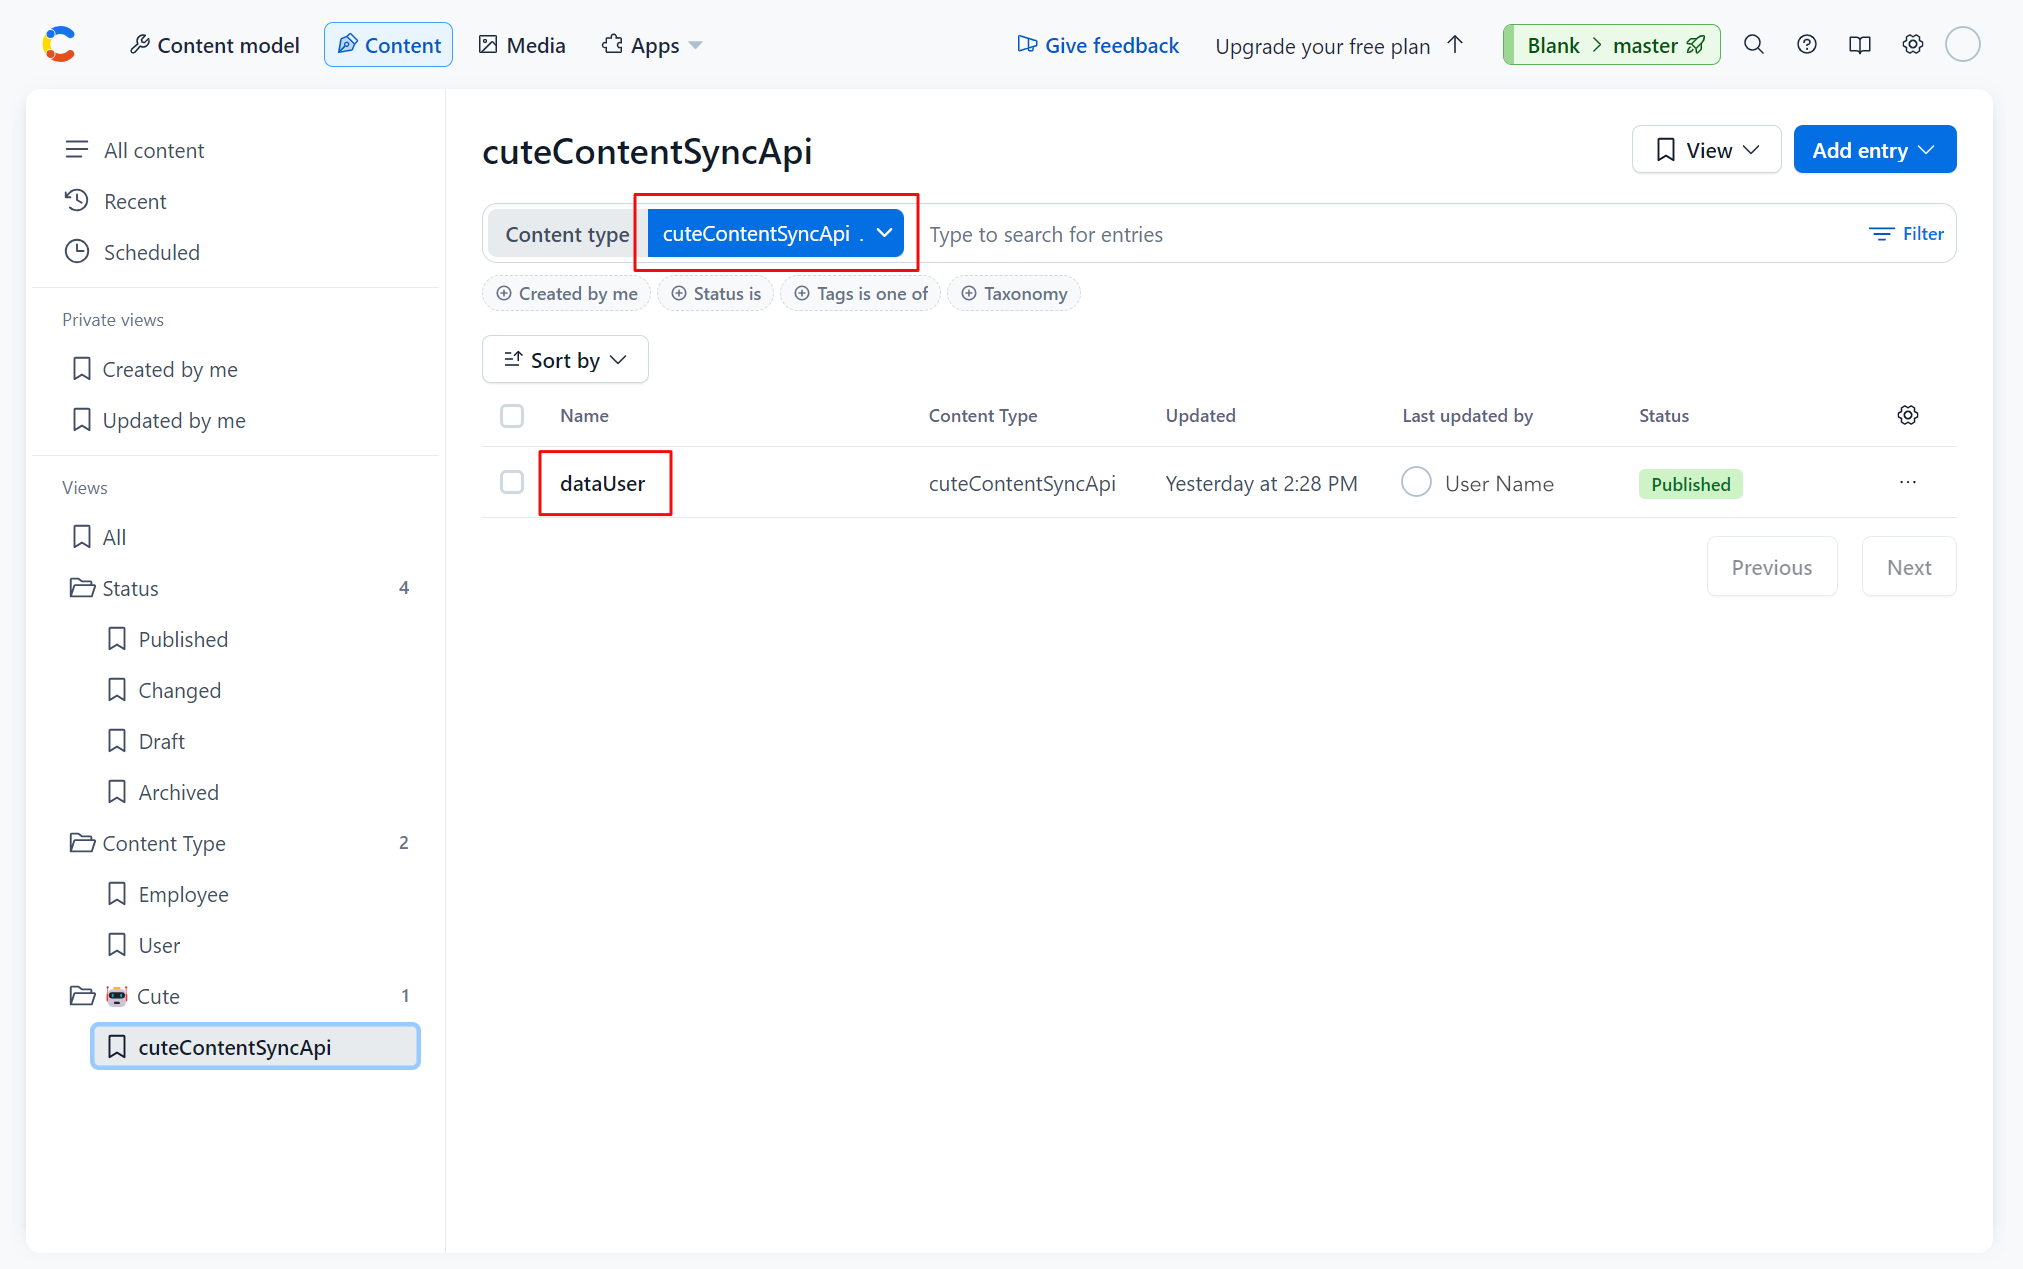
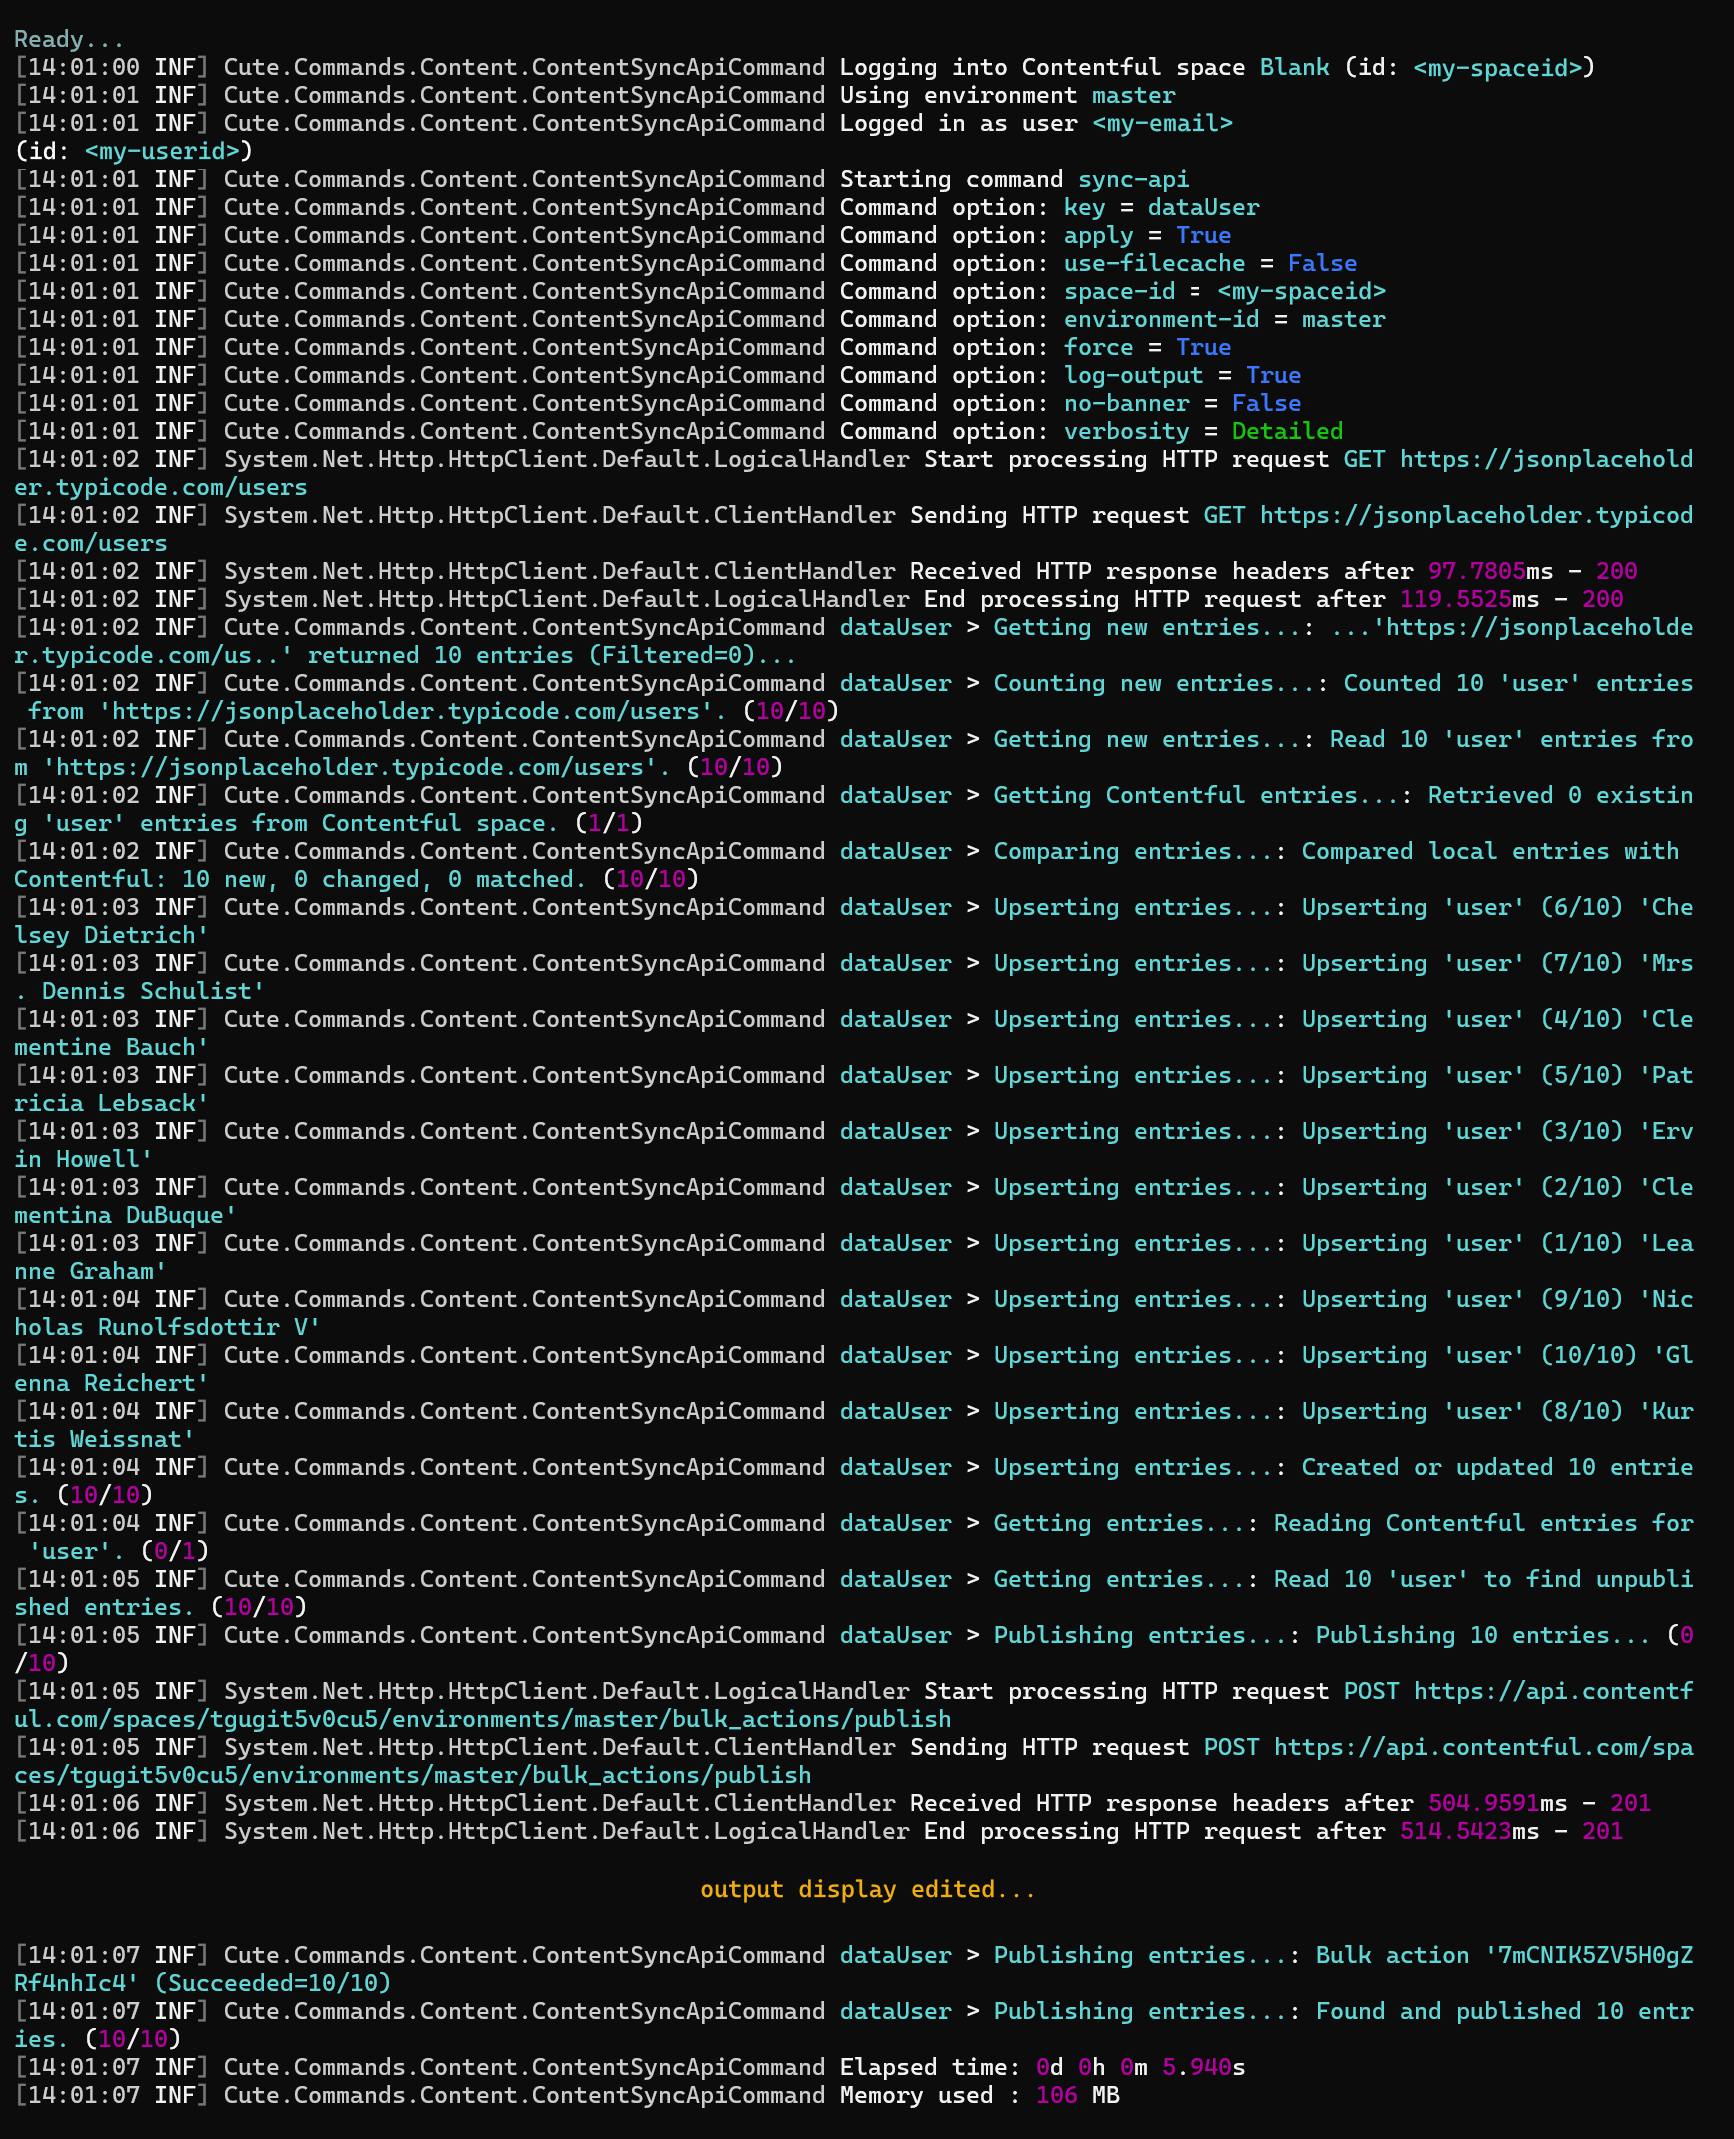
expression: '{{ row.phone }}'Running the cute content sync-api -k dataUser -a command yields the following output in the terminal:
Prior to running the command, you should configure database settings and field mappings in your Contentful space under the cuteContentSyncApi content type.
💡 See this section if you need to define a
cuteContentSyncApicontent type within your Contentful space if you're using this feature for the first time.
Select cuteContentSyncApi and then click the 'Add Entry' button:
Create a new entry for the relevant content as per the graphic below:
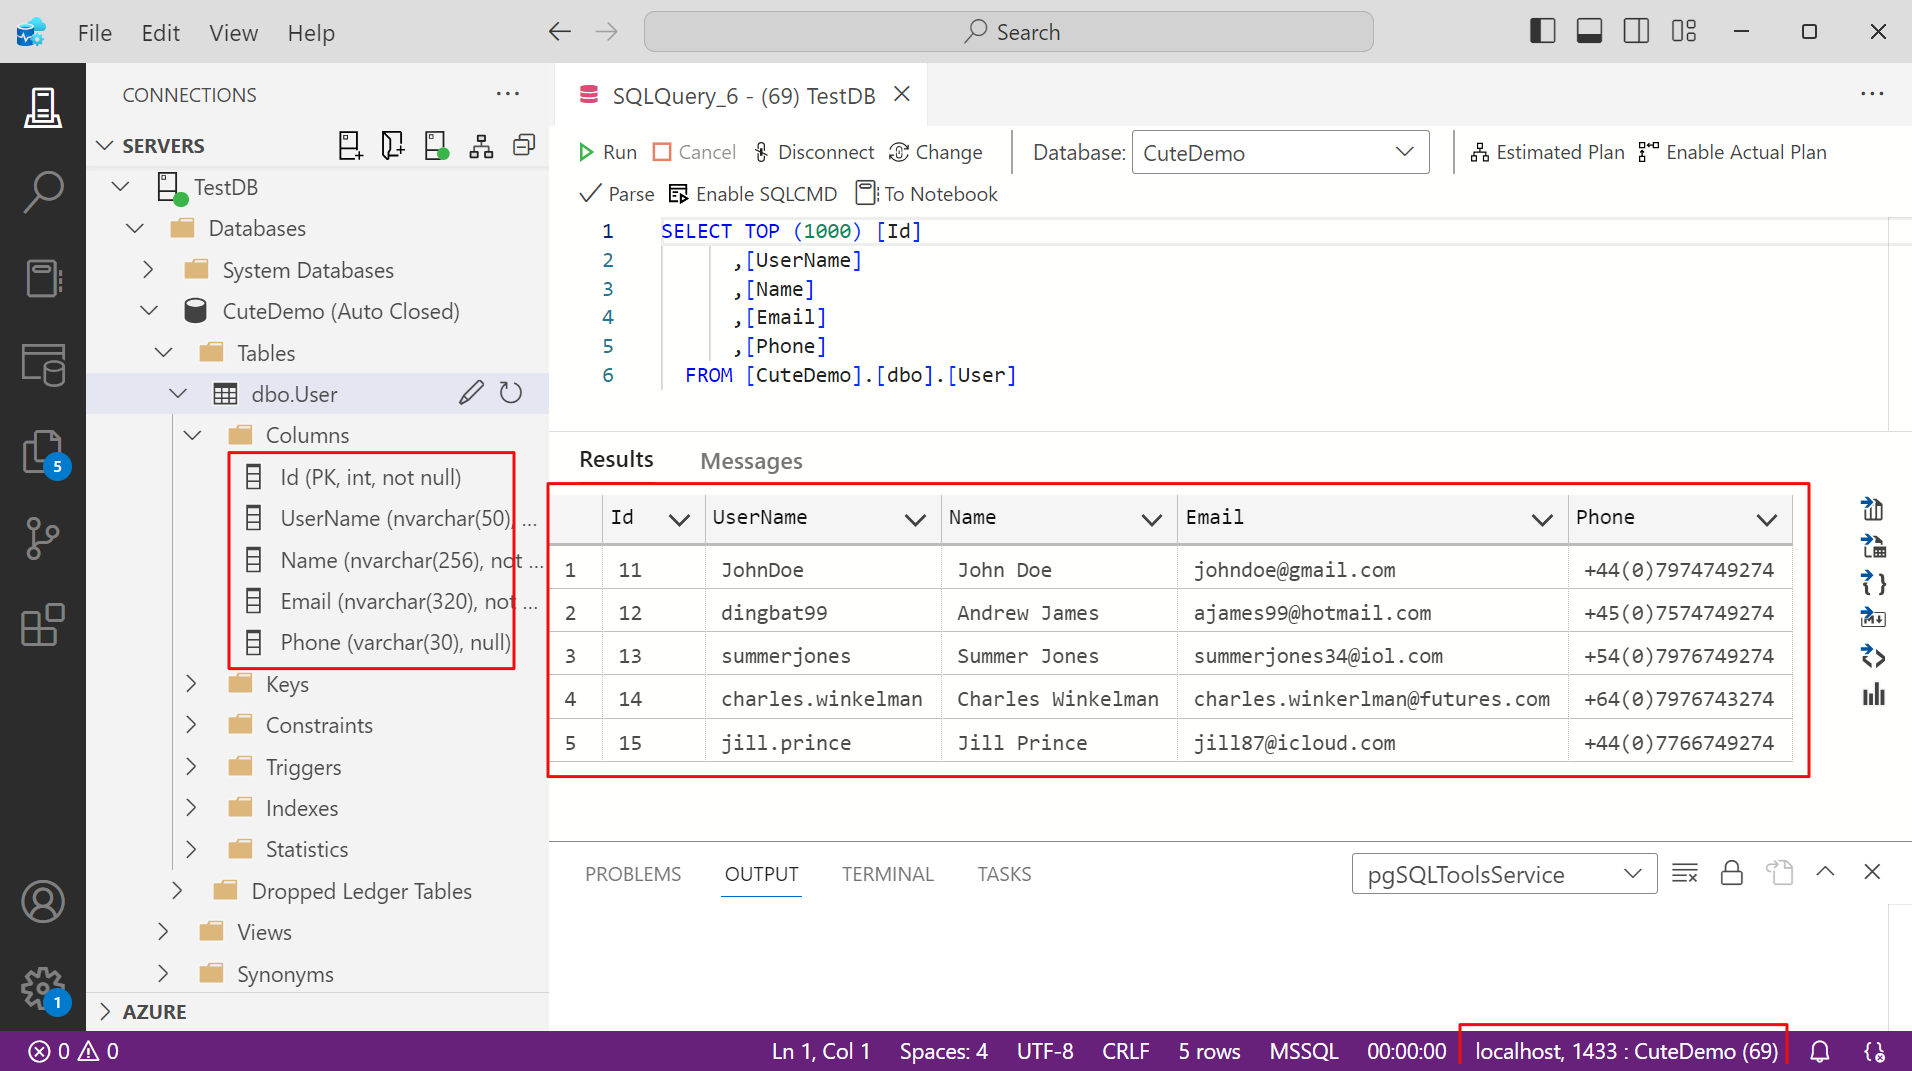
For this example we've set up SQL Server in a local Docker container, running on port 1433. We've created a database called CuteDemo and a table called dbo.User with 5 simple user records.
-- Create CuteDemo database
CREATE DATABASE CuteDemo
USE CuteDemo

-- Create User table
CREATE TABLE [dbo].[User]
(
    [Id] INT NOT NULL PRIMARY KEY, -- Primary Key column
    [UserName] NVARCHAR(50) NOT NULL,
    [Name] NVARCHAR(256) NOT NULL,
    [Email] NVARCHAR(320) NOT NULL,
    [Phone] VARCHAR(30)
);

-- Seed user data
INSERT INTO dbo.[User]
  ( Column1, Column2, Column3, Column4, Column5 )
VALUES
  (11, 'JohnDoe', 'John Doe', 'johndoe@gmail.com', '+44(0)7974749274'),
  (12, 'dingbat99', 'Andrew James', 'ajames99@hotmail.com', '+45(0)7574749274'),
  (13, 'summerjones', 'Summer Jones', 'summerjones34@iol.com', '+54(0)7976749274'),
  (14, 'charles.winkelman', 'Charles Winkelman', 'charles.winkerlman@futures.com', '+64(0)7976743274'),
  (15, 'jill.prince', 'Jill Prince', 'jill87@icloud.com', '+44(0)7766749274');

-- Select data
SELECT [Id], [UserName], [Name], [Email], [Phone] FROM [CuteDemo].[dbo].[User]
Our dbo.User table has a few matching fields and some which we'll map.
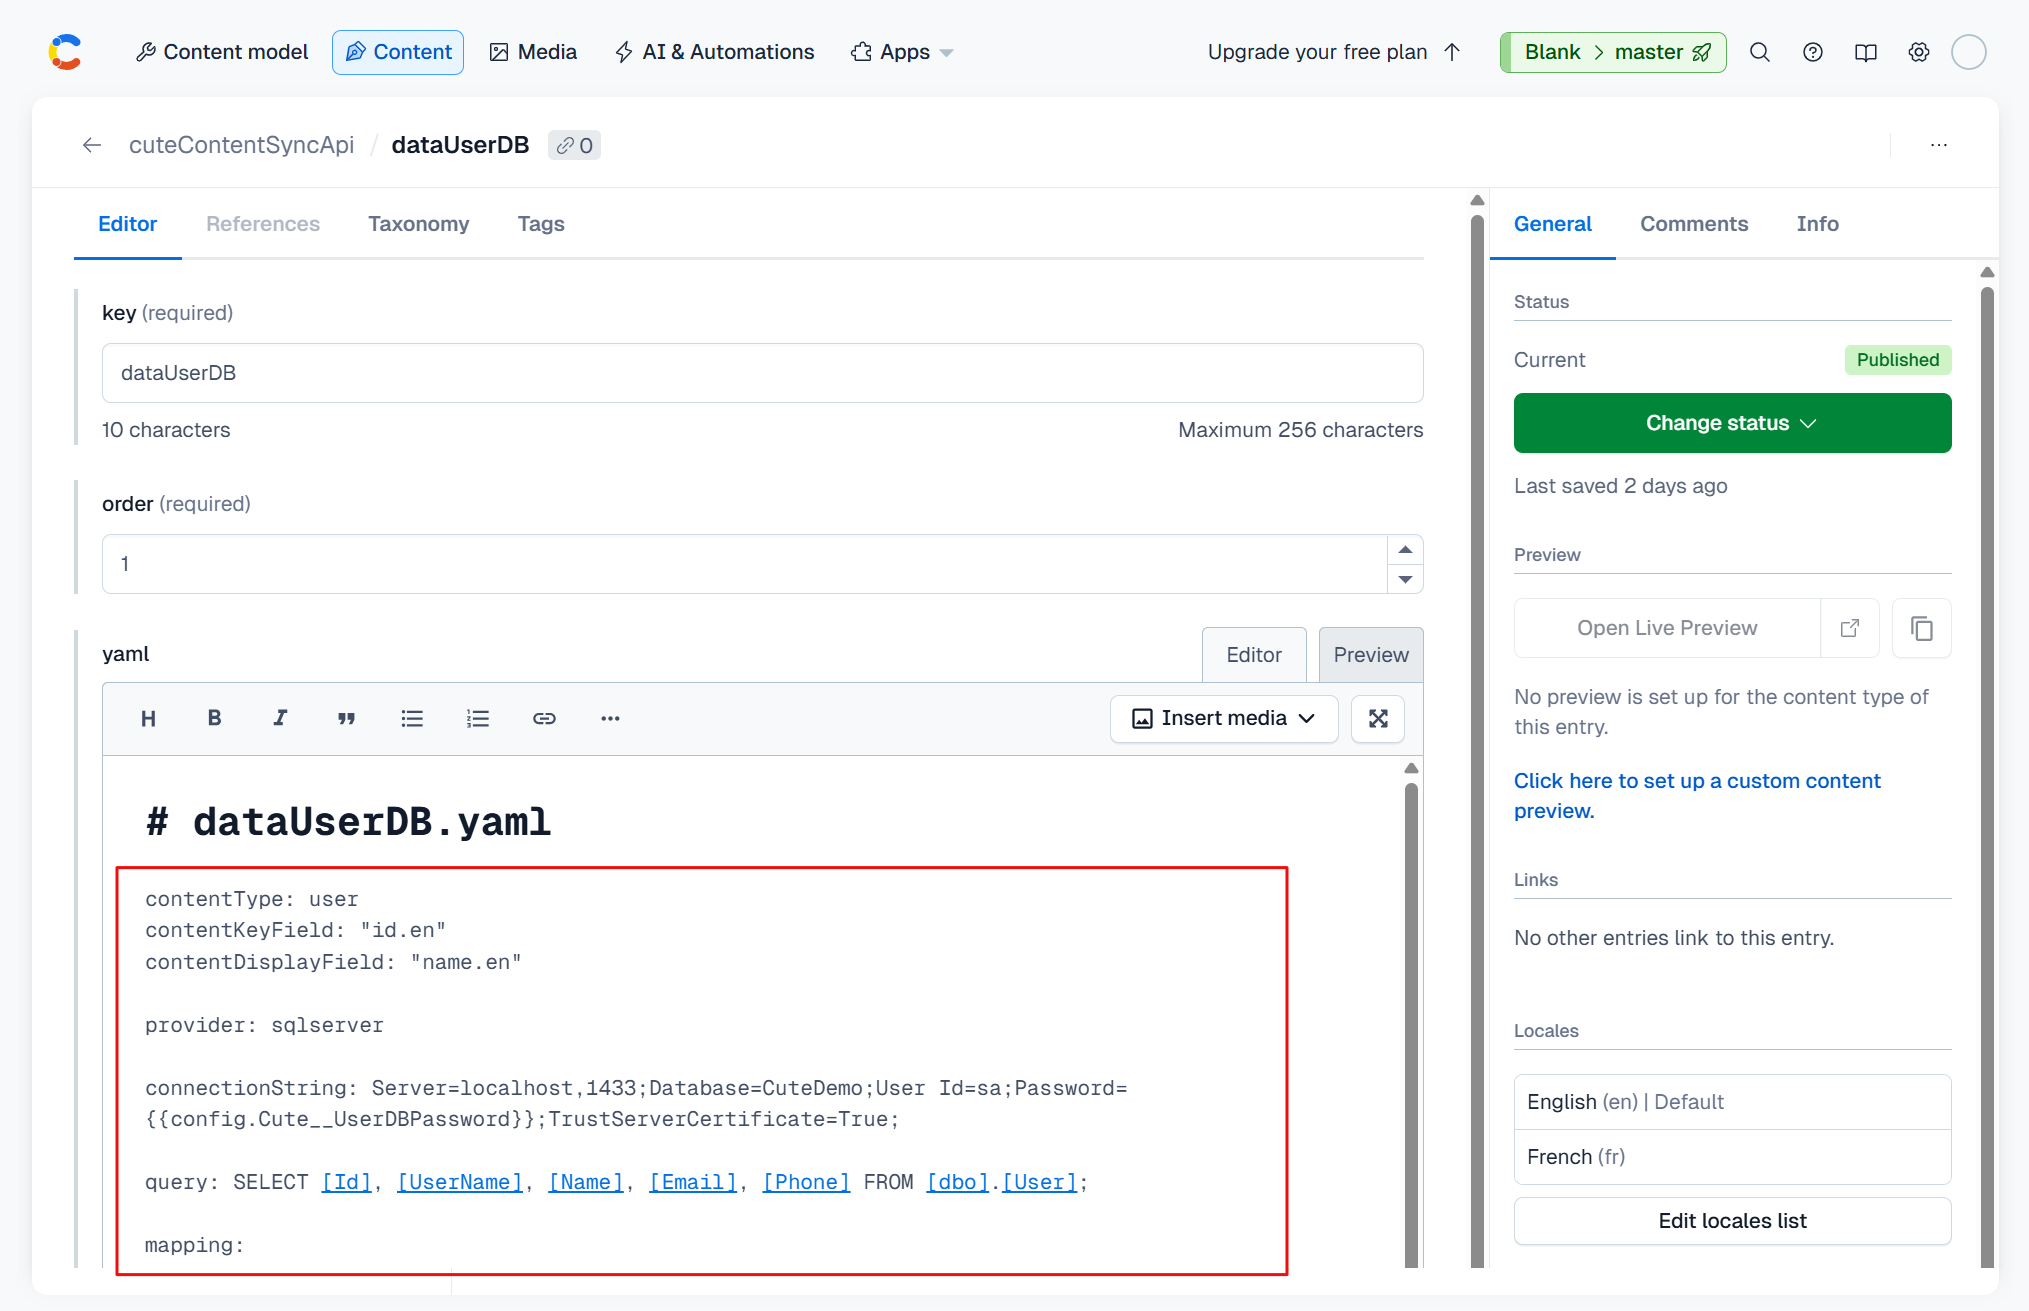
Basic identifiers, database provider and connection string, as well as field mappings can be configured as per the code snippet below.
# dataUserDB.yaml

contentType: user
contentKeyField: "id.en"
contentDisplayField: "name.en"

provider: sqlserver

connectionString: Server=localhost,1433;Database=CuteDemo;User Id=sa;Password={{config.Cute__UserDBPassword}};TrustServerCertificate=True;

query: SELECT [Id], [UserName], [Name], [Email], [Phone] FROM [dbo].[User];

mapping:
    - fieldName: id.en
      expression: '{{ row.Id }}'

    - fieldName: userName.en
      expression: '{{ row.UserName }}'

    - fieldName: name.en
      expression: '{{ row.Name }}'

    - fieldName: email.en
      expression: '{{ row.Email }}'

    - fieldName: phoneNumber.en
      expression: '{{ row.Phone }}'
Running the cute content sync-api -k dataUserDB -a command yields the following output in the terminal:
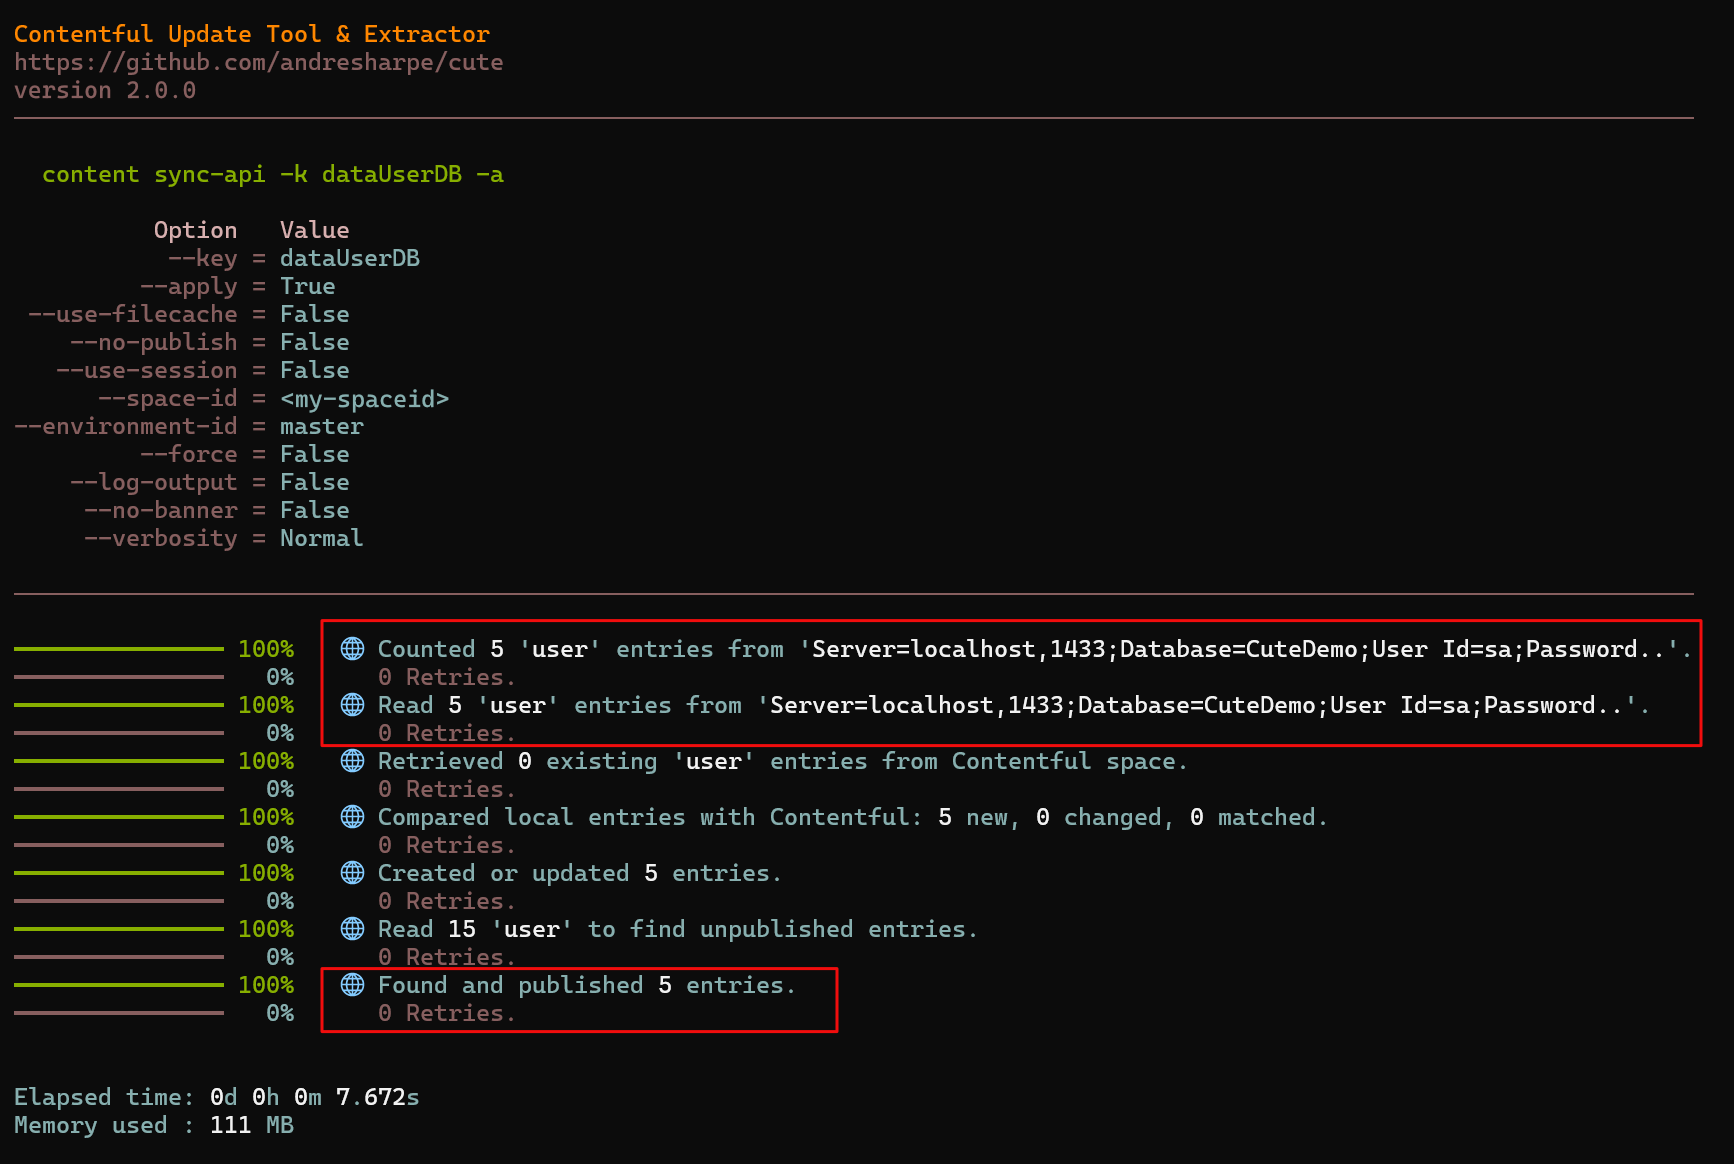
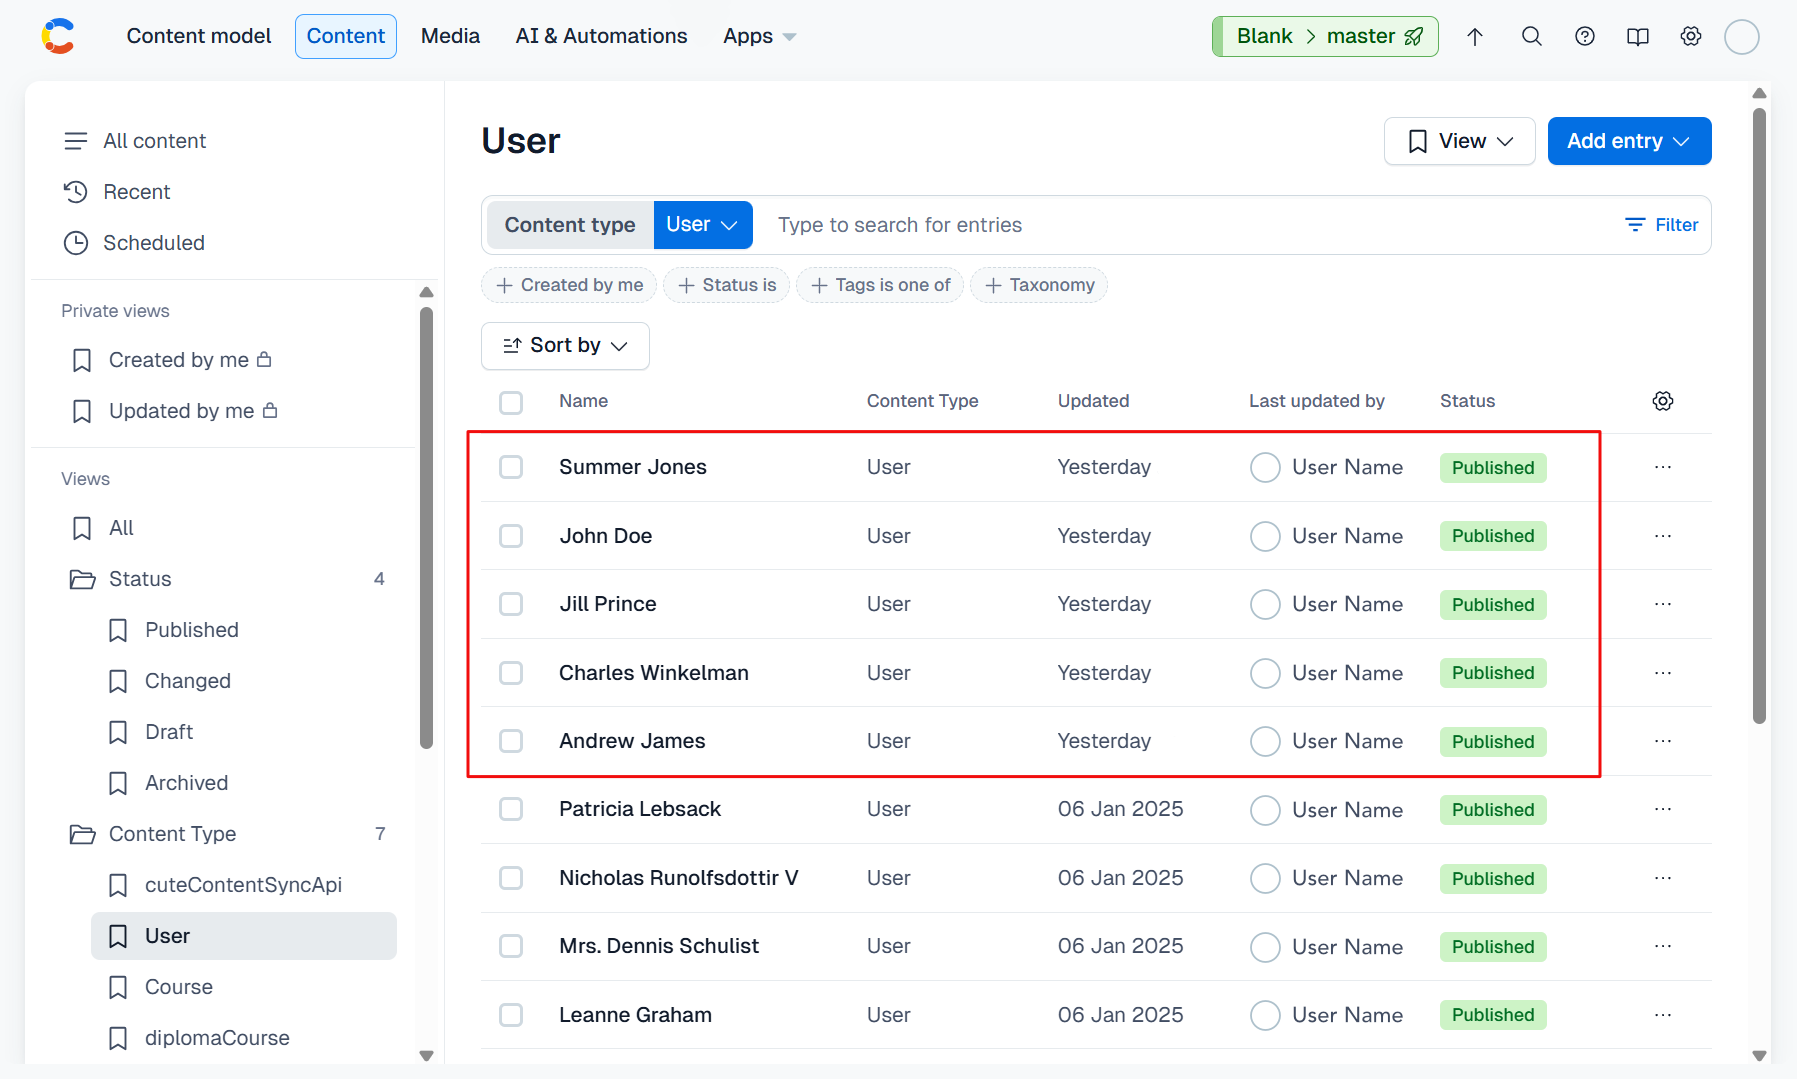
And a closer look at our User content type in Contentful reveals the addition of the 5 user records in our database.
You can generate content using OpenAI Generative Pre-trained Transformer (GPT) using the bulk operation feature of cute.
OpenAI ChatGPT uses a state-of-the-art Large Language Model (LLM) to generate text that is difficult to distinguish from human-written content.
Prompts and system messages that are generally used to interact with ChatGPT are configured and persisted in your Contentful space. This is especially useful as your AI prompts are persisted and backed up in the cloud right alongside your content.
💡 In order to use cute's content generation feature, you'll need a valid OpenAI API key which is entered when you run the
cute logincommand along with a valid endpoint and deployment model.
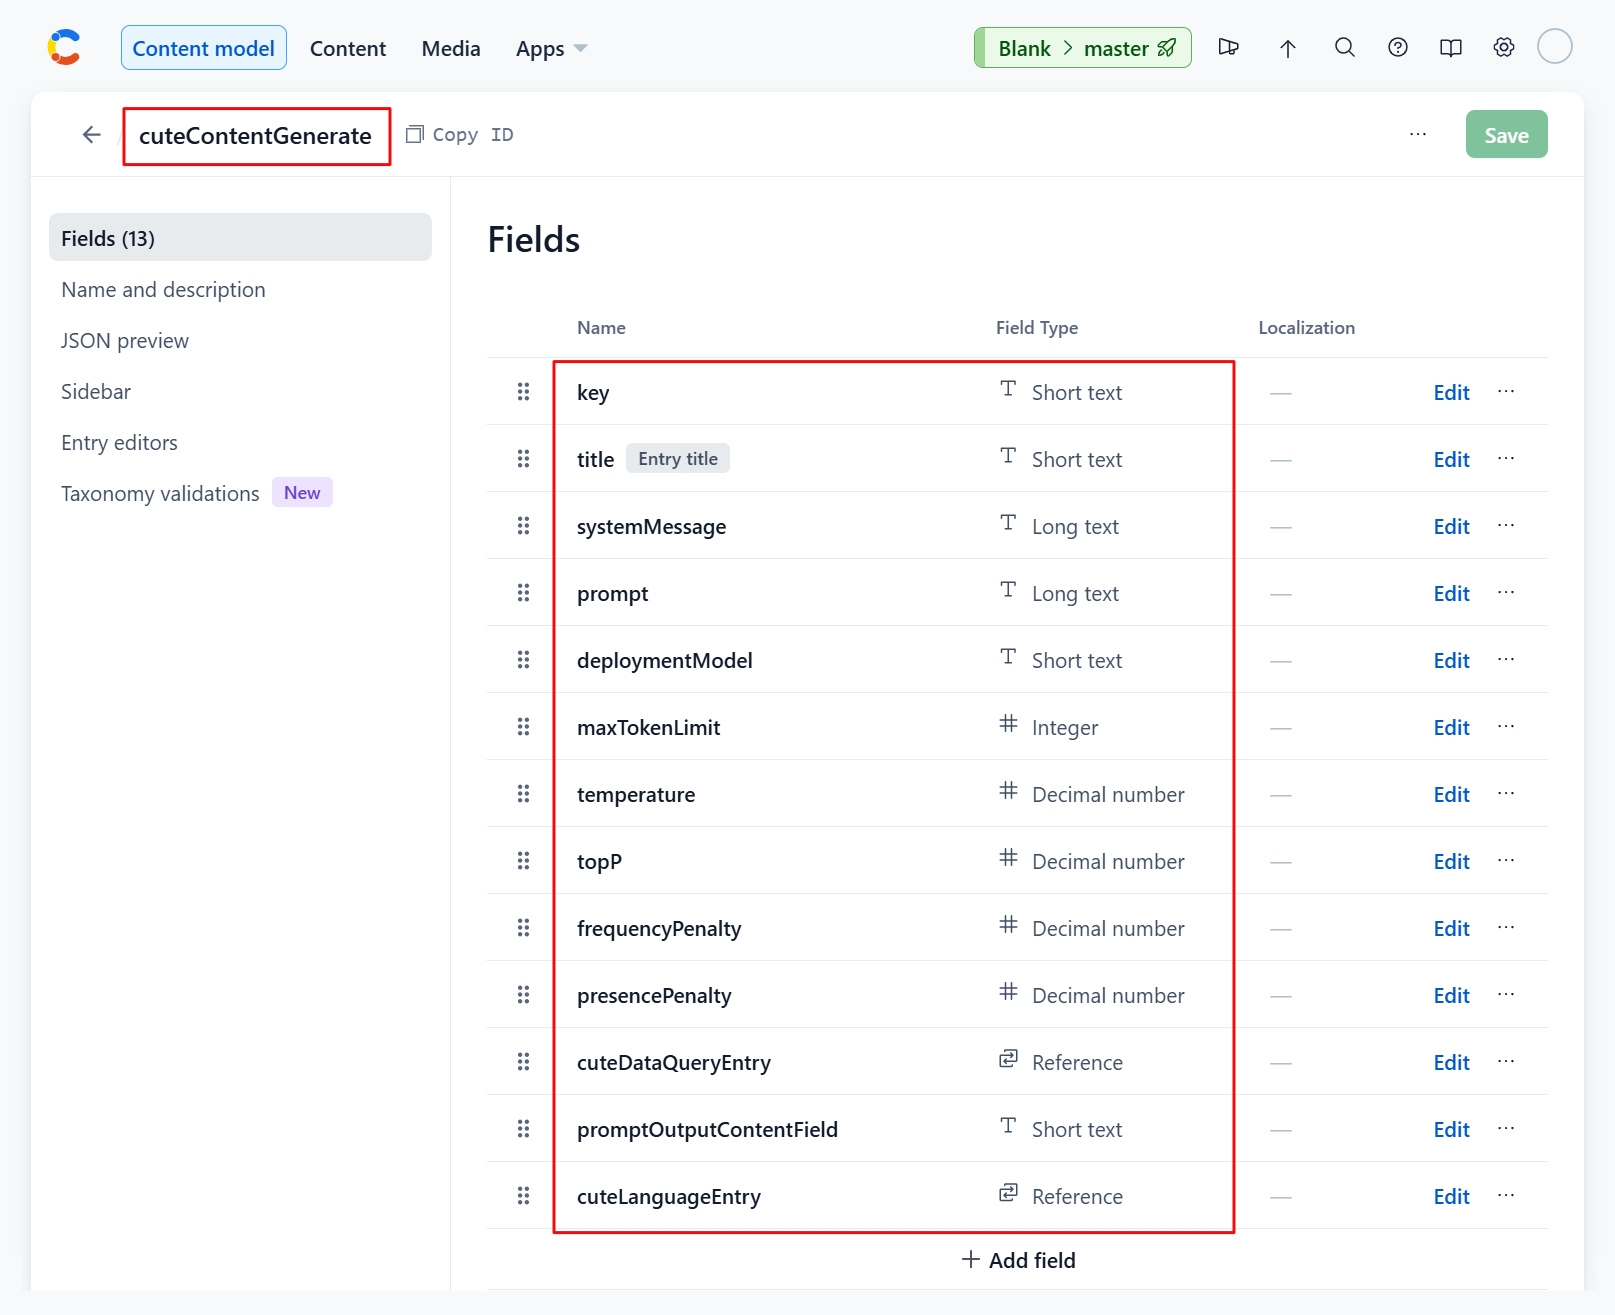
cuteContentGenerate entries can be added and configured under the 🤖 Cute / ContentGenerate view of your Contentful space.
This section outlines how to create a cuteContentGenerate content type in your Contentful space if you have not done so yet.
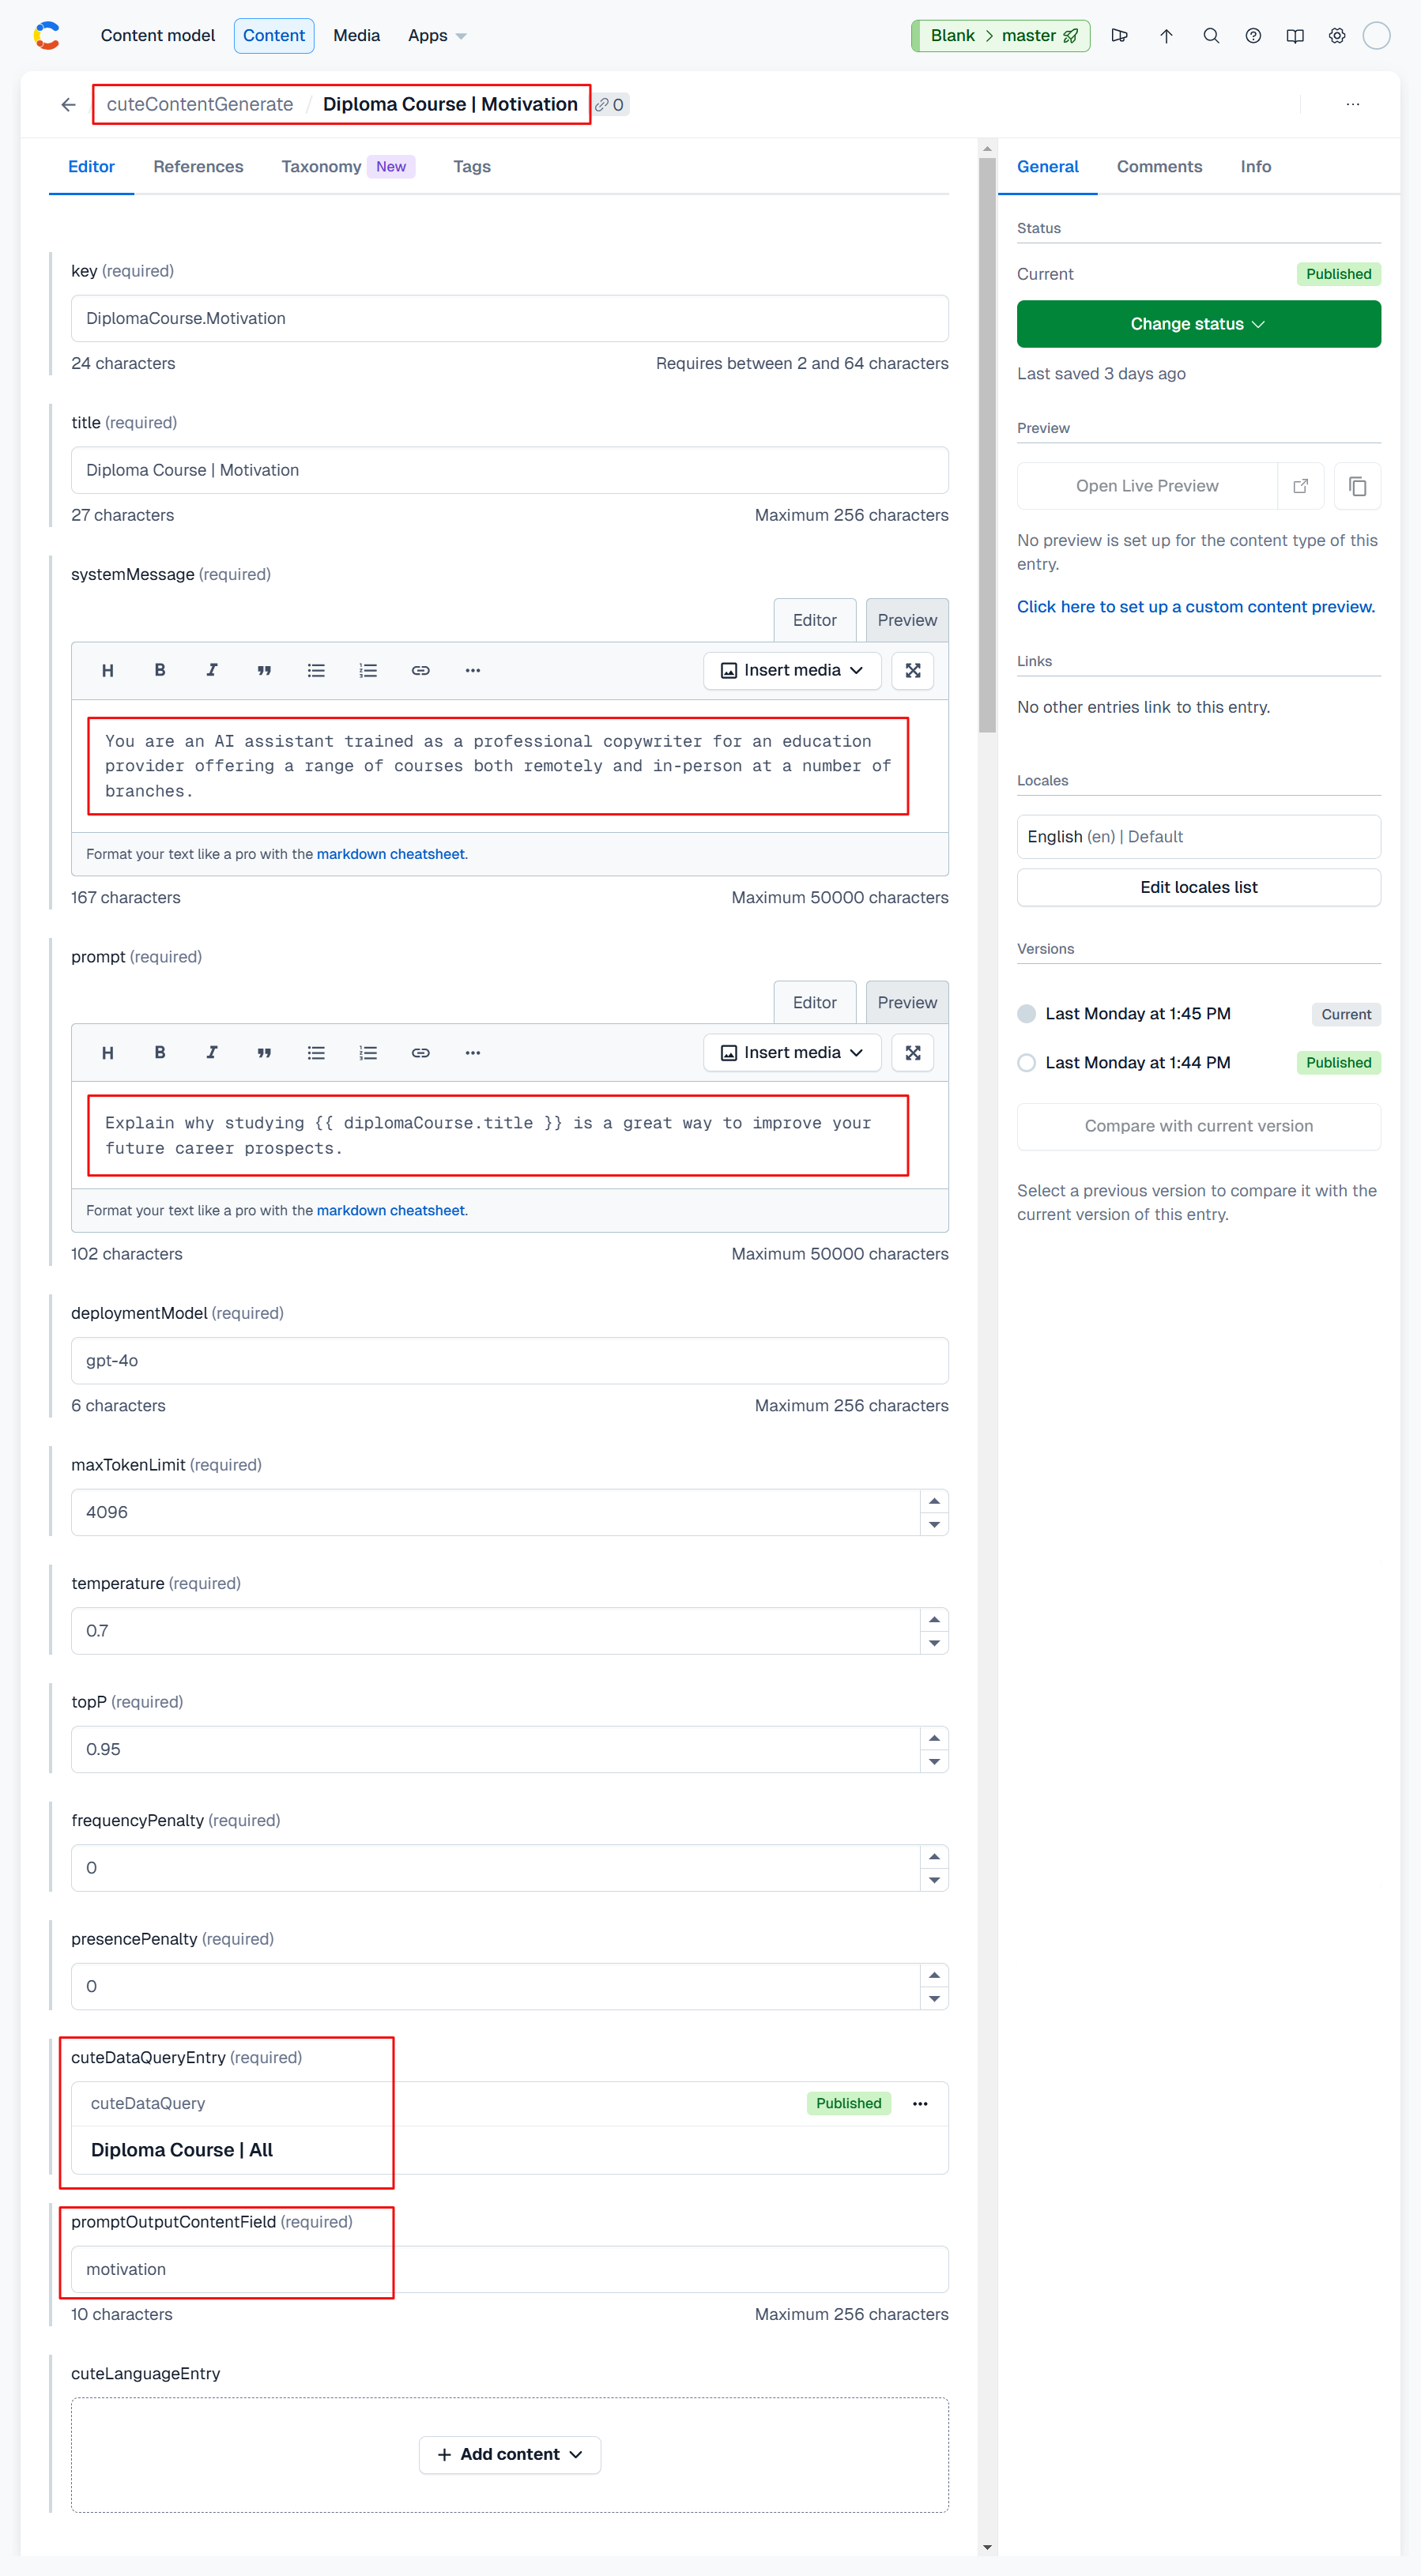
A cuteContentGenerate entry has an id, a system message, a prompt, points to a data query and an output field. Something like :-
| Title | Note |
|---|---|
| title | A short title by which the prompt entry is referred to. |
| systemMessage | Used to communicate instructions or provide context to the model at the beginning of a conversation. |
| prompt | A question or instruction that you issue to ChatGPT. This prompt is used to generate an appropriate response. |
| deploymentModel | Select which Large Language Model (LLM) is used for your interaction. |
| maxTokenLimit | The maximum tokens to be used for the interaction |
| temperature | Controls the randomness of the generated response. A higher temperature value increases randomness, making the responses more diverse and creative, while a lower value makes them more focused and deterministic. |
| topP | Controls the diversity of the generated output by truncating the probability distribution of words. It functions as a filter to determine the number of words or phrases the language model examines while predicting the next word. For instance, when the Top P value is set at 0.4, the model only considers 40% of the most probable words or phrases. A higher Top P value results in more diverse creative responses. A lower value will result in more focused and coherent responses. |
| frequencyPenalty | Controls the repetitiveness of words in generated responses. Increasing this value is like telling ChatGPT not to use the same words too often. |
| presencePenalty | Manages the appearance of words in generated text based on their position, rather than frequency. This parameter encourages ChatGPT to employ a more diverse vocabulary |
| cuteDataQueryEntry | A link to the associated data query in 🤖 Cute / DataQuery. See this section for a detailed overview of creating cuteDataQuery entries. |
| promptOutputContentField | The target field of the content entry where the generated response is stored. |
DESCRIPTION:
Generate content using a Large Language Model (LLM).

USAGE:
    cute content generate [OPTIONS]

OPTIONS:
    -h, --help          Prints help information
    -k, --key           The key of the 'cuteContentGenerate' entry
    -a, --apply         Apply and publish all the required edits
    -o, --operation     Specify the generation operation to perform. (GenerateSingle, GenerateParallel,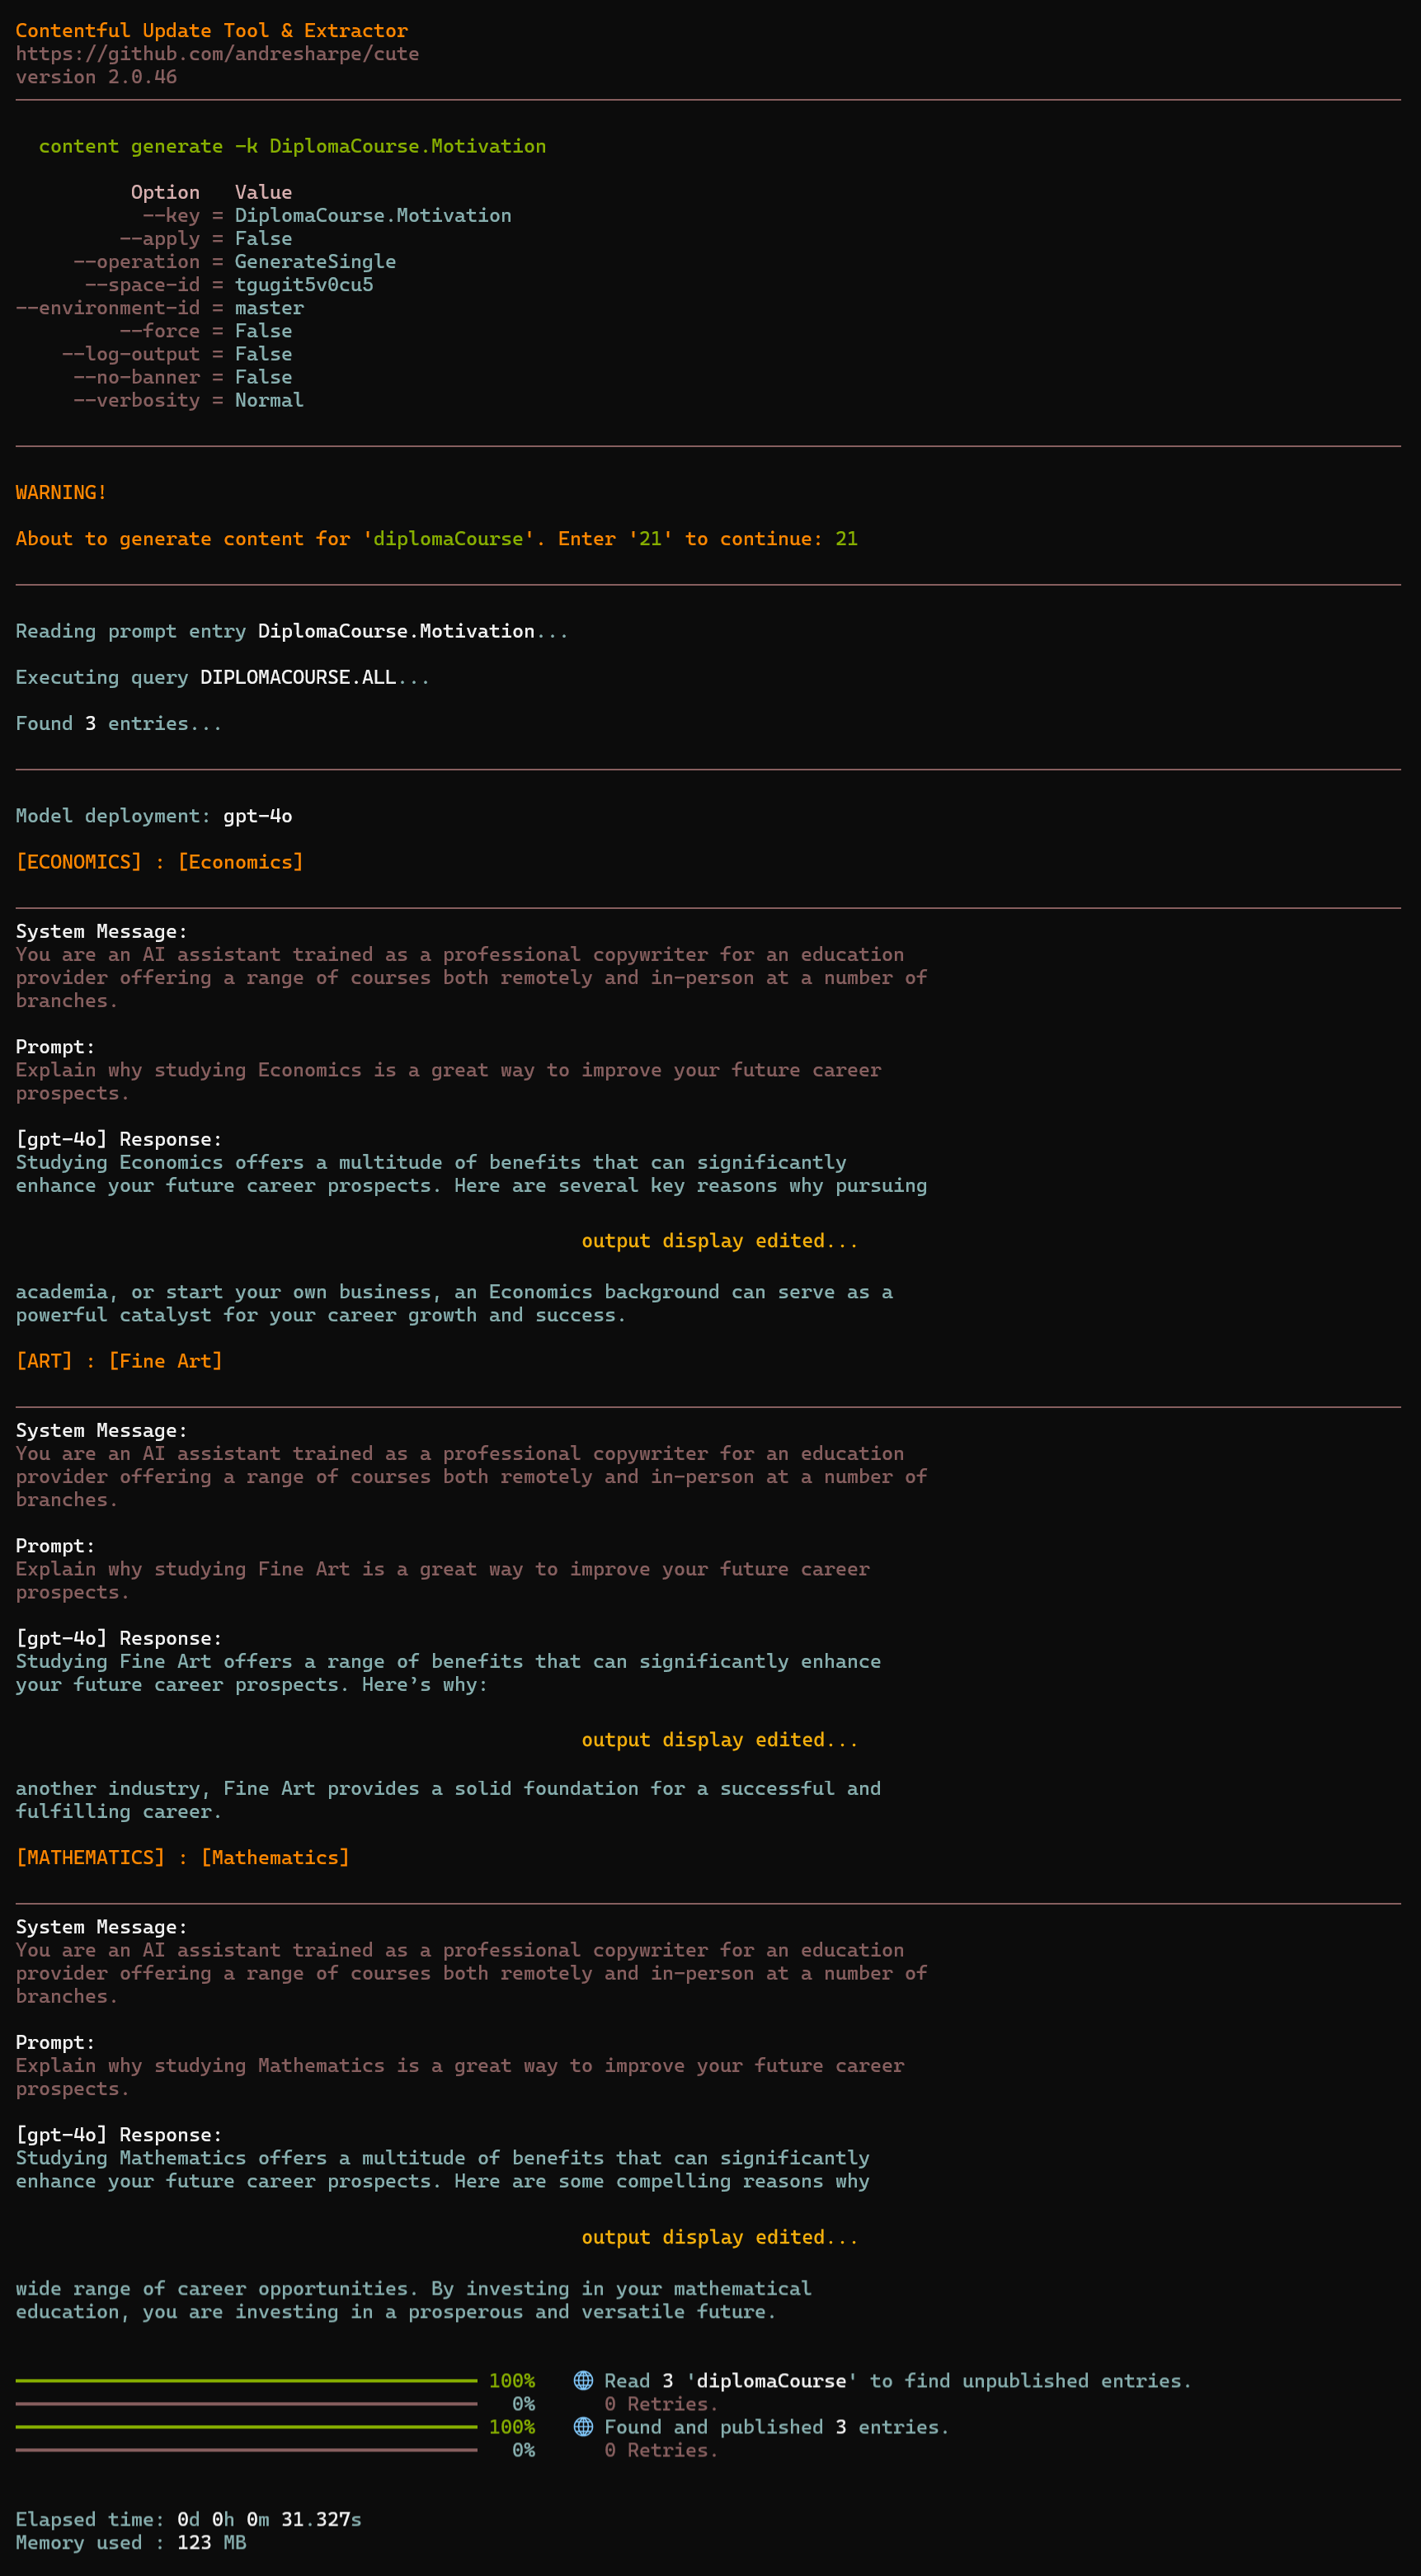
GenerateBatch or ListBatches)Let's extend our earlier example of an educational institution by adding a content type diplomaCourse with a key, title and motivation. We'll use cute's content generation feature to generate a motivation on why it's a good idea to study a specific subject to advance your career.
We'll add a cuteContentGenerate entry called Diploma Course | Motivation in our Contentful space as per the attached screenshot below. We'll configure a systemMessage and prompt as per the highlighted areas and link the entry to our Diploma Course | All entry we configured in cuteDataQuery in this section previously.
Let's run the content generate command and have a look at the results.
cute content generate -k DiplomaCourse.MotivationYou'll notice from the output that the Diploma Course | All query returns 3 entries, Economics, Fine Art and Mathematics, and the ChatGPT responses are displayed for each prompt.
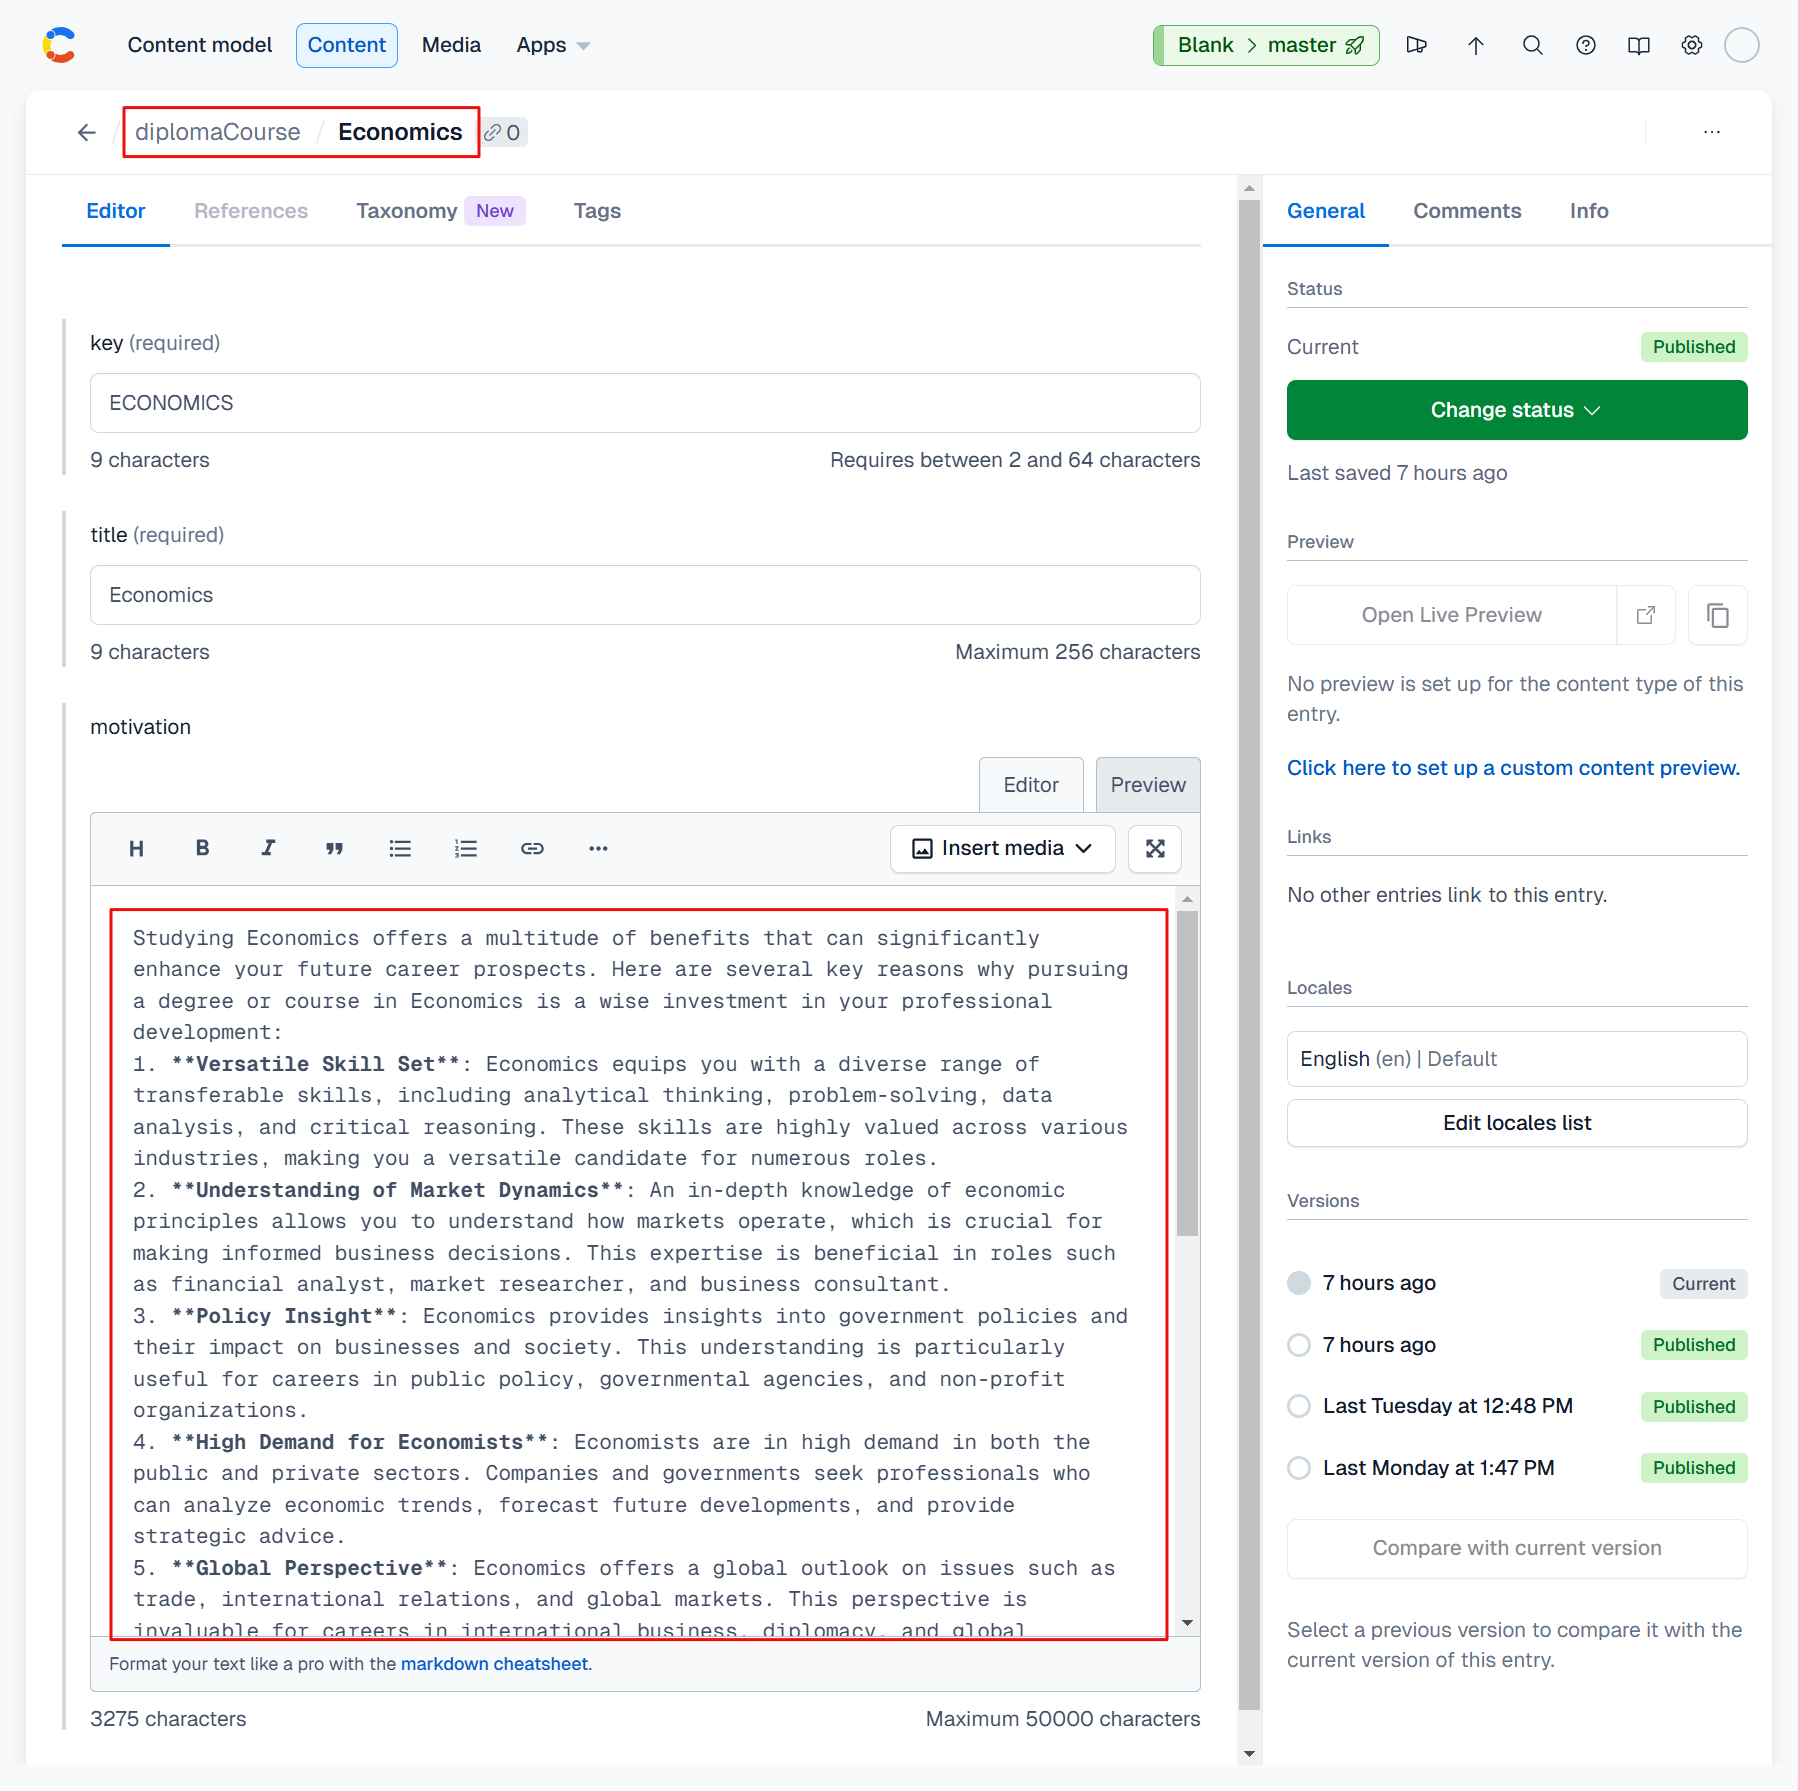
And having a look at the Mathematics, Fine Art and Economics entries under the diplomaCourse content type confirms that the motivation field have been populated with the ChatGPT response for each respective entry. The screenshot below shows the Economics entry.
For our second example, we'll work with the viewCourseByLocation content type we created here. This content type is an aggregate of branchLocation and diplomaCourse and we'll reference both those content types in our prompt.
As with example 1 above, we'll start by configuring a cuteDataQuery entry that we'll reference in our cuteContentGenerate entry.
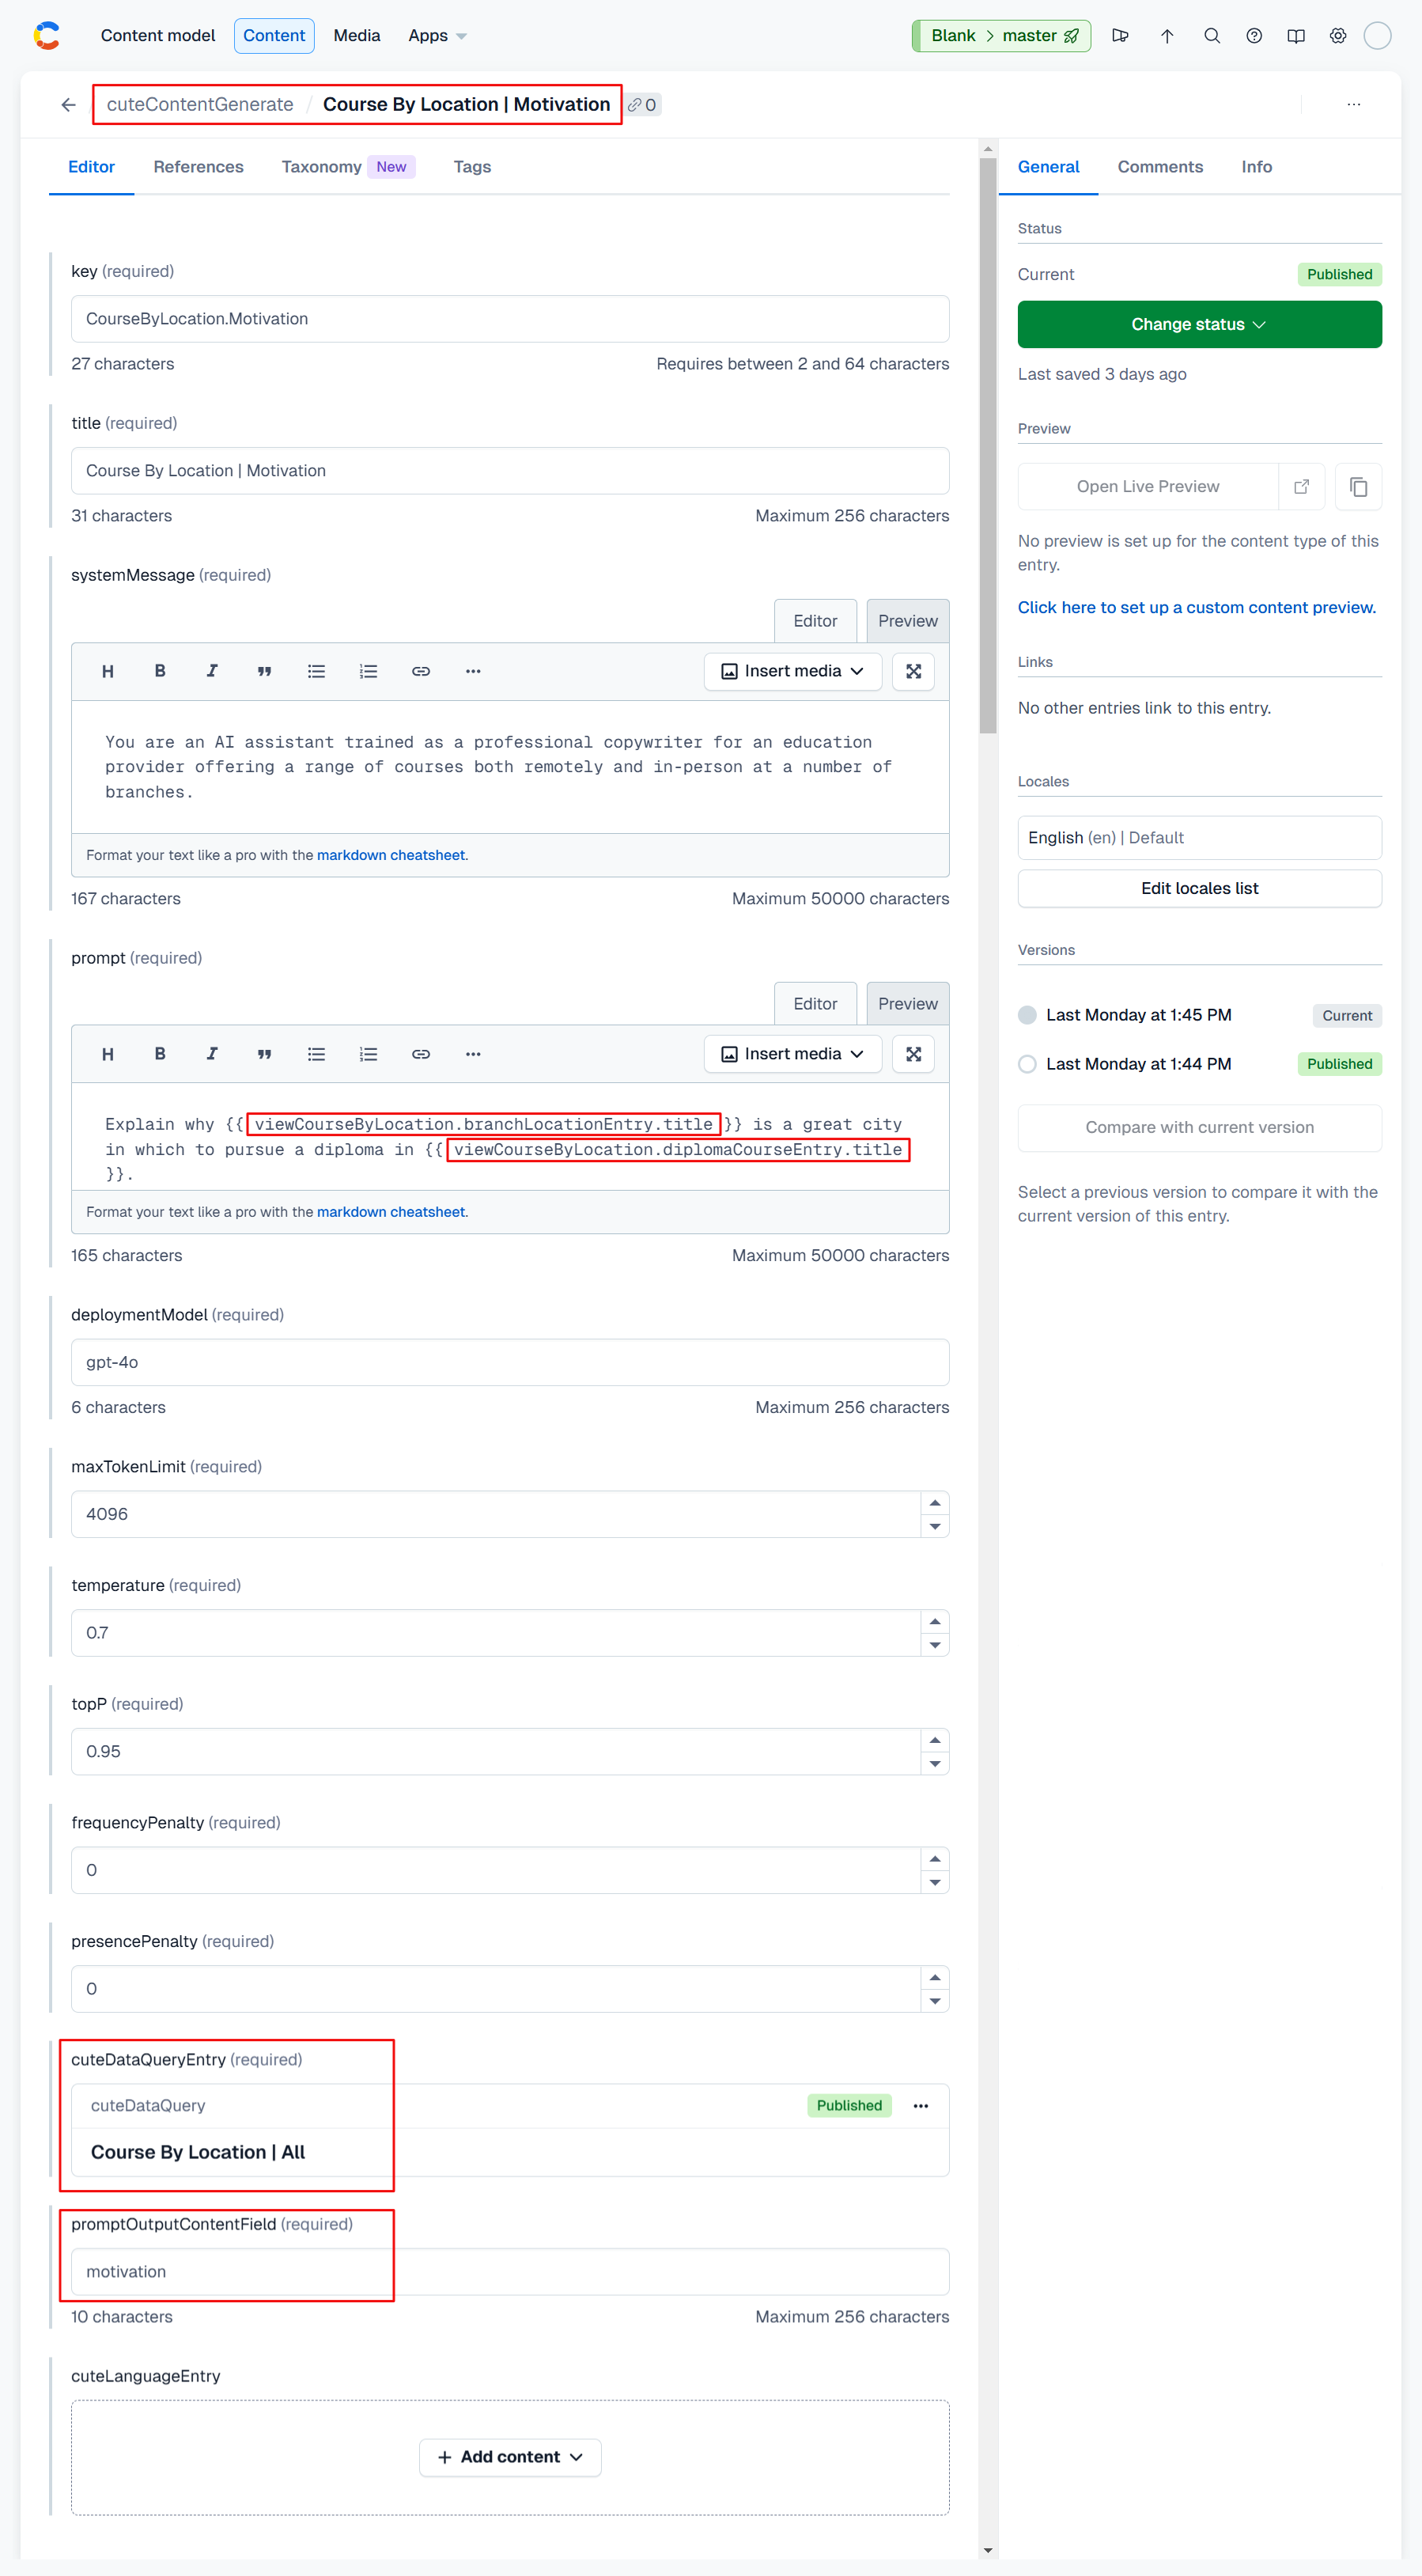
Let's add a cuteContentGenerate entry called Course By Location | Motivation in our Contentful space as per the attached screenshot below. We'll configure a systemMessage and prompt as per the highlighted areas and link the entry to our Diploma Course | All entry we configured in cuteDataQuery in this section previously.
Note that in our prompt we're referencing properties from the aggregate data objects rather than the root object.
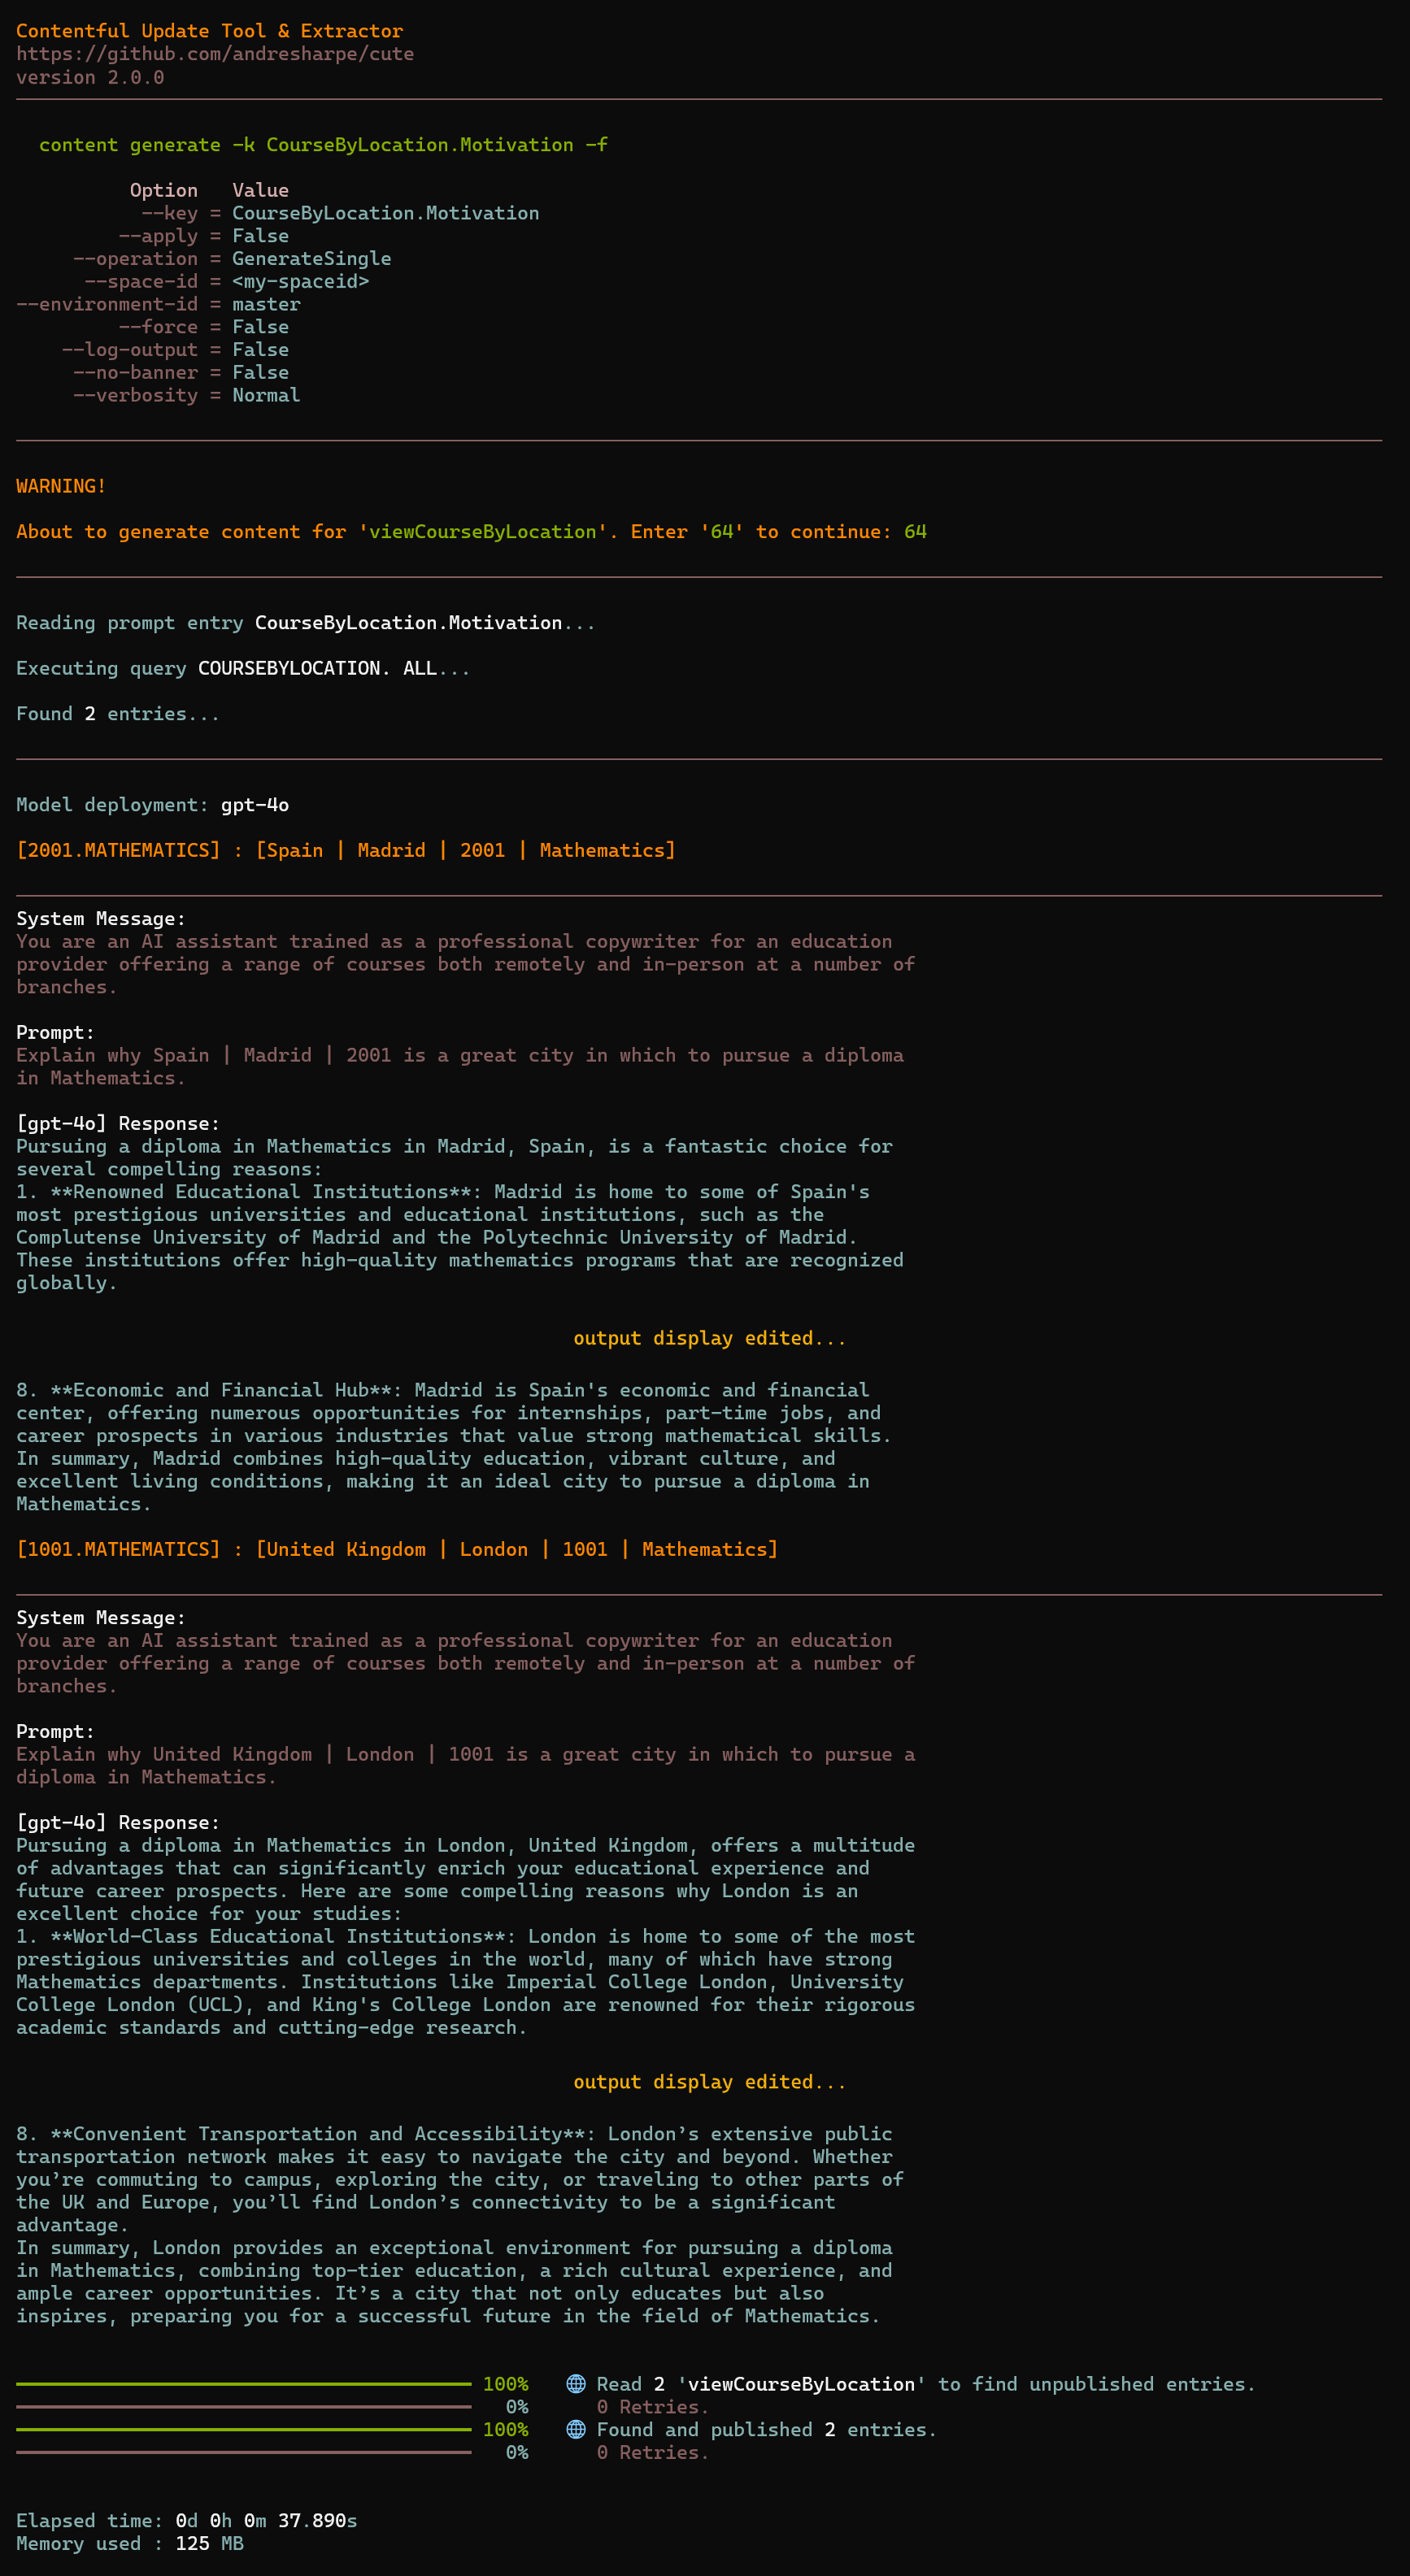
Let's run the cute content generate -k CourseByLocation.Motivation command and have a look at the terminal output:
You'll notice from the output that the Course By Location | All query returns 2 entries, Madrid and London, and the ChatGPT responses are displayed for each prompt.
And having a look at the United Kingdom | London | 1001 | Mathematics and Spain | Madrid | 2001 | Mathematics entries under the viewCourseByLocation content type confirms that the motivation field have been populated with the ChatGPT response for each respective entry. The screenshot below shows the Spain | Madrid | 2001 | Mathematics entry.

You can translate your content into languages of your choice using various popular AI translation services including Azure AI Translator, DeepL, Google Translation AI and OpenAI.
Typing cute content translate --help will show the full usage and options.
USAGE:
    cute content translate [OPTIONS]

OPTIONS:
    -h, --help                  Prints help information
    -c, --content-type-id <ID>  The Contentful content type id
    -l, --locale <CODE>         The locale code (eg. 'en') linked to the relevant language. If unspecified, all localized fields and languages will be translated
    -k, --key                   The key of a single entry to be translated
    -f, --field                 The field(s) which will be translated. If not specified, all localized fields will be translated
--custom-model <CODE> Specifies whether a custom translation model or glossary should be usedcute will filter your content entries and process all entries where:
- The target translated content field is empty, AND
- The default locale content field (source) is not empty.
cute let's you work with one or several AI translation services, depending on your requirement. You're not limited to a single translation service for all your languages. You can choose the translation service that yields the best result for all or any of the languages you are translating content to.
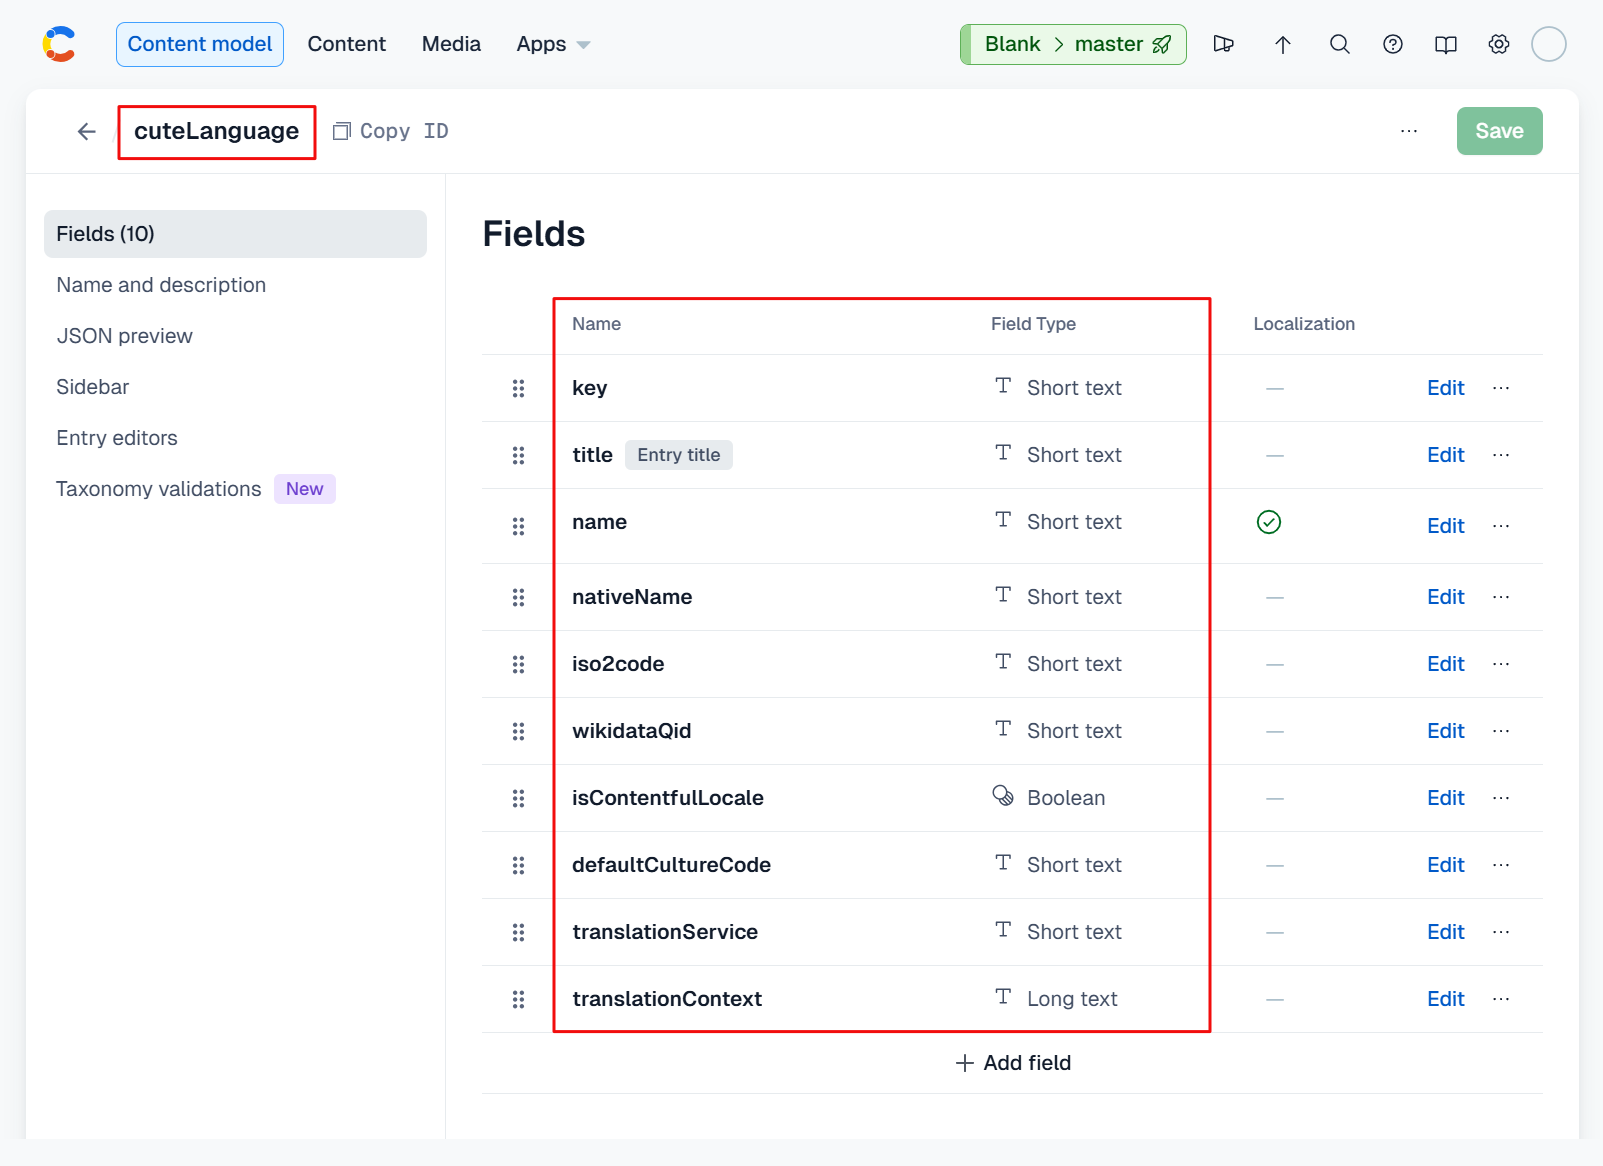
To enable cute's translation features you'll need the cuteLanguage and cuteContentTypeTranslation content types defined within your space. See this section if these required cute content types are not yet defined within your space.
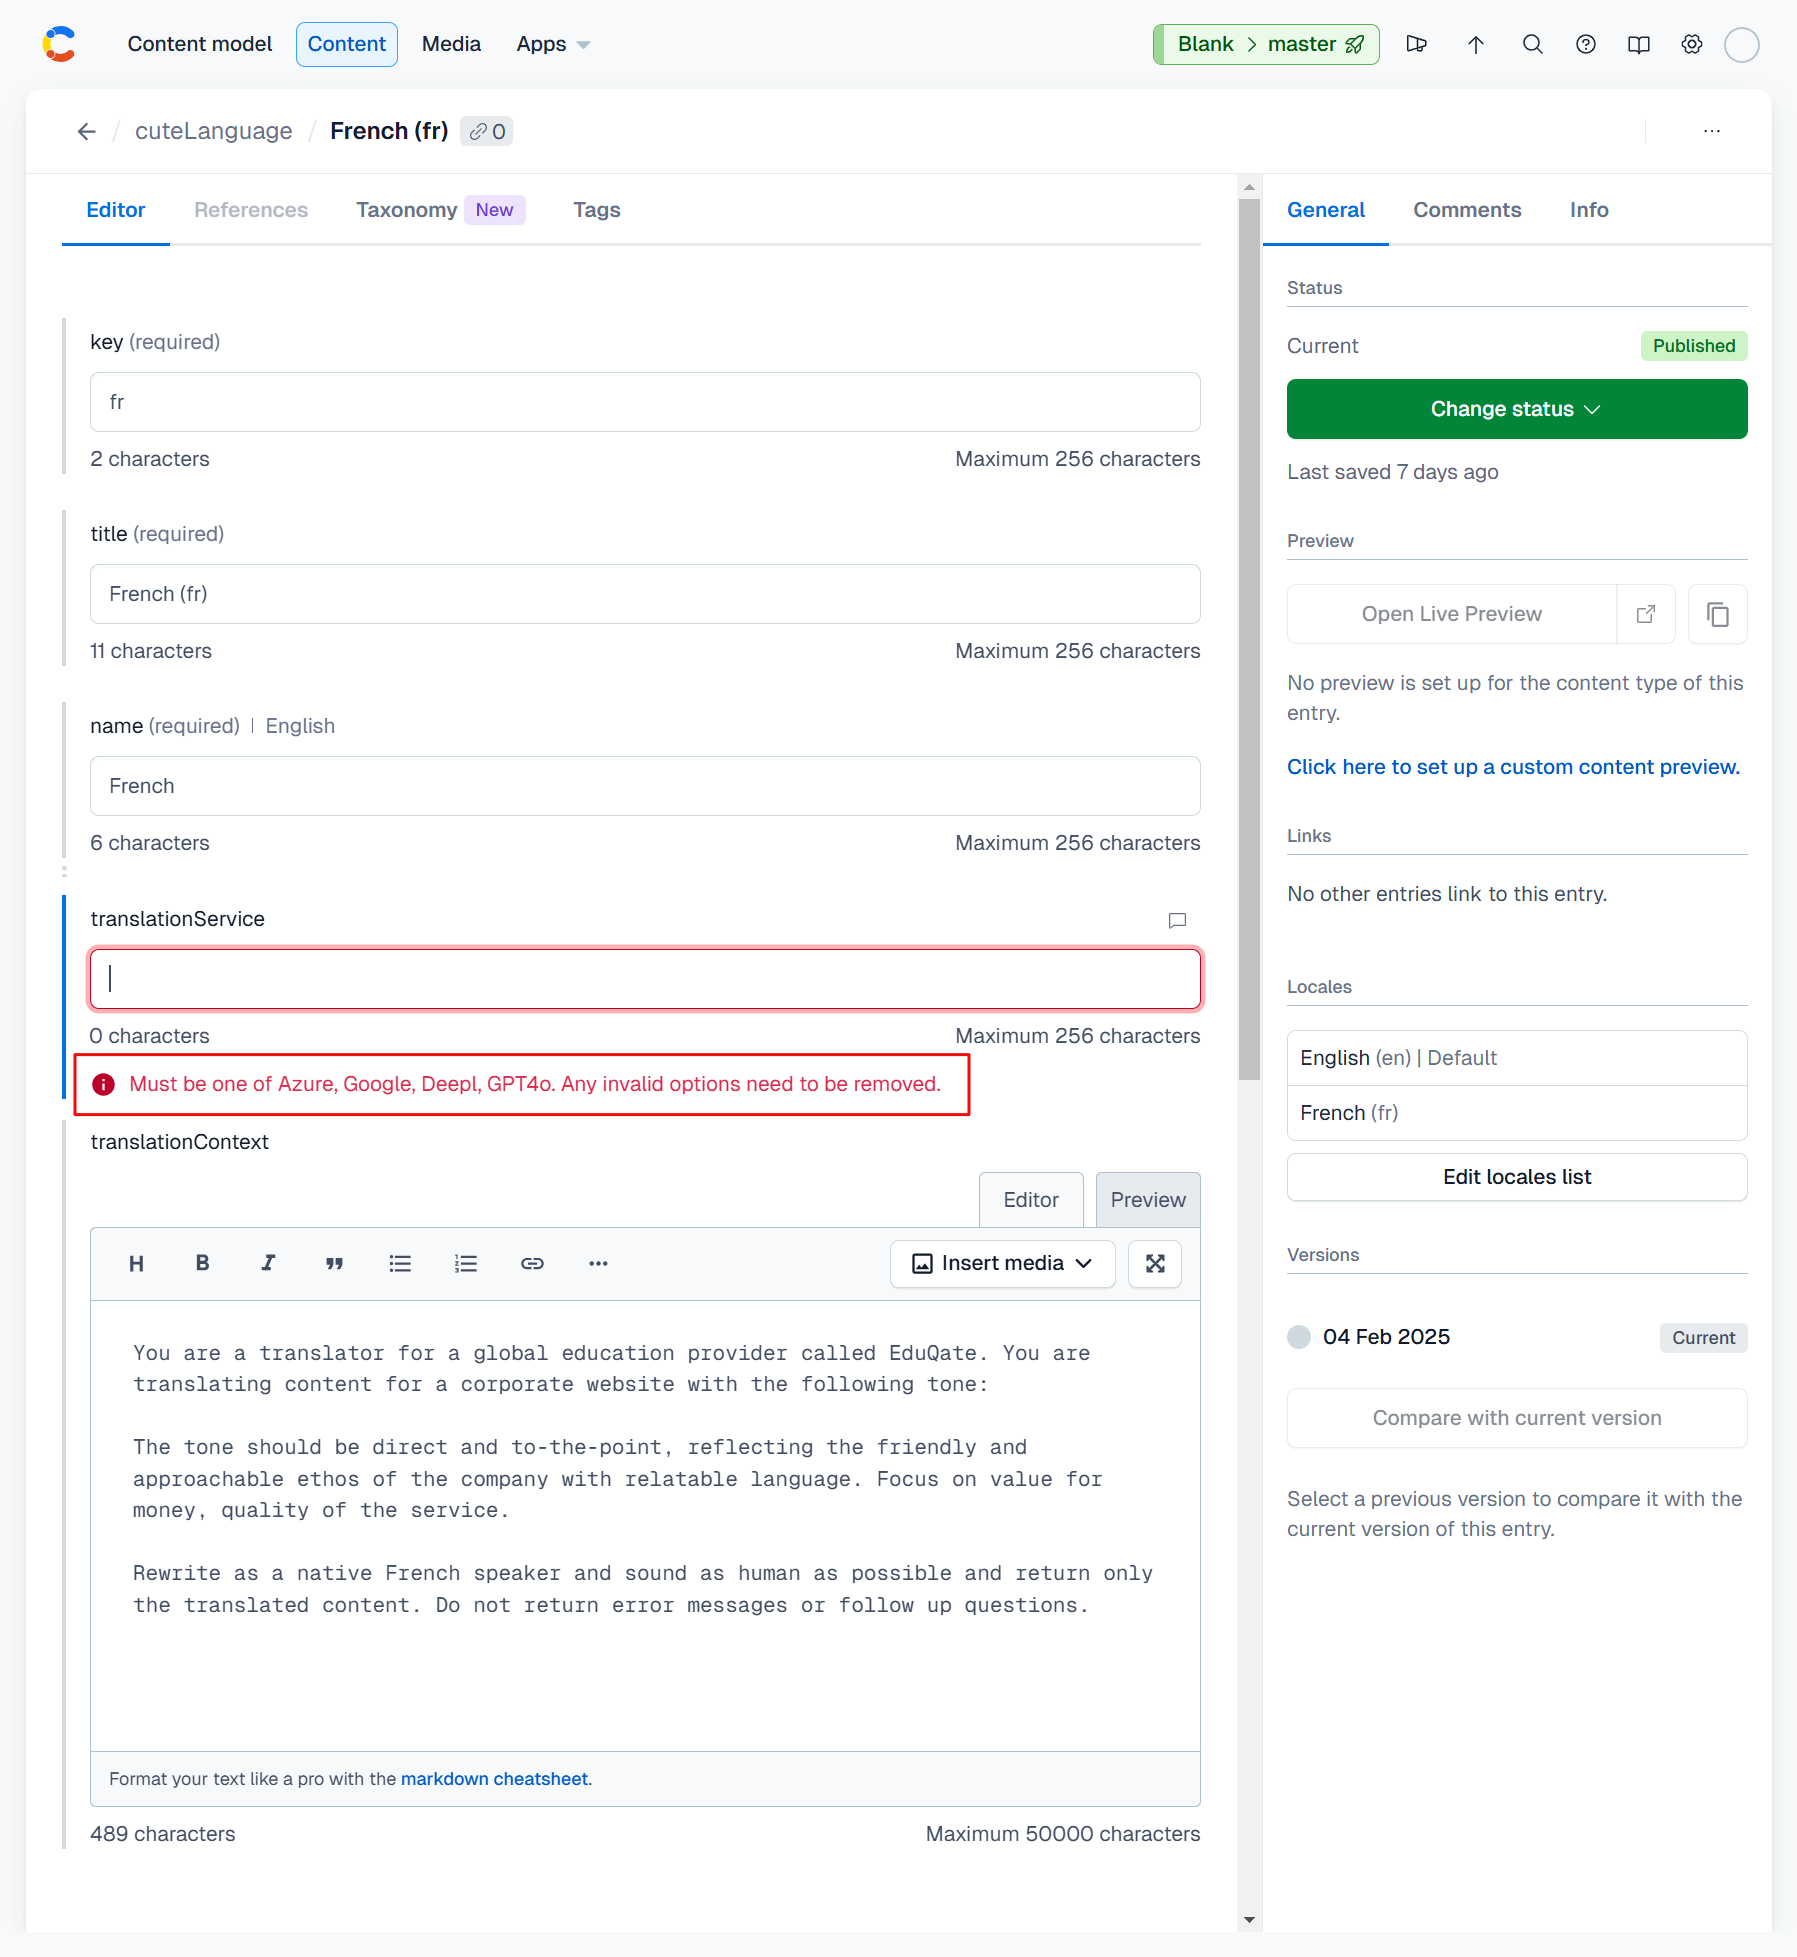
Configuring a translation service per language is simple undertaking. Edit (or add) your language of choice in the cuteLanguage content type and set the translationService field to Azure, Google, Deepl or GPT4o, based on your preference.
The translationContext field hosts advanced translation options. Typically, for GPT4o you can use this field to set a system message to provide additional context to the default translation prompt. For the other translation services this field is used to store the text ID for a custom translation model or glossary.
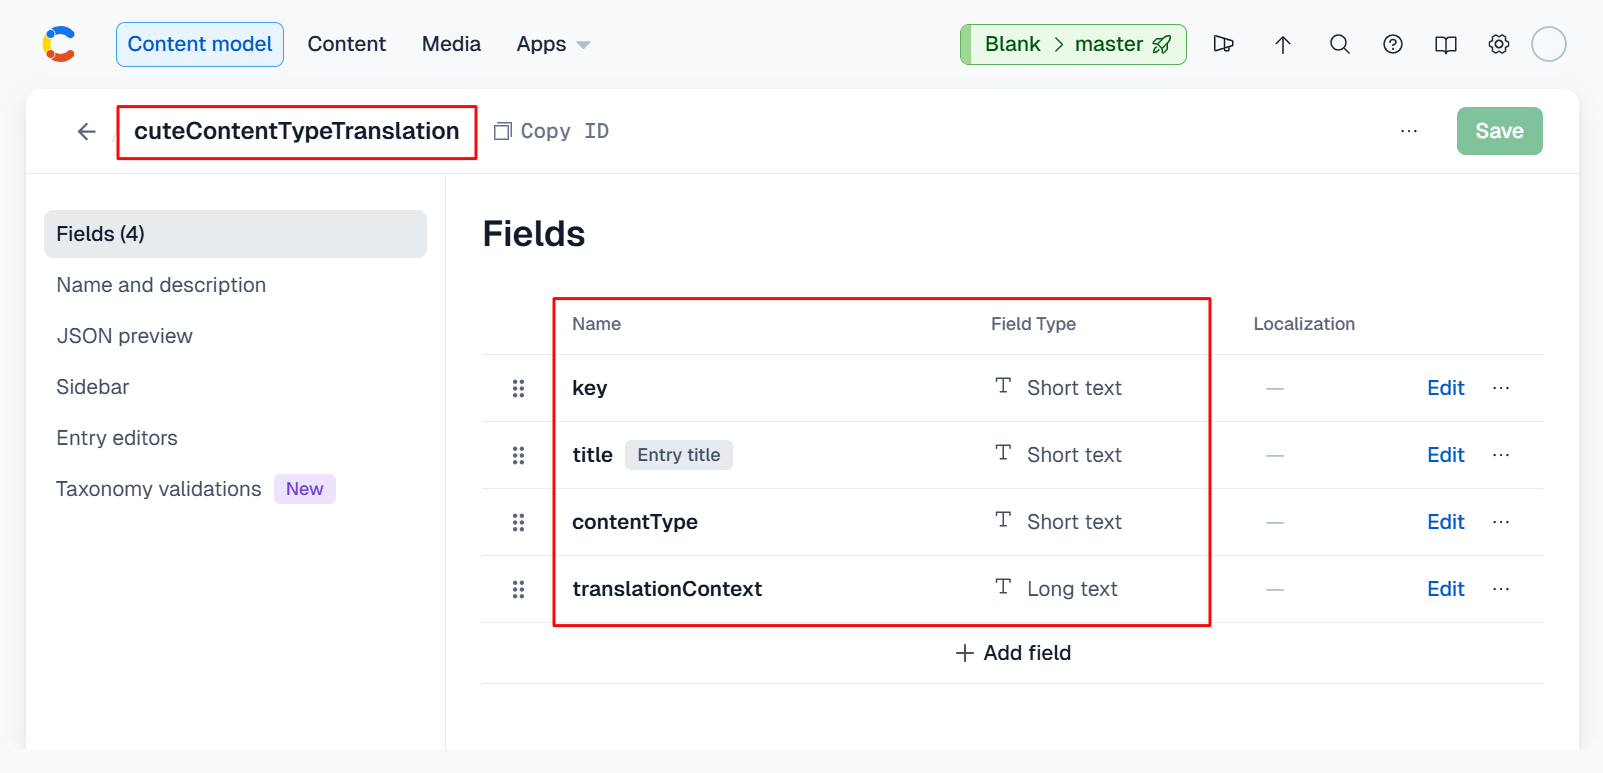
Optionally, in the cuteContentTypeTranslation content type, you can add additional OpenAI prompt configuration per translated content type. We'll explain this further in the examples below.
If no translation service is specified, Azure Translation Service will be used.
We're going to translate the content of the viewCourseByLocation.motivation field which we generated in this section into French.
Start by adding a locale for French to your Contentful space and enabling localization of the motivation field in the viewCourseByLocation content type.
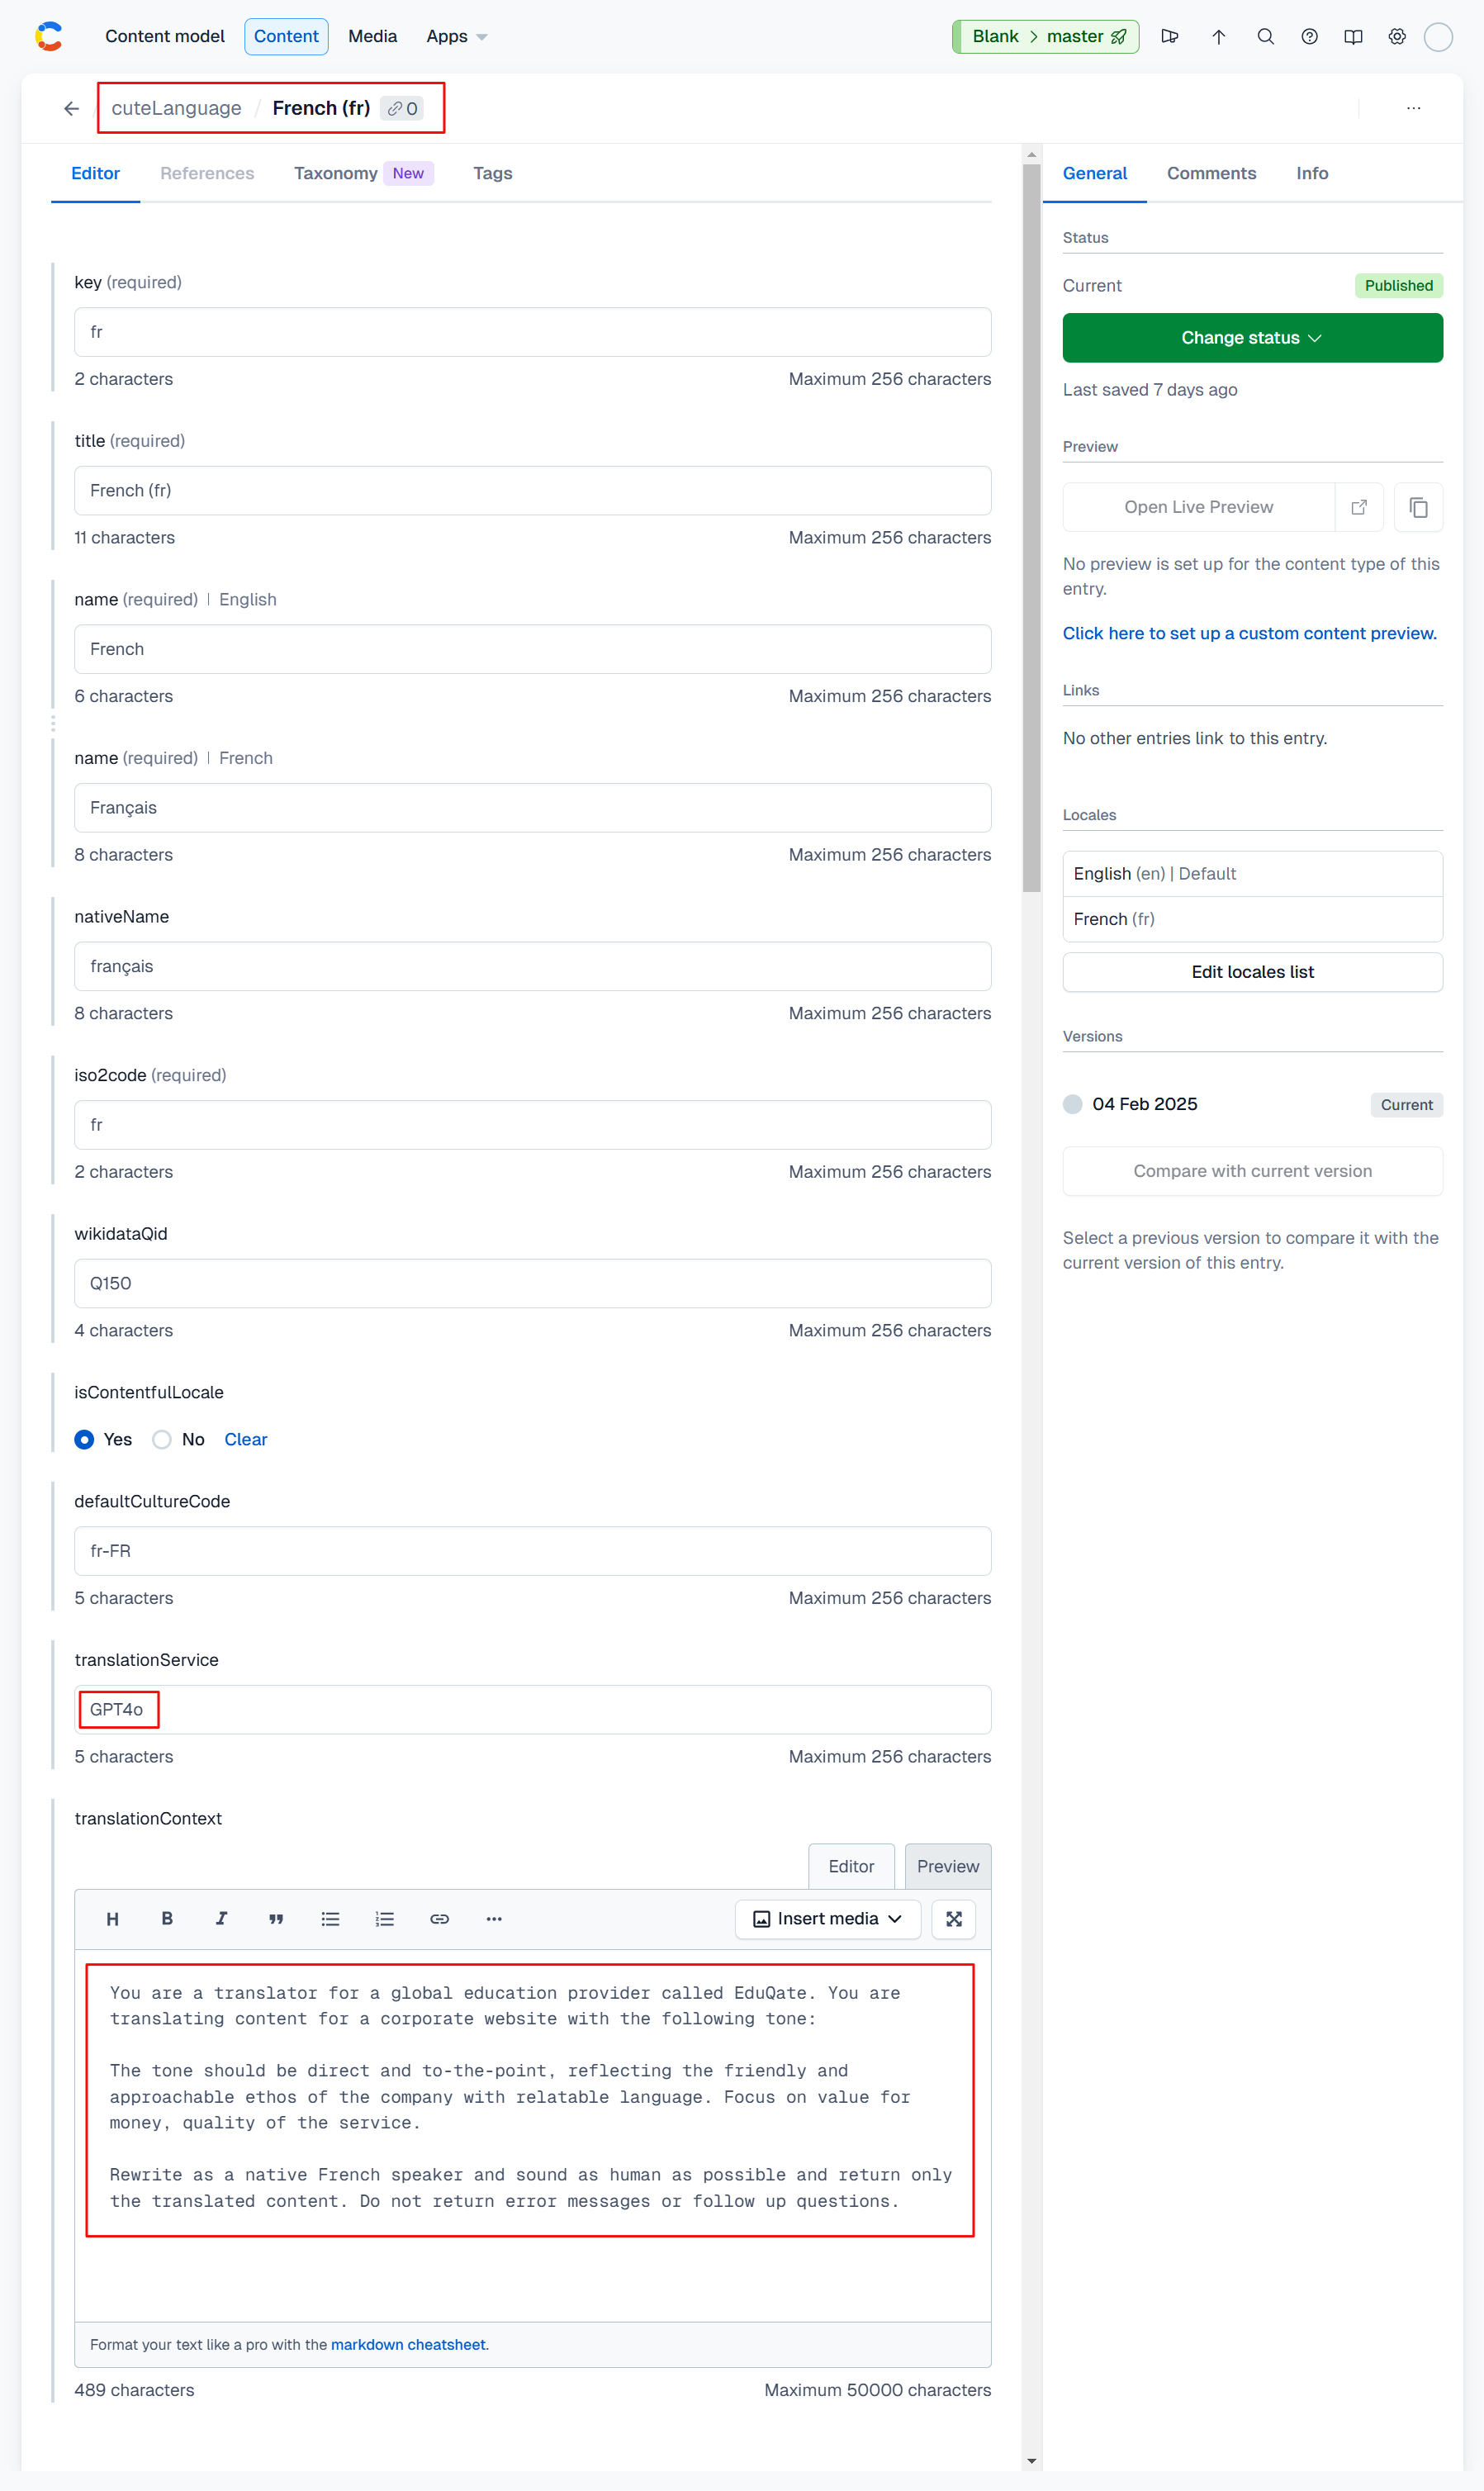
Next we'll add a French entry to cuteLanguage and configure the translationService field as per the screenshot below. Optionally you can add a system message for GPT4o to the translationContext field.
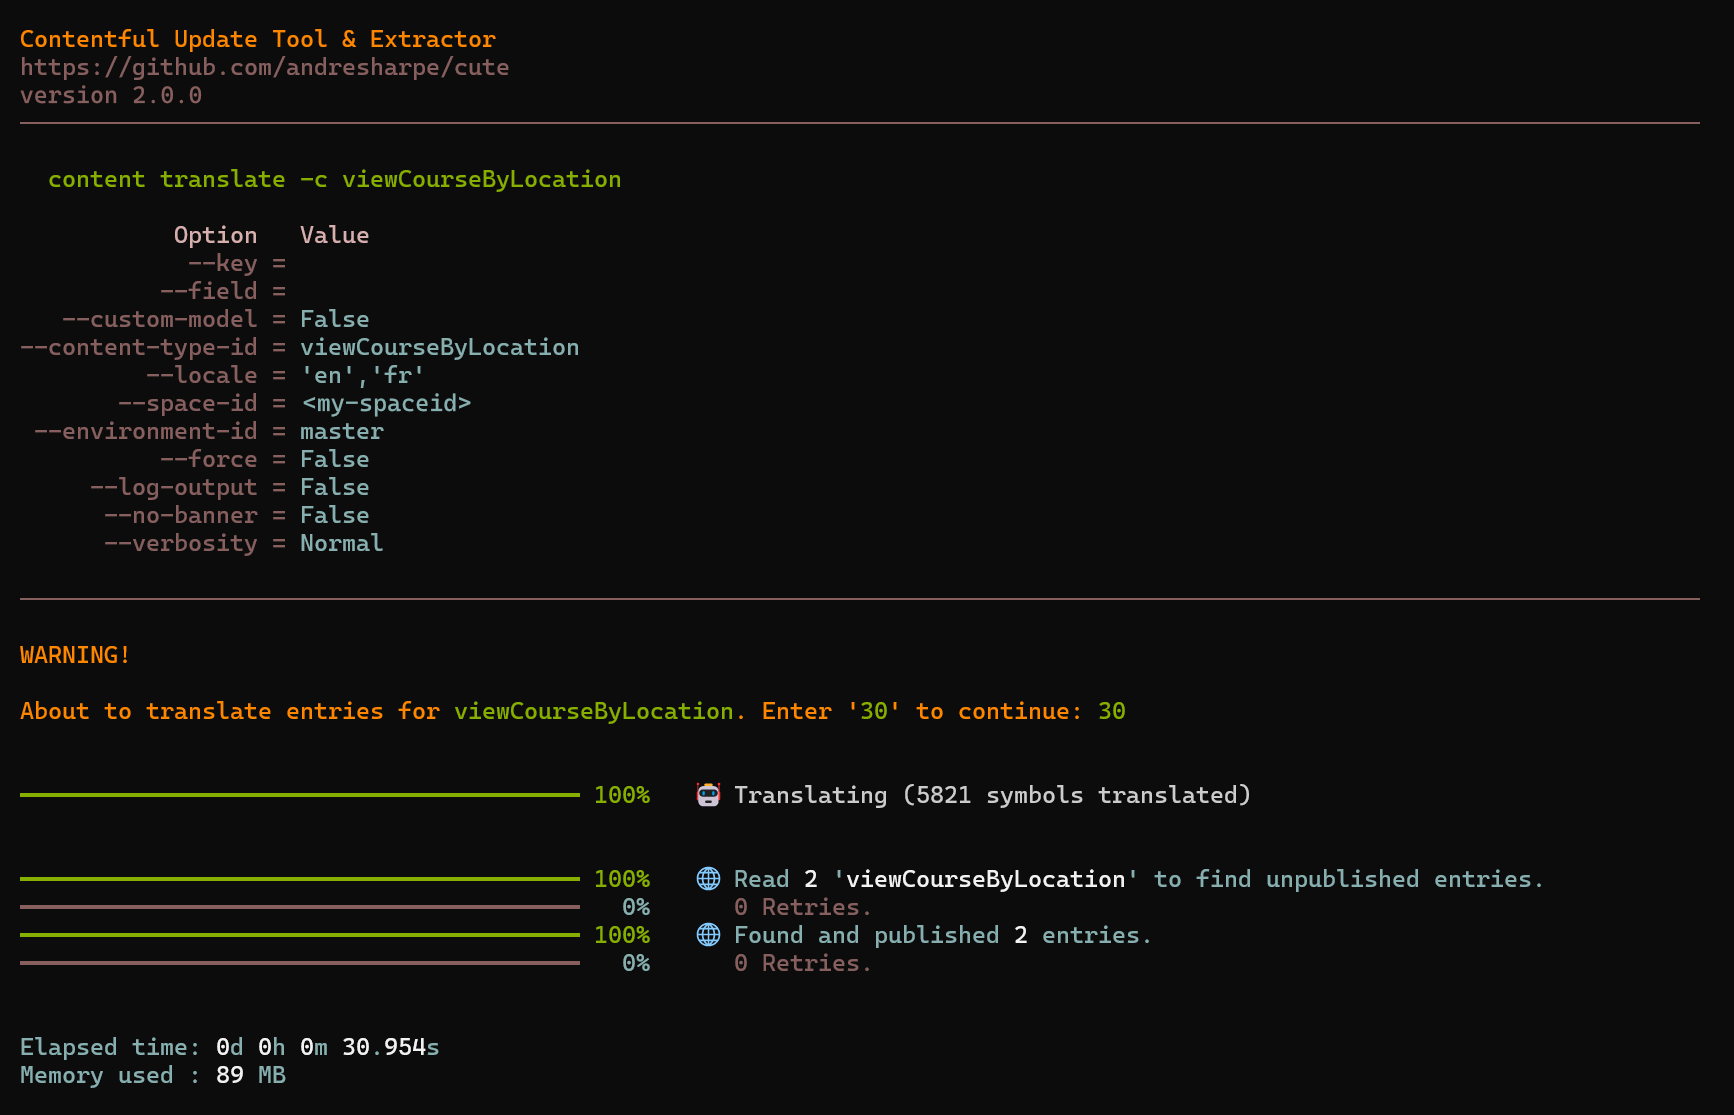
We're ready to translate the content of the motivation-en field and populate the target motivation-fr field. Note that you can specify selected fields and/or locales using the --field and --locale command options, but if you omit these cute will process all localized fields for all locales.
cute content translate -c viewCourseByLocationcute reads and processes our two viewCourseByLocation entries as per the screenshot below.
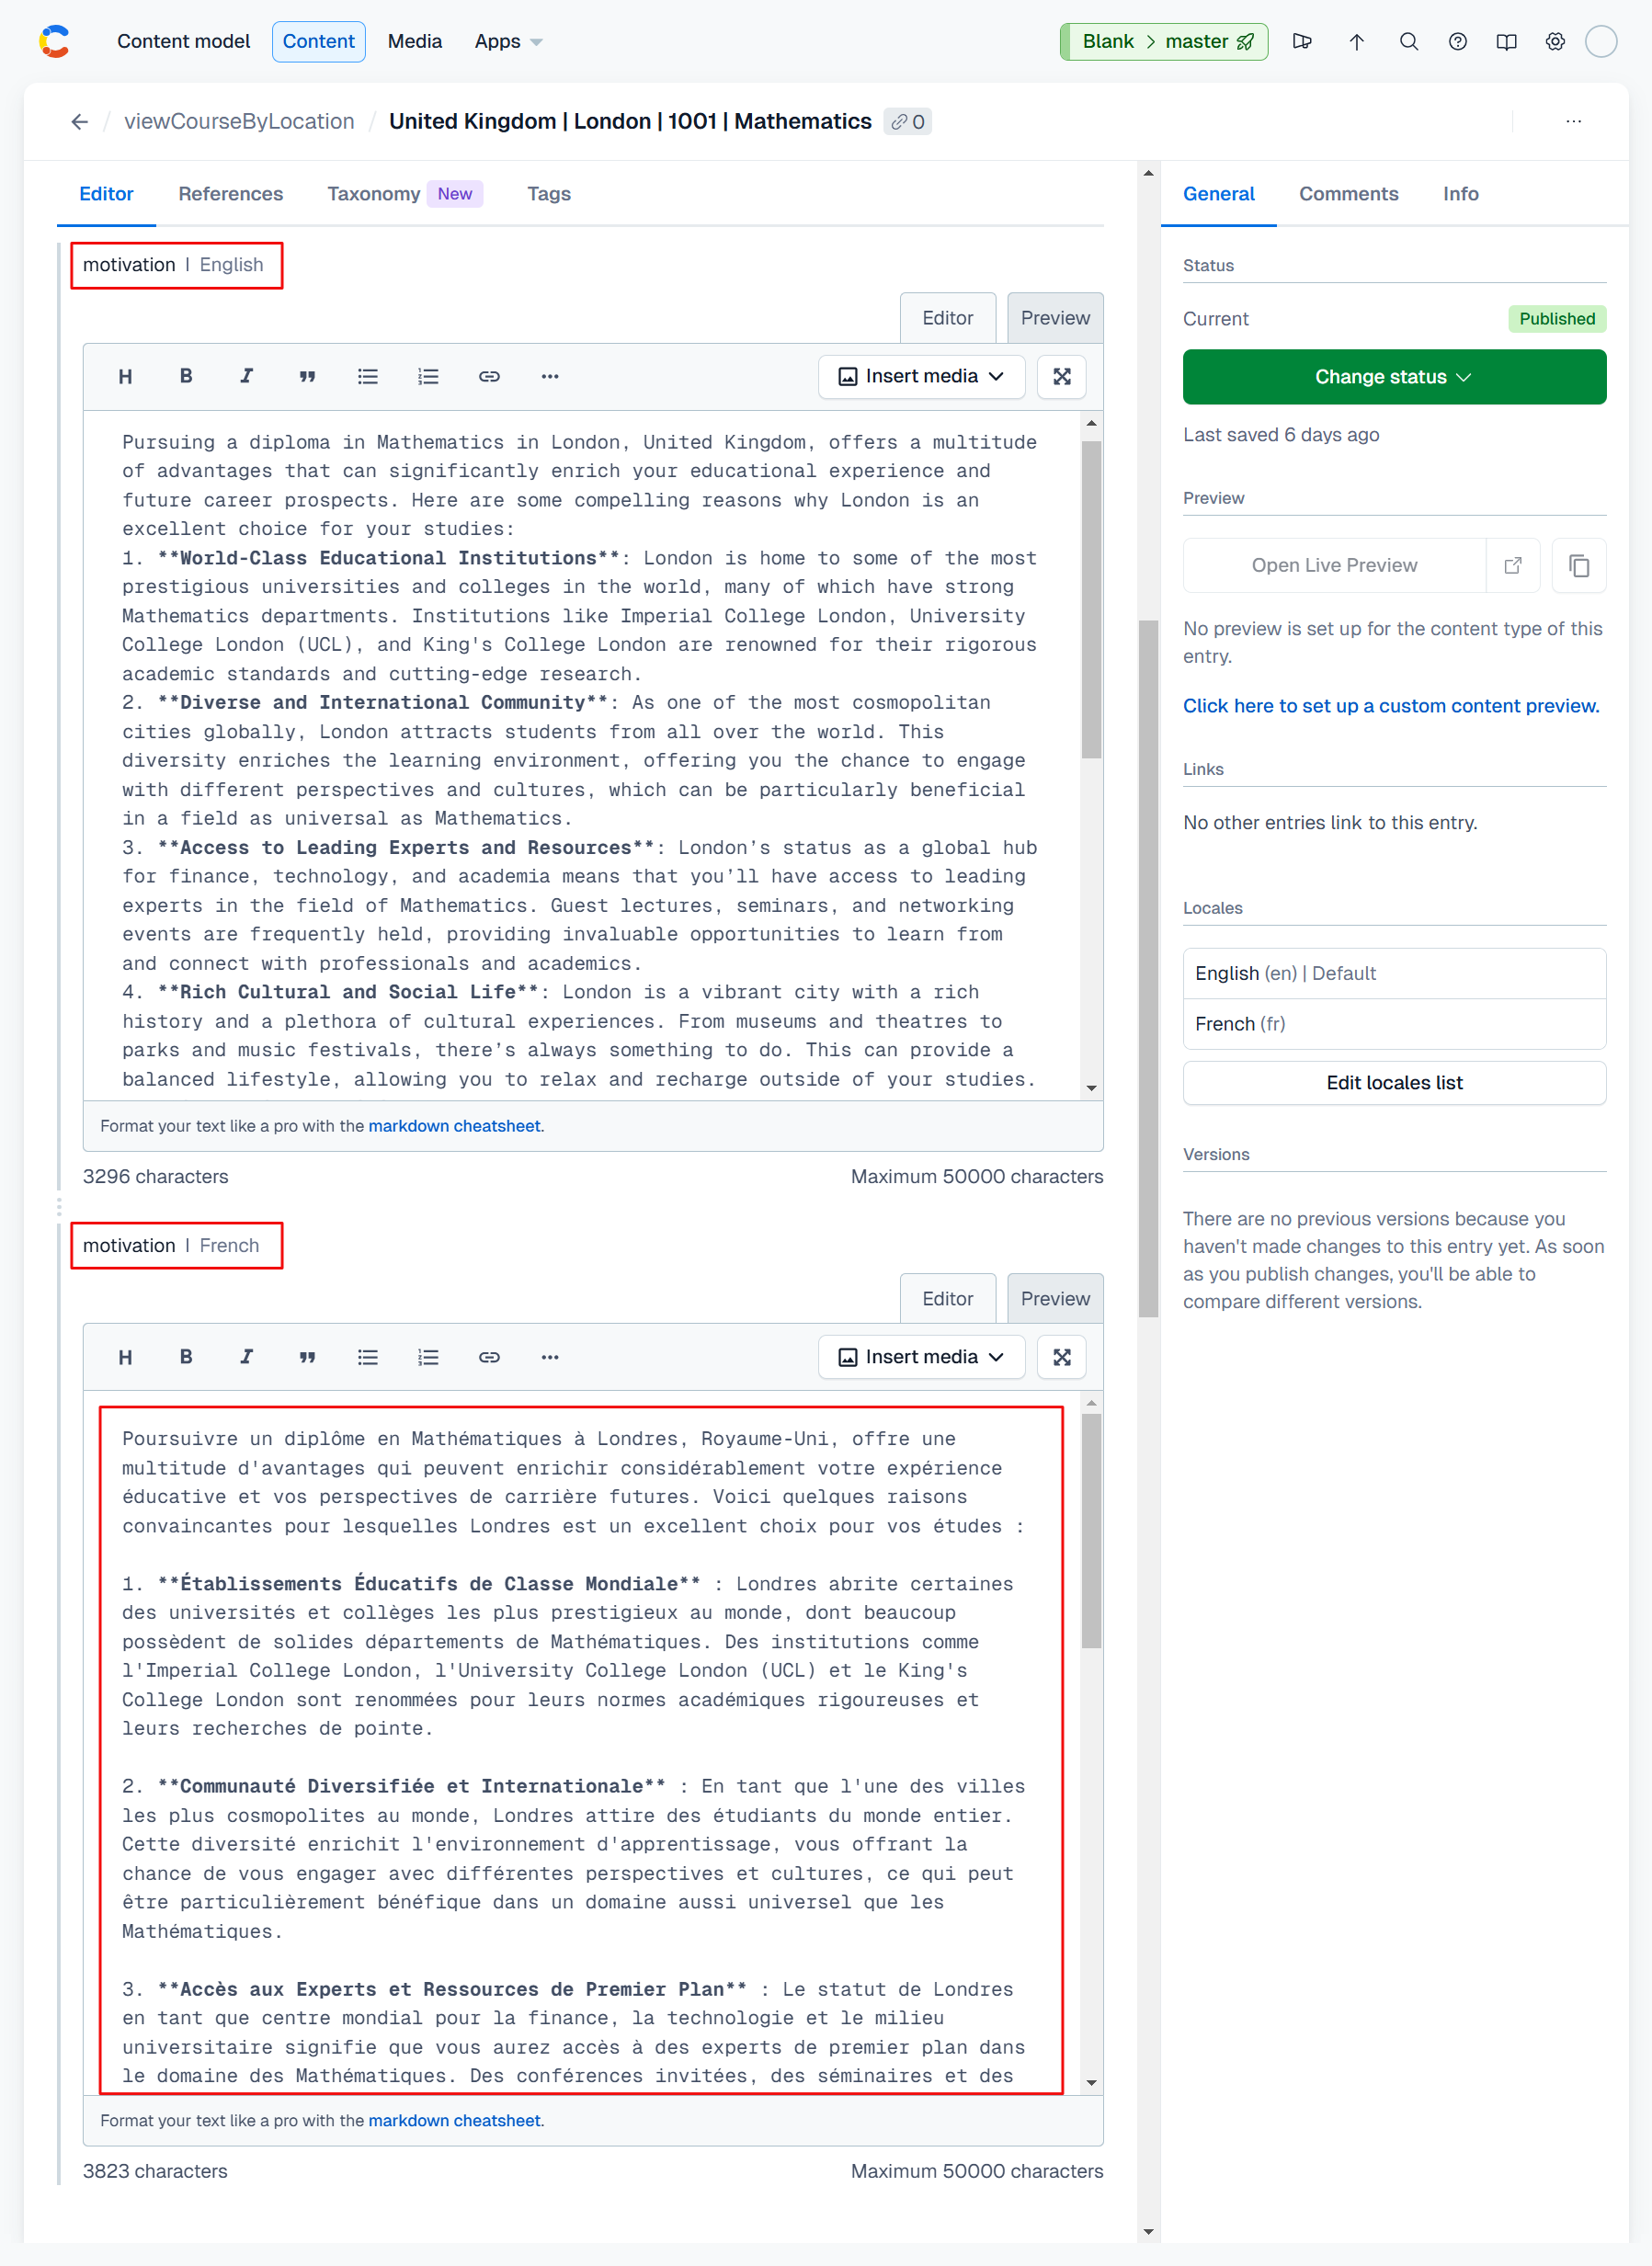
Reviewing the entries in viewCourseByLocation reveals that the motivation-fr field for both entries now contain translated content.
The examples above used OpenAI GPT to translate the required content, and since we used the same OpenAI credentials we supplied when we configured our session using cute login, no additional configuration was required. However, when using other dedicated translation services we'll need some specific configuration settings per service.
☝ cute stores configuration information for translation and other services in a local
.envfile. This file ensures that cute supports autonomous configuration for each environment to which it is deployed. Ensure that this file is present in your application root folder. If not you can use a code editor of your choice to create a new file and save it with the.envfile name.
See the code snippet below as an example of required configuration information for the Azure, Google and DeepL translation services respectively.
Cute__AzureTranslatorApiKey=<my_azure_apikey>
Cute__AzureTranslatorEndpoint=<my_azure_endpoint>
Cute__AzureTranslatorRegion=<my_azure_region>
Cute__AzureTranslationCategory=<my_azure_category>

Cute__GoogleApiKey=<my_google_apikey>

Cute__DeeplApiKey=<my_deepl_apikey>
Replace everything between and including the < and > characters with your credentials and configuration settings relevant to your selected translation service.
All that remains is to set the translationService value in cuteLanguage to your selected service, as per the screenshot below:
cute can be run as a stand-alone server in two modes:
- Scheduler mode runs all or specific entries from the
CuteSchedulecontent type in your Contentful space. - Webhooks mode will process callbacks configured in—and triggered from—your Contentful space.
Typing cute server scheduler --help will show the full usage and options.
USAGE:
    cute server scheduler [OPTIONS]

OPTIONS:
    -h, --help                  Prints help information
    -p, --port                  The port to listen on
    -k, --key                   CuteSchedule Key
Prior to running cute as a scheduler for the first time you will need to define a cuteSchedule content type in your Contentful space as per the attached screenshot below:
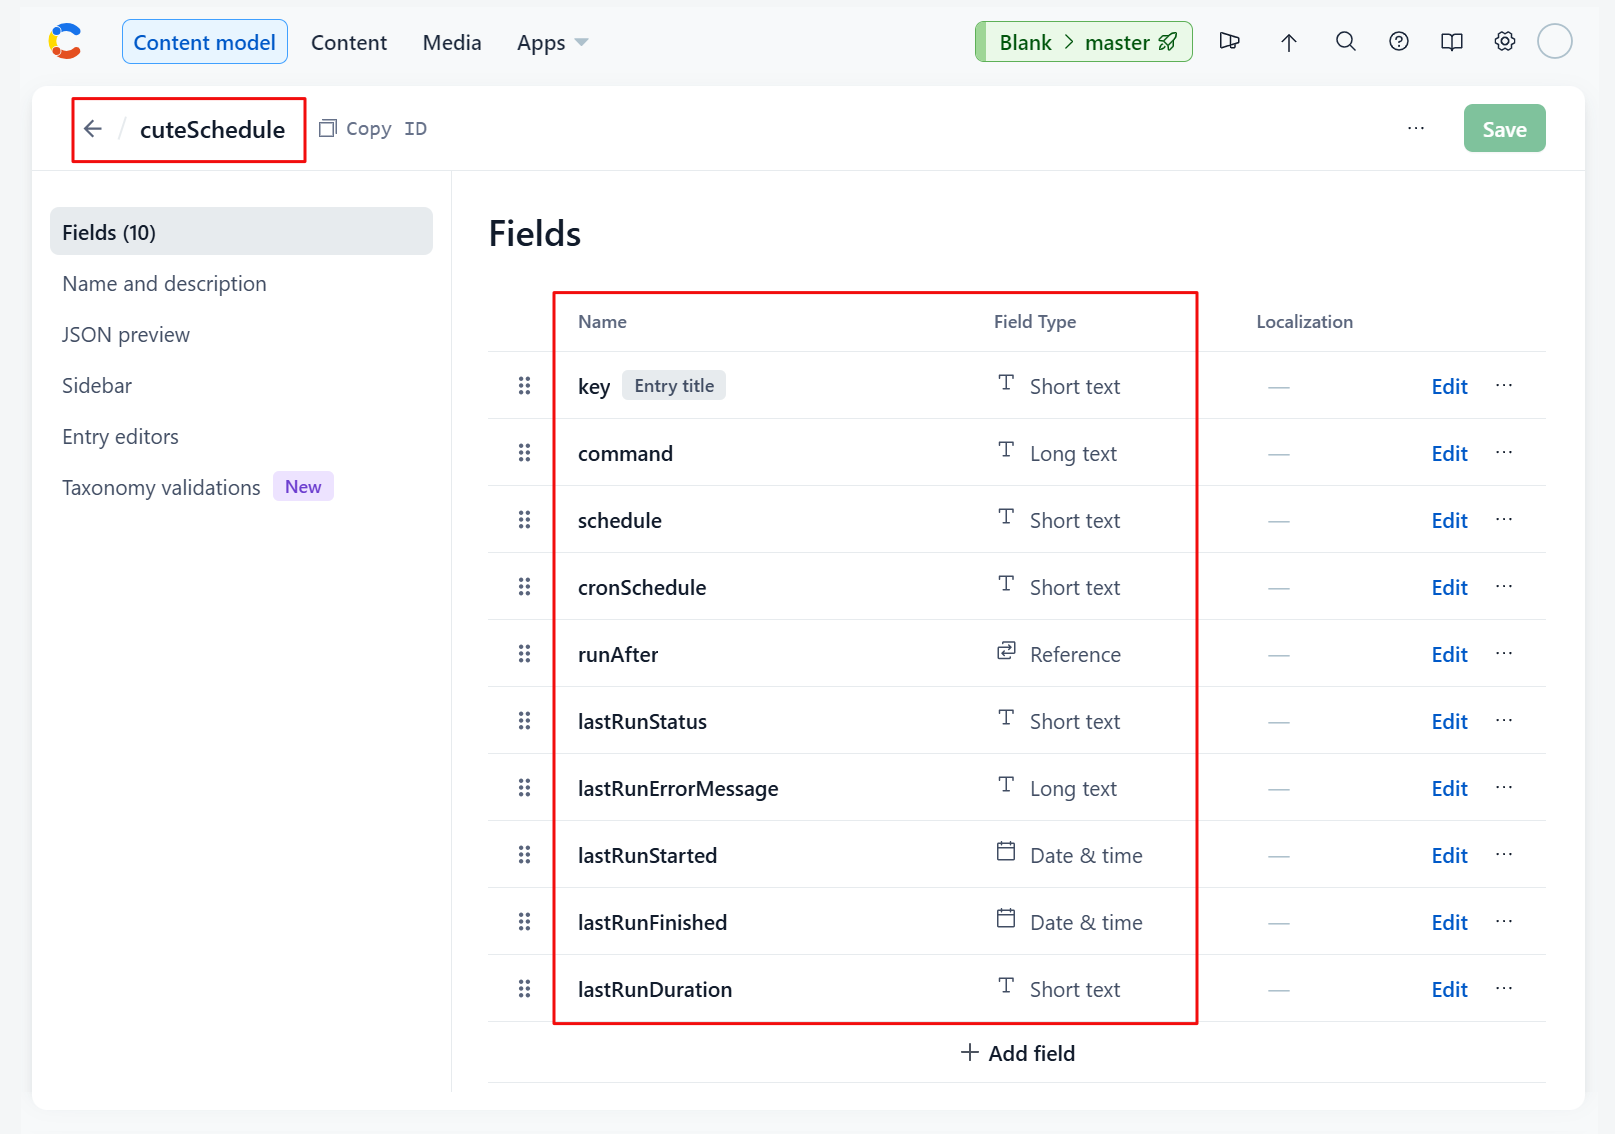
You can then configure your scheduled commands, all of which will be loaded when the scheduler is started. Alternatively, scheduled commands can be individually invoked by referencing them with the optional --key command option.
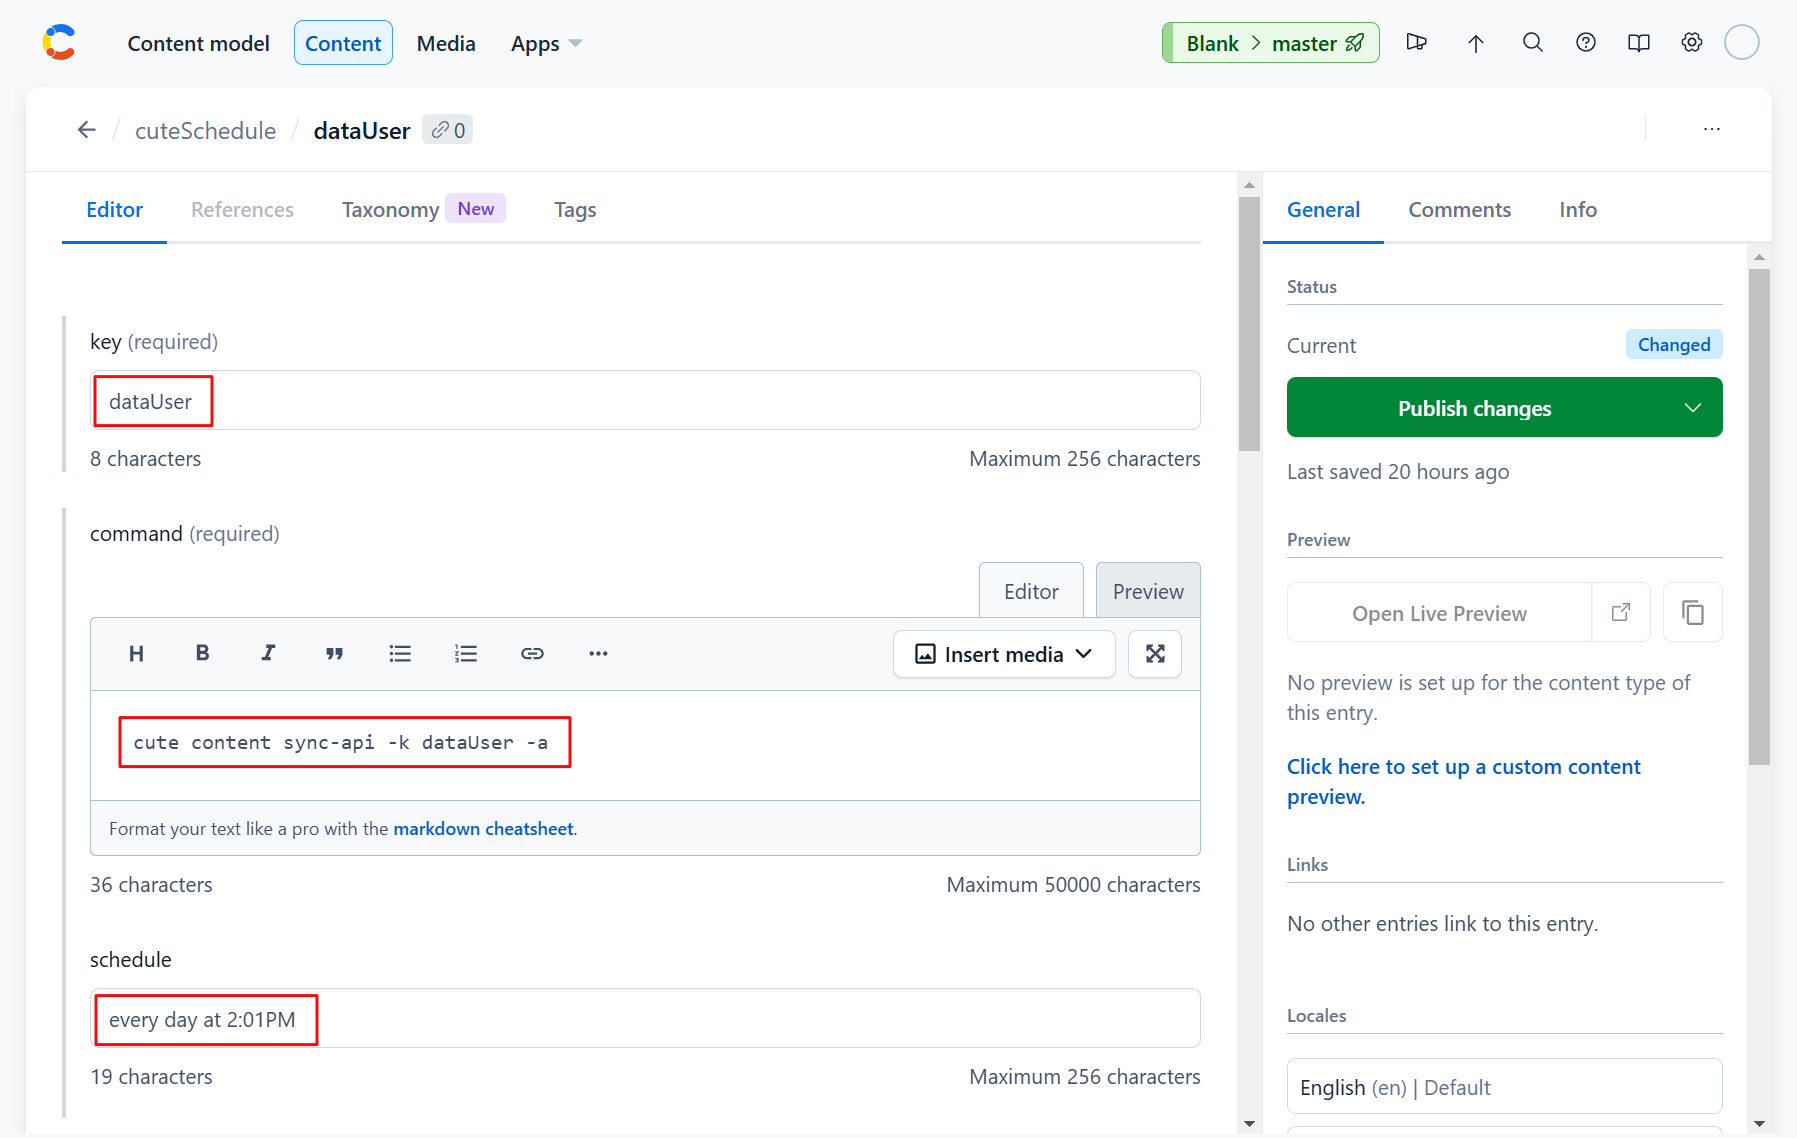
The screenshot below illustrates how we create a scheduled entry for the dataUser content type which we synced from an external API.
We'll configure it to invoke the dataUser entry we created in the cuteContentSyncApi section, and we'll schedule it to run at 2:01 p.m. every day.
All that remains is to run the command. We'll invoke it to listen on port 2345.
cute server scheduler --port 2345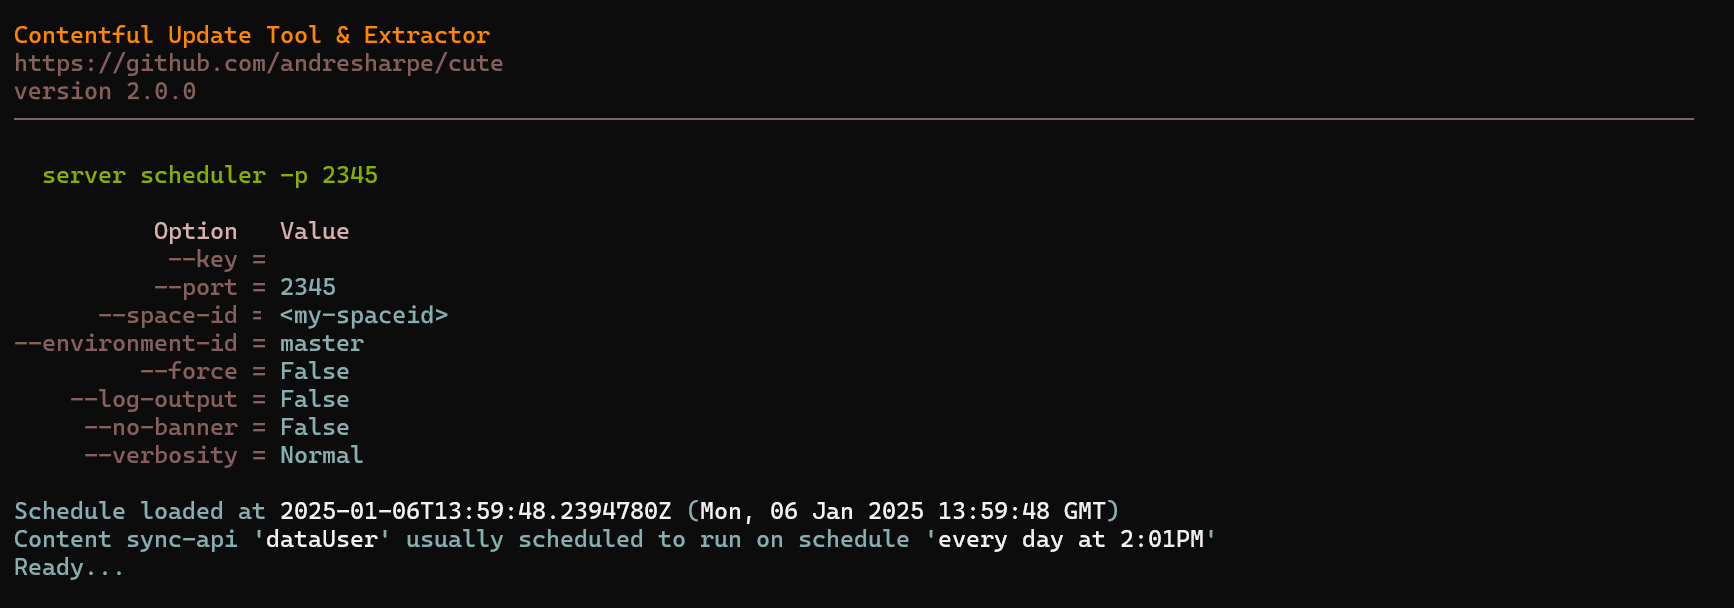
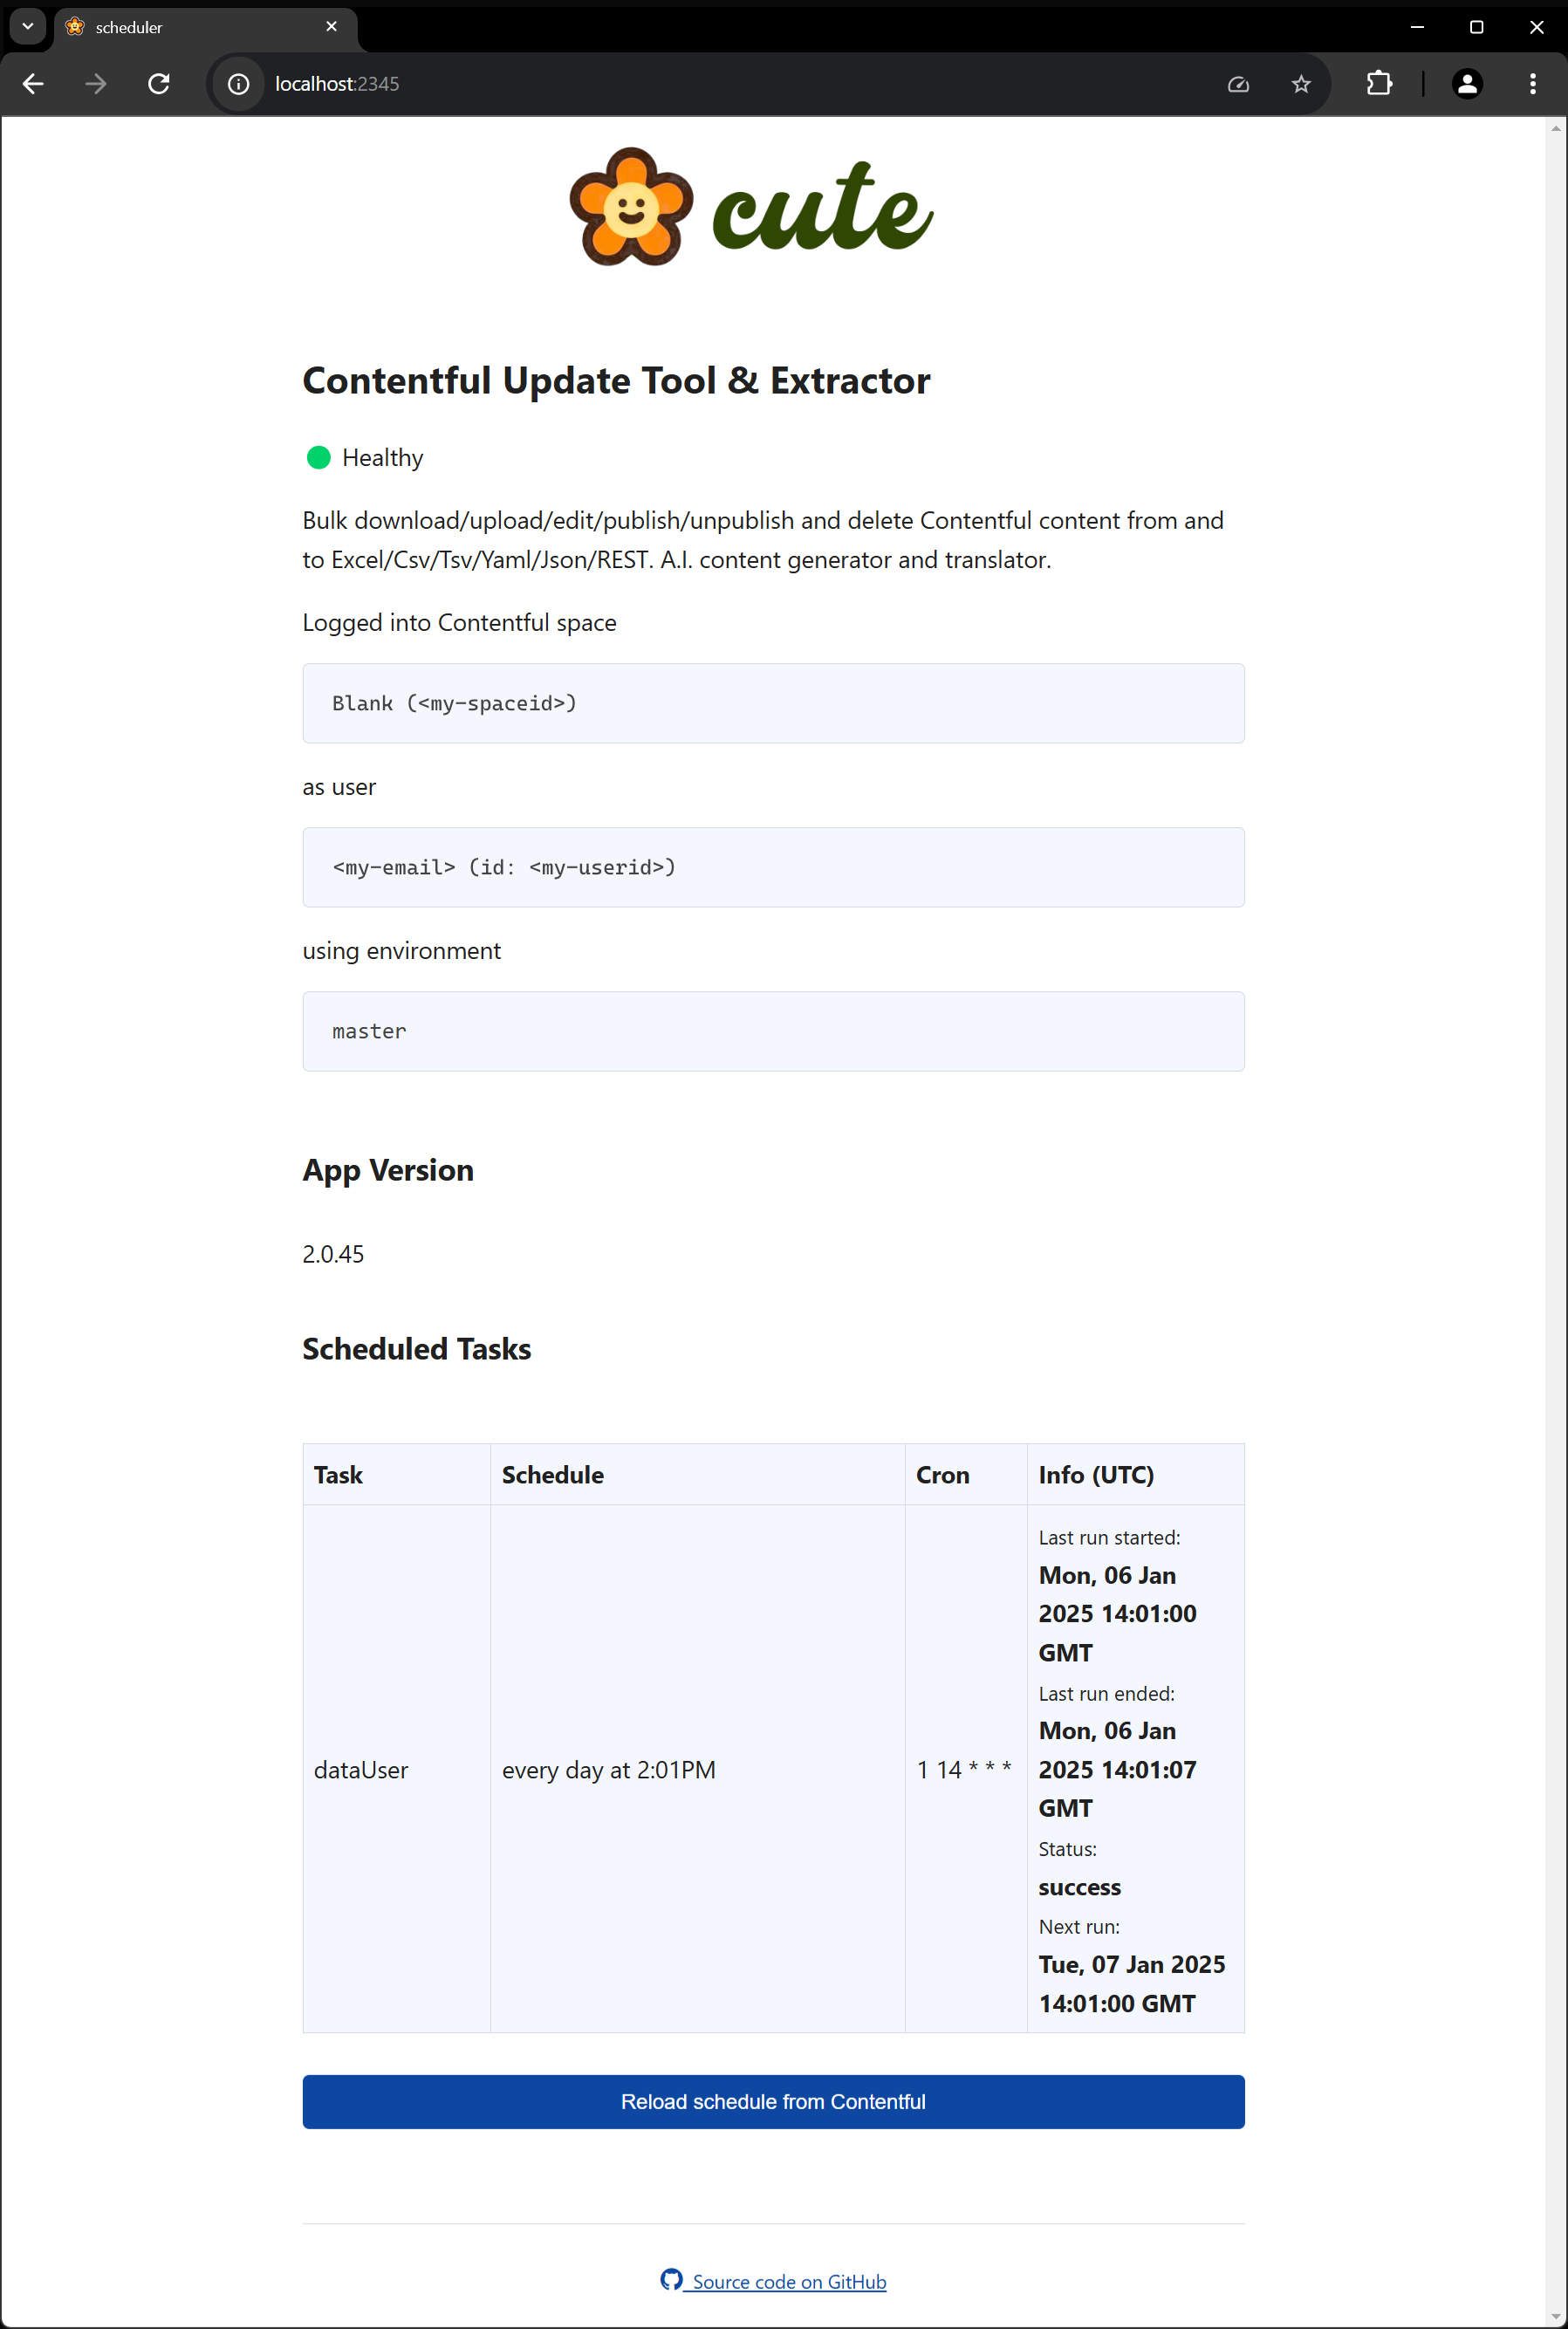
cute also exposes a monitoring interface on the port that the server is running. All the cuteSchedule entries are listed along with their configured properties.
When the scheduled entries are triggered, either by a cron schedule or a sequenced condition, the relevant command will be run and information will be displayed as per the screenshot below:
Running cute in server webhooks mode is a convenient way to process any cute command resulting from a content event from within Contentful. The steps required are simple:
- Start a cute server in webhooks mode
- Configure a webhook in your Contentful space along with a relevant payload
- Trigger the event from within Contentful
Typing cute server webhooks --help will show the full usage and options.
USAGE:
    cute server webhooks [OPTIONS]

OPTIONS:
    -h, --help                  Prints help information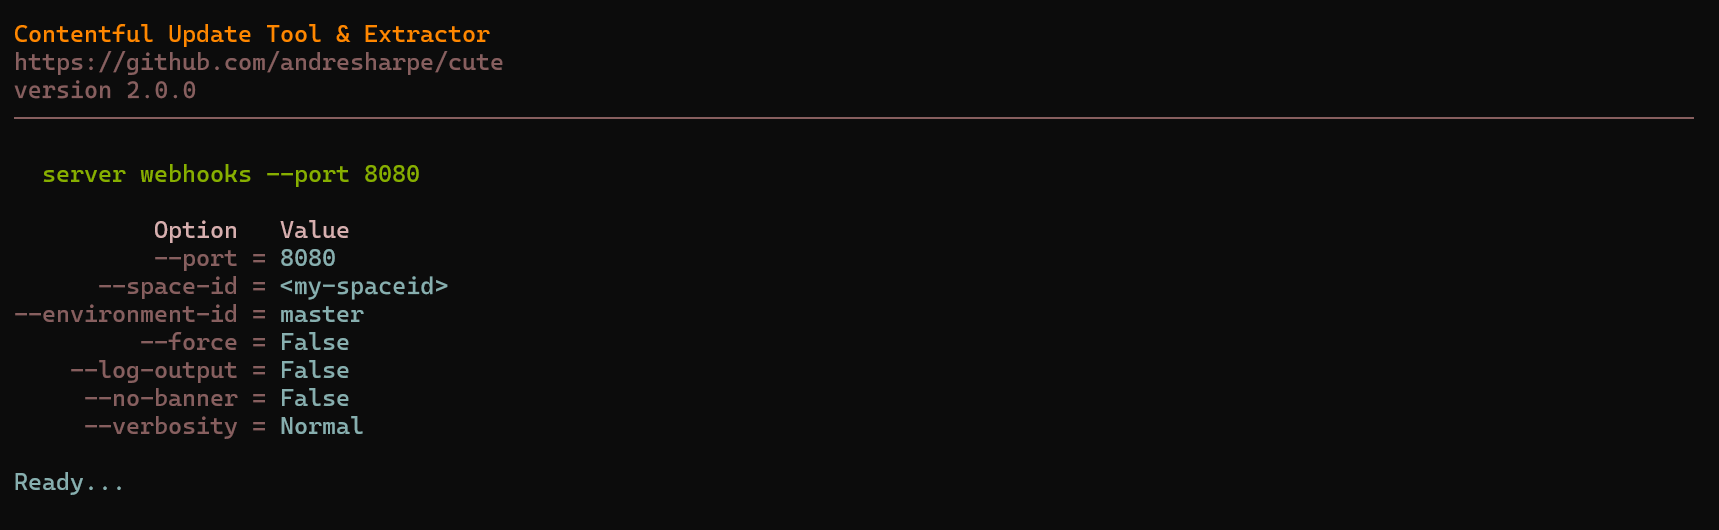
-p, --port The port to listen onLet's start a cute server in webhooks mode by executing the cute server webhooks --port 8080 in a shell of our choice.
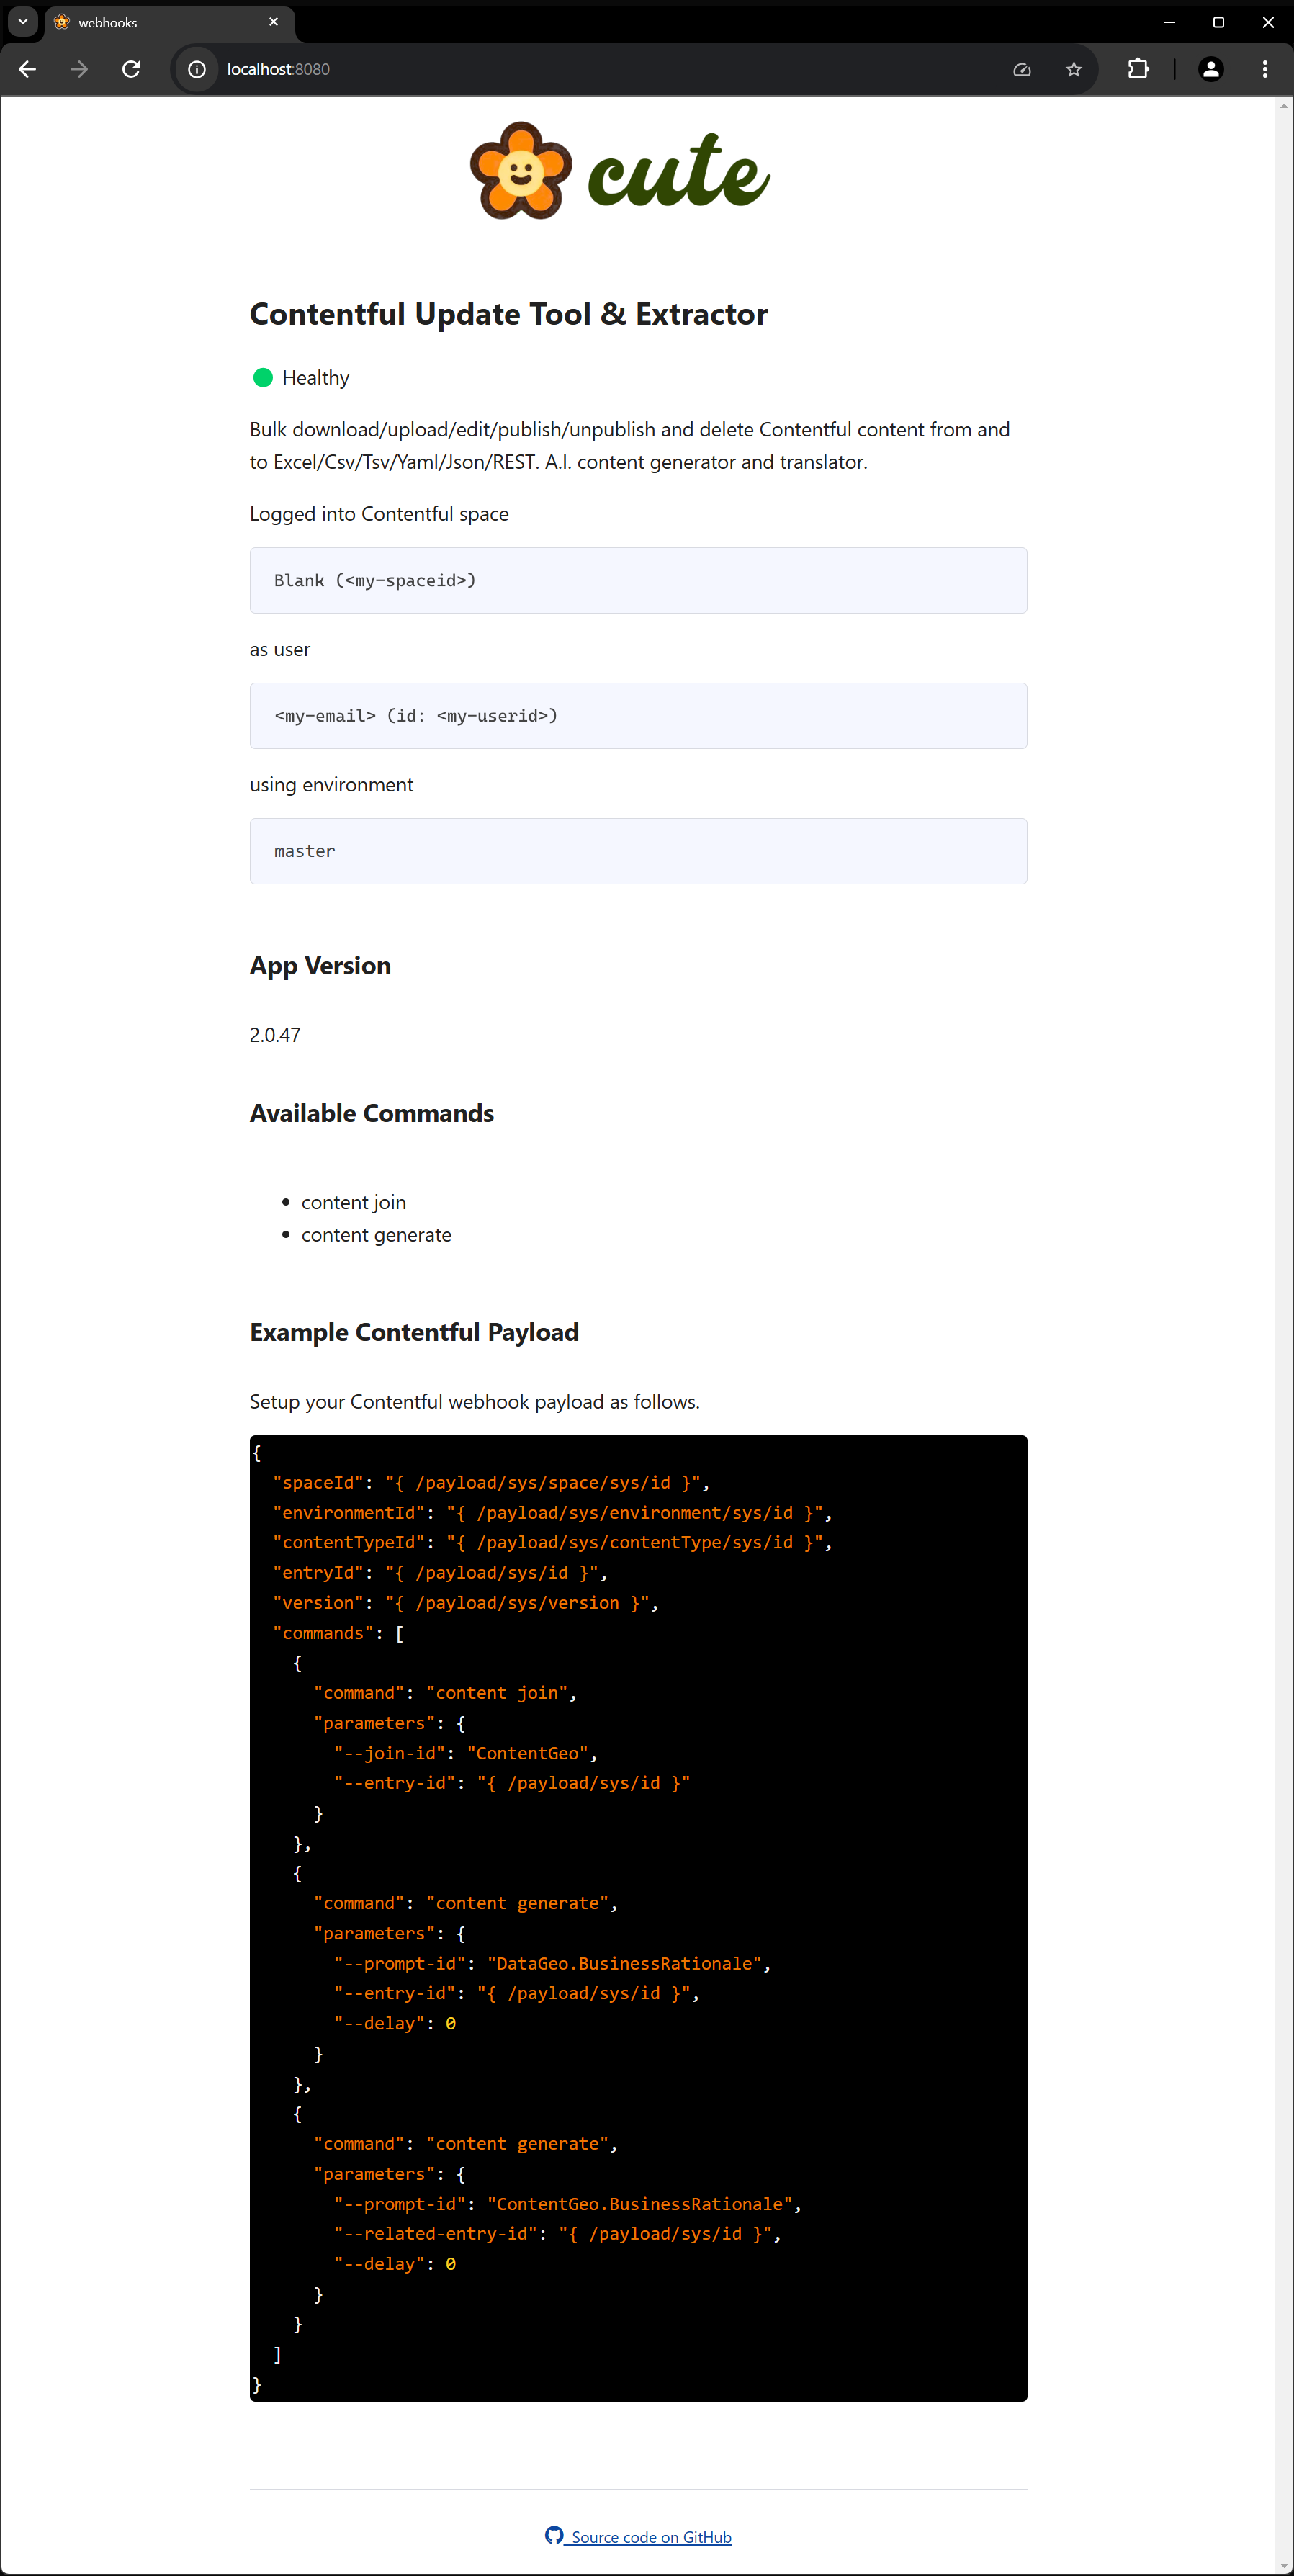
The cute webhooks server is now ready and listening on port 8080, as per the screenshot below:
As with the scheduler mode, cute server also exposes a monitoring interface on the port that the server is running in webhooks mode. See the attached screenshot below:
Next we'll configure a webhook within Contentful that will be triggered when we publish any changes to our diplomaCourse content type, be it an addition or change.

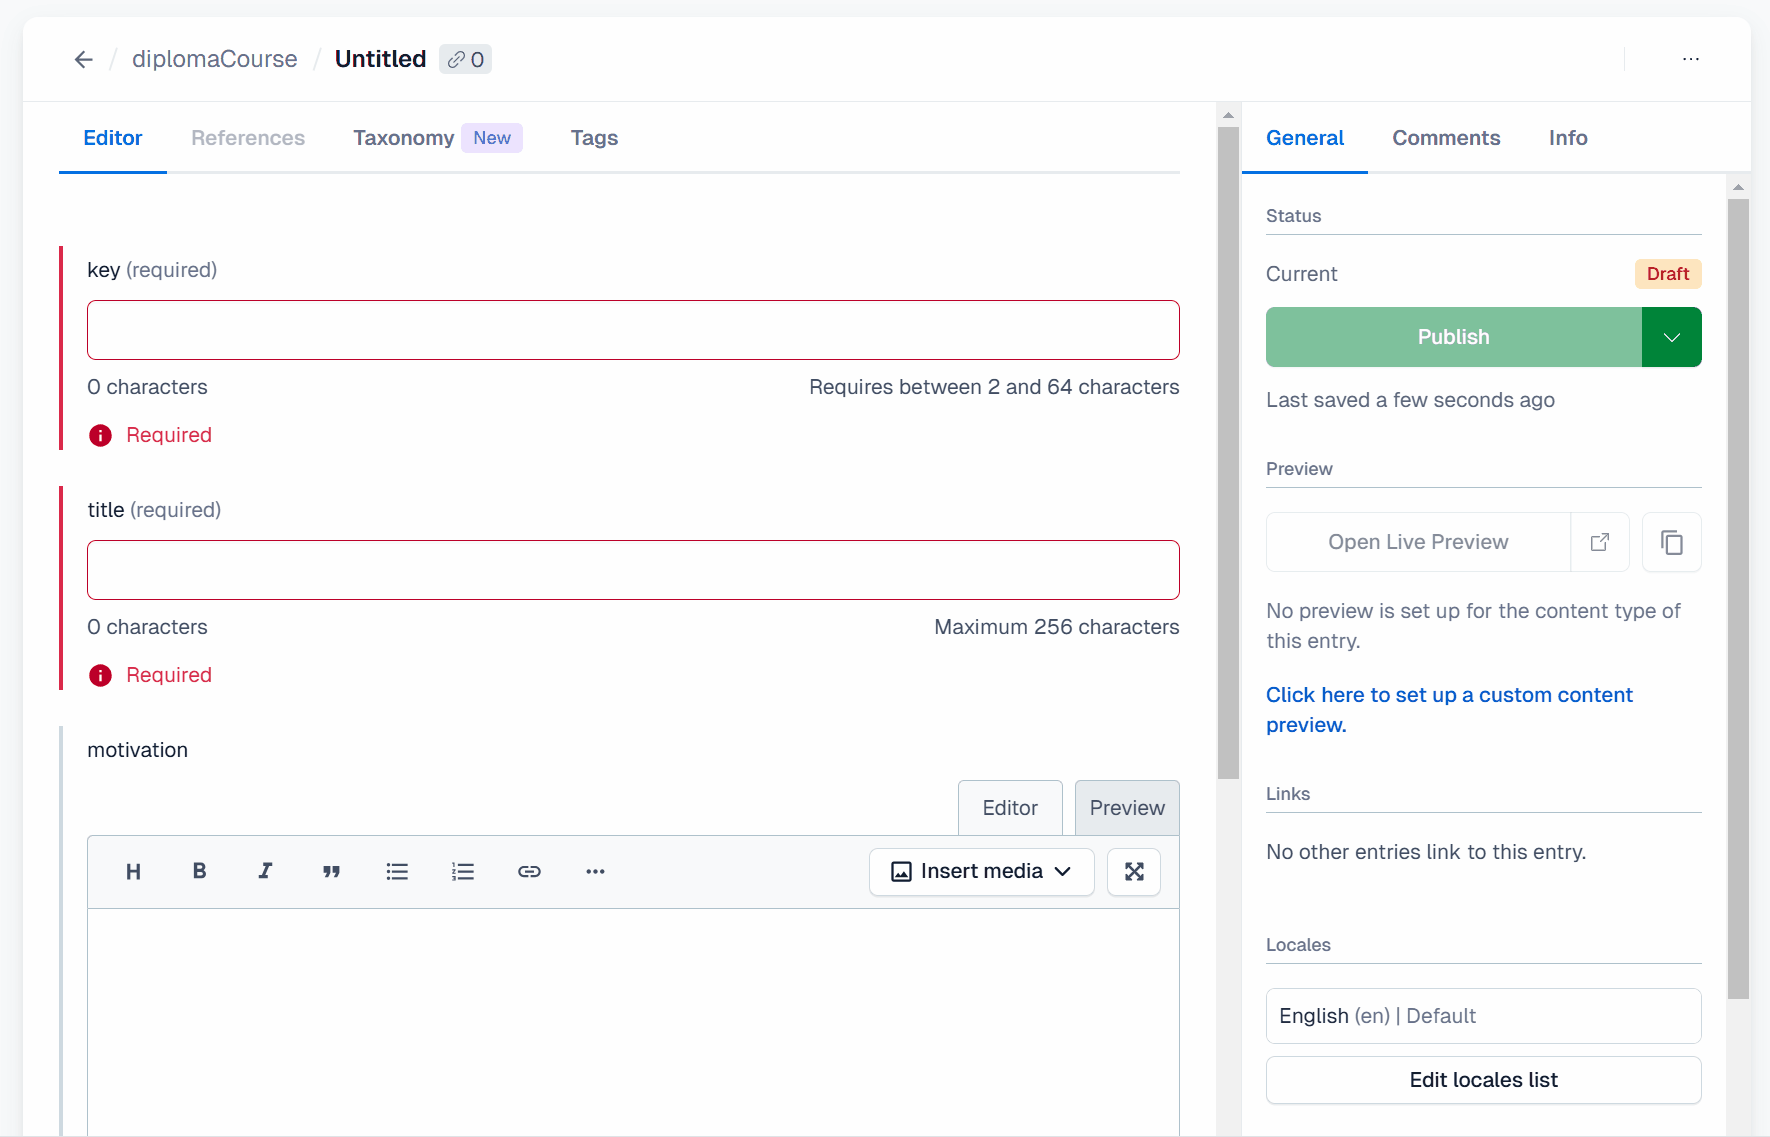
All that remains is to test our webhook server. Now that the server is up and running, and we've configured the webhook for our diplomaCourse content type publish event, we can go ahead an add a new course and click the 'publish' button.
As per the attached screenshot animation below, after a few seconds the motivation field is populated.
To enable local testing of our cute webhooks server, we've used ngrok. They have a useful guide here detailing how to test Contentful webhooks with local servers.
Contentful also has documentation on configuring and implementing webhooks here.
cute supports structural subtyping through the type scaffold command option. You can export TypeScript (TS) or .NET (CS) interface declarations, or a simple Excel file with individual worksheets detailing your content model. This feature is especially useful to keep your JavaScript or .NET projects in sync with your content types.
USAGE:
    cute type scaffold [OPTIONS]

OPTIONS:
    -h, --help            Prints help information
    -c, --content-type    Specifies the content type to generate types for. Default is all
    -o, --output          The local path to output the generated types to
    -l, --language        The language to generate types for (TypeScript/CSharp)
-n, --namespace The optional namespace for the generated typecute has a number of native content types that it uses internally to configure and enable a number of its bulk operation features (cuteContentSyncApi and cuteContentJoin), AI options (cuteDataQuery and cuteContentGenerate), Translation services (cuteLanguage and cuteContentTypeTranslation) and Server options (cuteSchedule).
cute offers a useful command that will do all the heavy lifting for you related to creating all native content types required by cute for all its advanced features.
Typing cute content testdata --help will show the full usage and options.
USAGE:
    cute content testdata [OPTIONS]

OPTIONS:
    -h, --help                  Prints help information
    -s, --space-id <ID>         The Contentful space identifier
    -e, --environment-id <ID>   The Contentful environment identifier
        --force                 Specifies whether warning prompts should be bypassed
    -n, --number                The number of user entries to generate. (default=1000)
Let's execute the command and review the results.
💡 Remember to ensure your cute session is configured correctly. It might be a good idea to run
cute logoutfollowed bycute loginprior to running this command to reset your session configuration and credentials.
cute content testdataThe terminal output confirms that the cute content types have been generated, along with 10 entries for the testUser content type, as seen in the screenshot below:

Clicking the Content model tab in our Contentful space reveals that all of the required cute content types have been scaffolded. In addition there are a few test data content types to get you started. Feel free to delete those should you not require them.
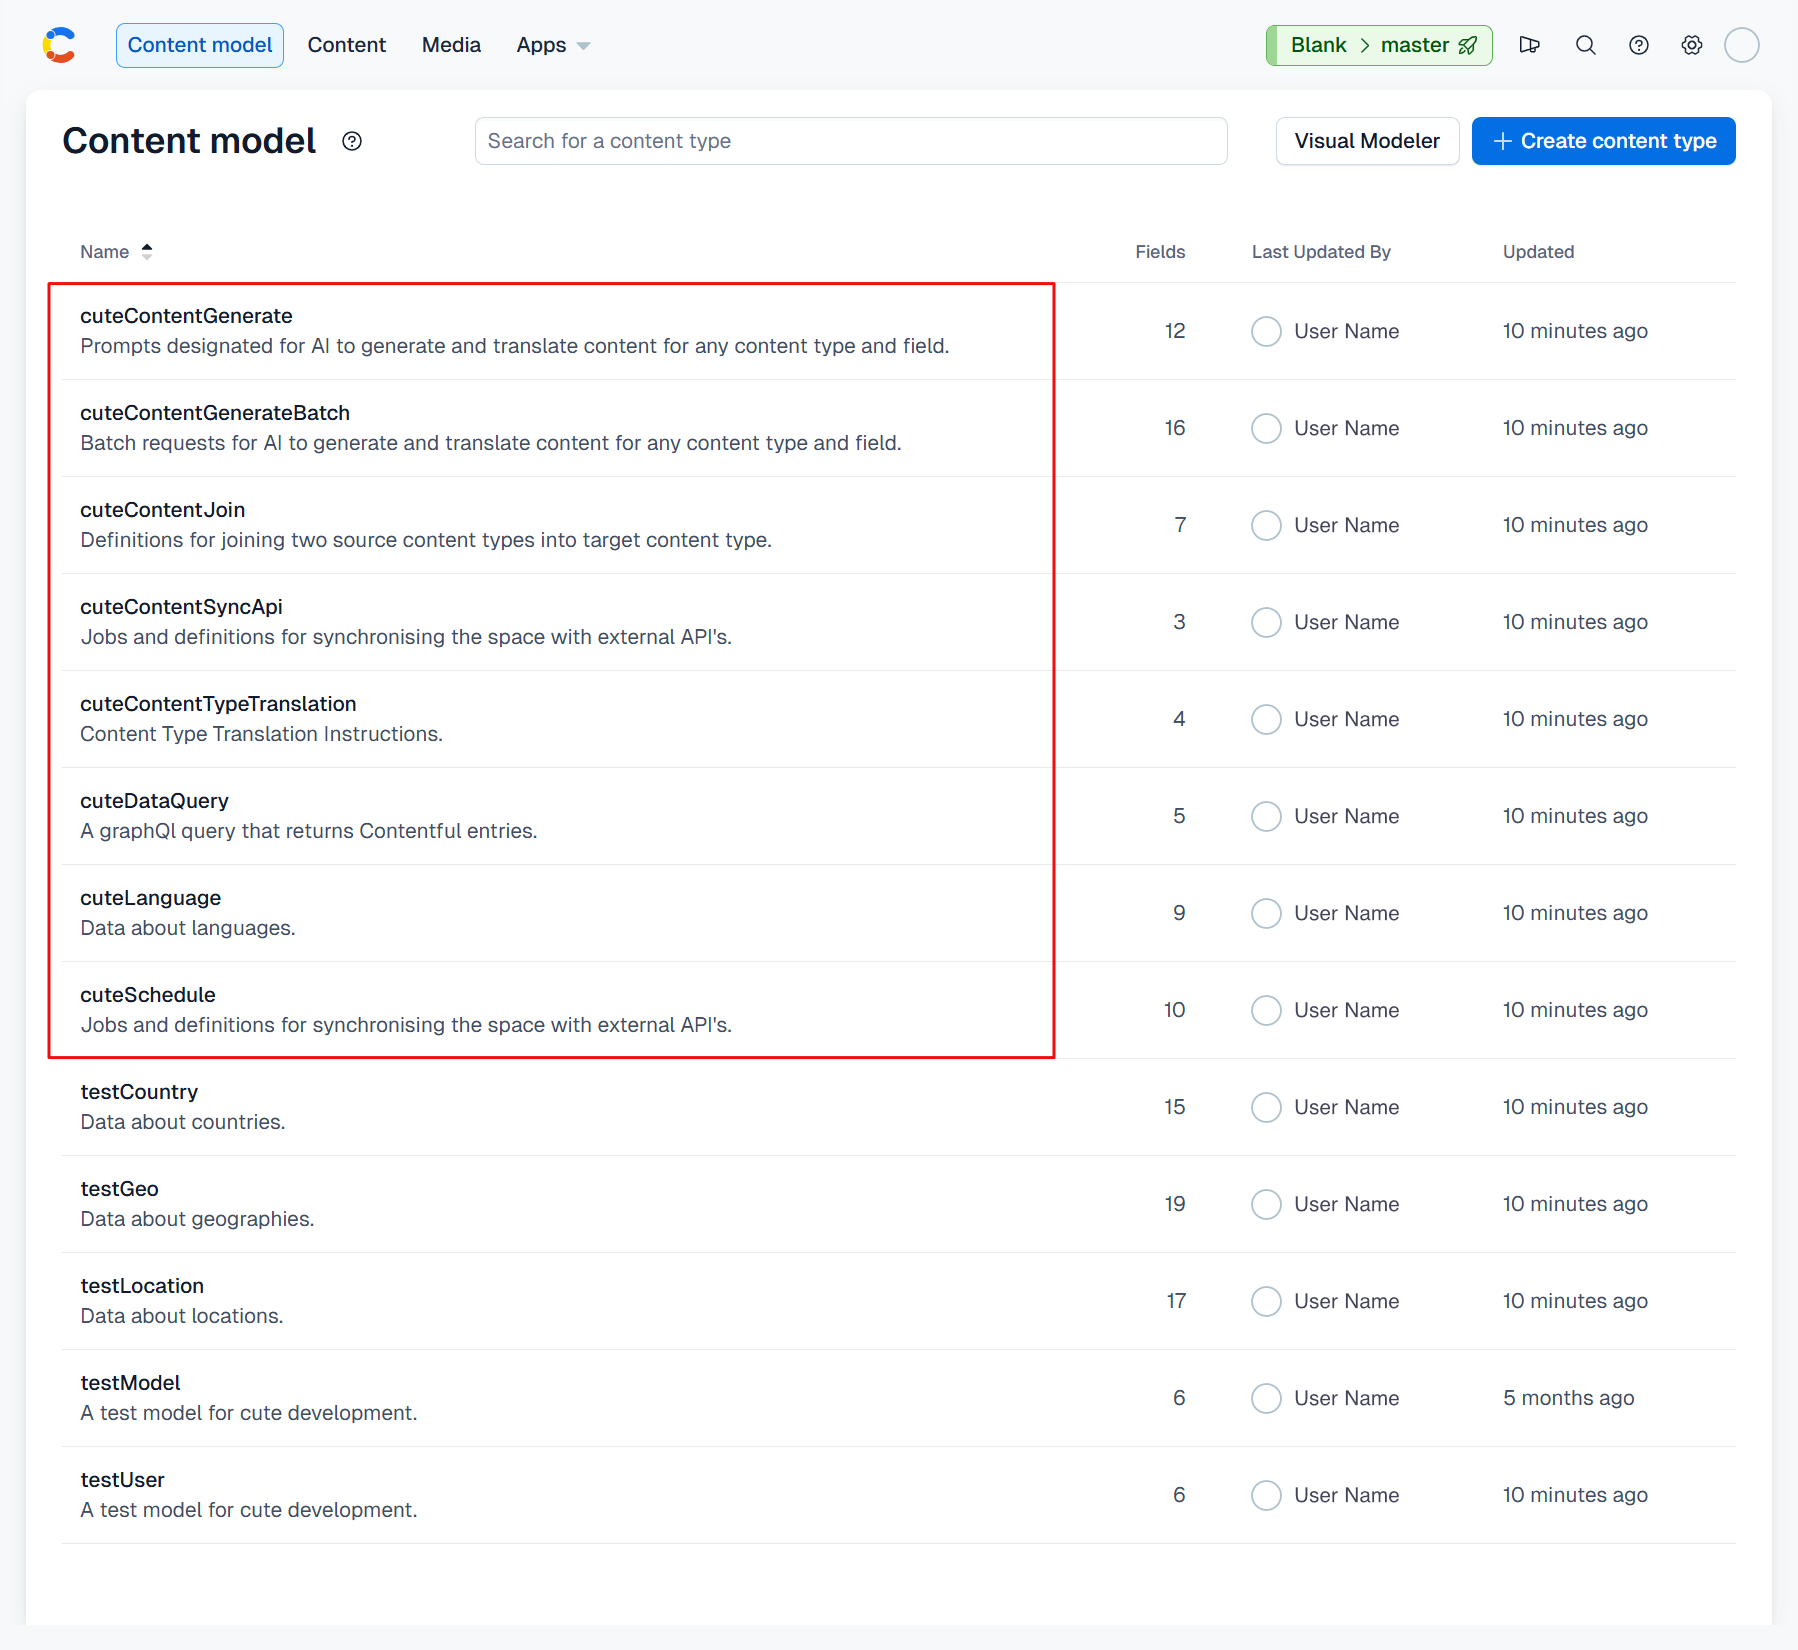
It might be a good idea to organize these content types under a separate view folder in Contentful. It's certainly not mandatory, but it might aid in overall organization of your data, presentation and native cute content types.
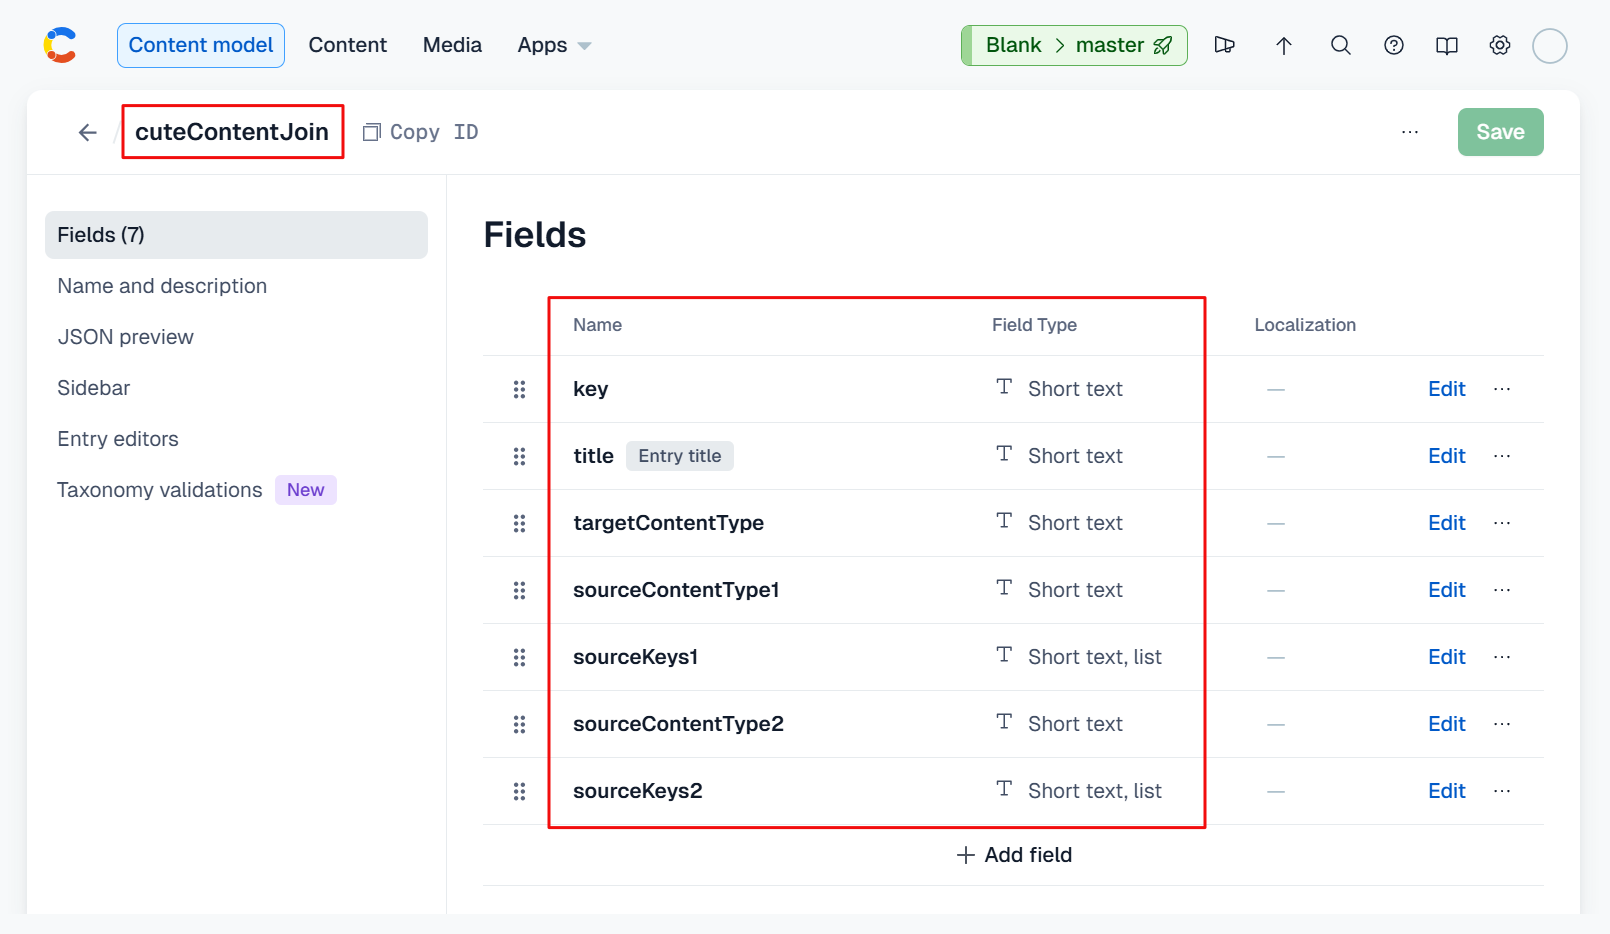
If you're using the cute content join feature for the first time, you'll need to define a cuteContentJoin content type within your Contentful space in which to configure your aggregates, as per the attached screenshot below:
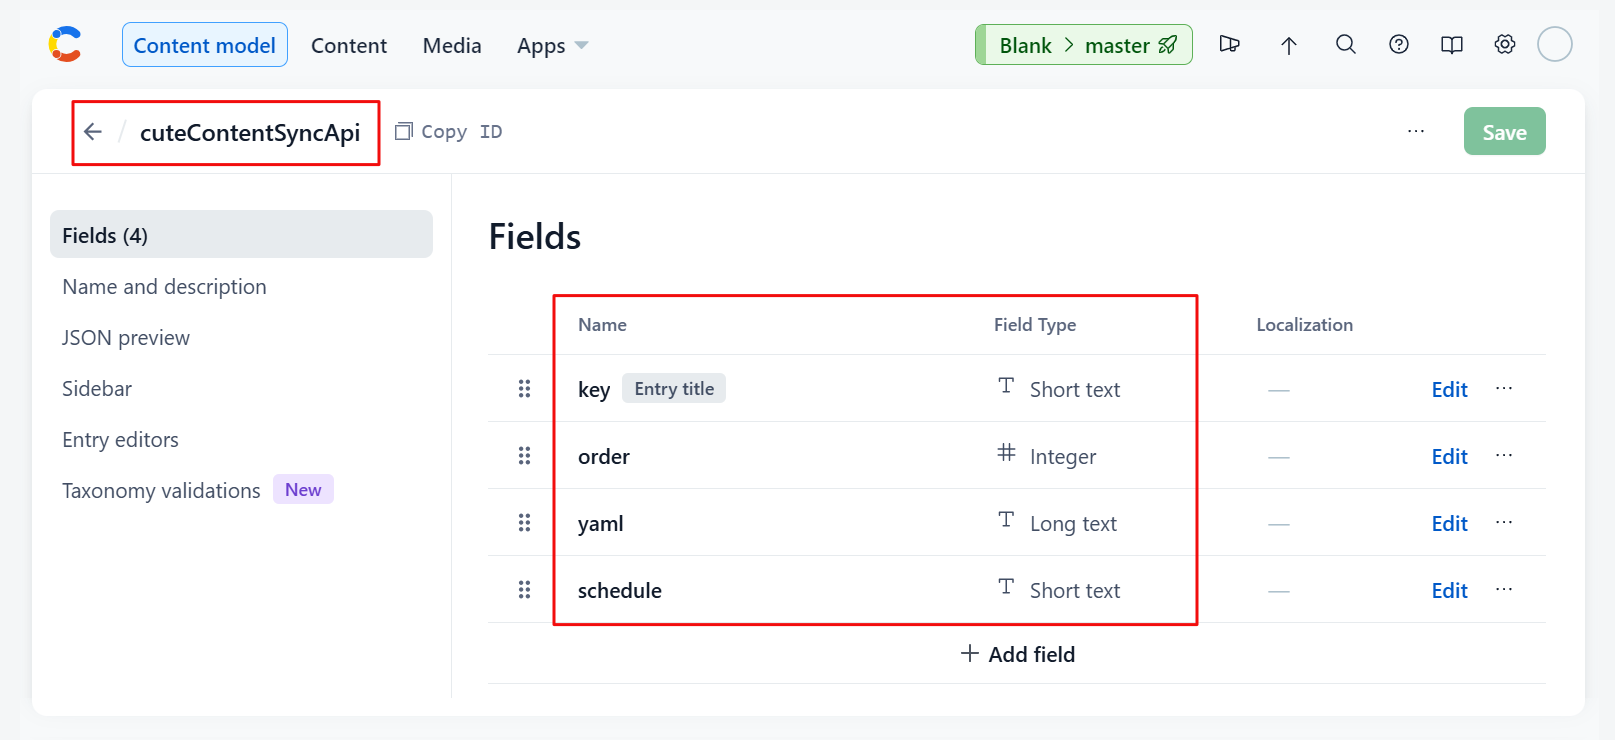
If you're using the cute content sync-api feature for the first time, you'll need to define a cuteContentSyncApi content type within your Contentful space and configure the fields as per the screenshot below:
If it's the first time you're using the content generation feature of cute you will need to define a cuteContentGenerate content type in your Contentful space as per the attached screenshot below:
If it's the first time you're using the content translation features of cute you will require translation content types in your Contentful space. Firstly, define cuteLanguage as per the attached screenshots below:
Then define cuteContentTypeTranslation as per the screenshot below:
Certain of the built-in features of cute—like AI content generation—will operate on data sets which is the result of queries on your content in your Contentful space.
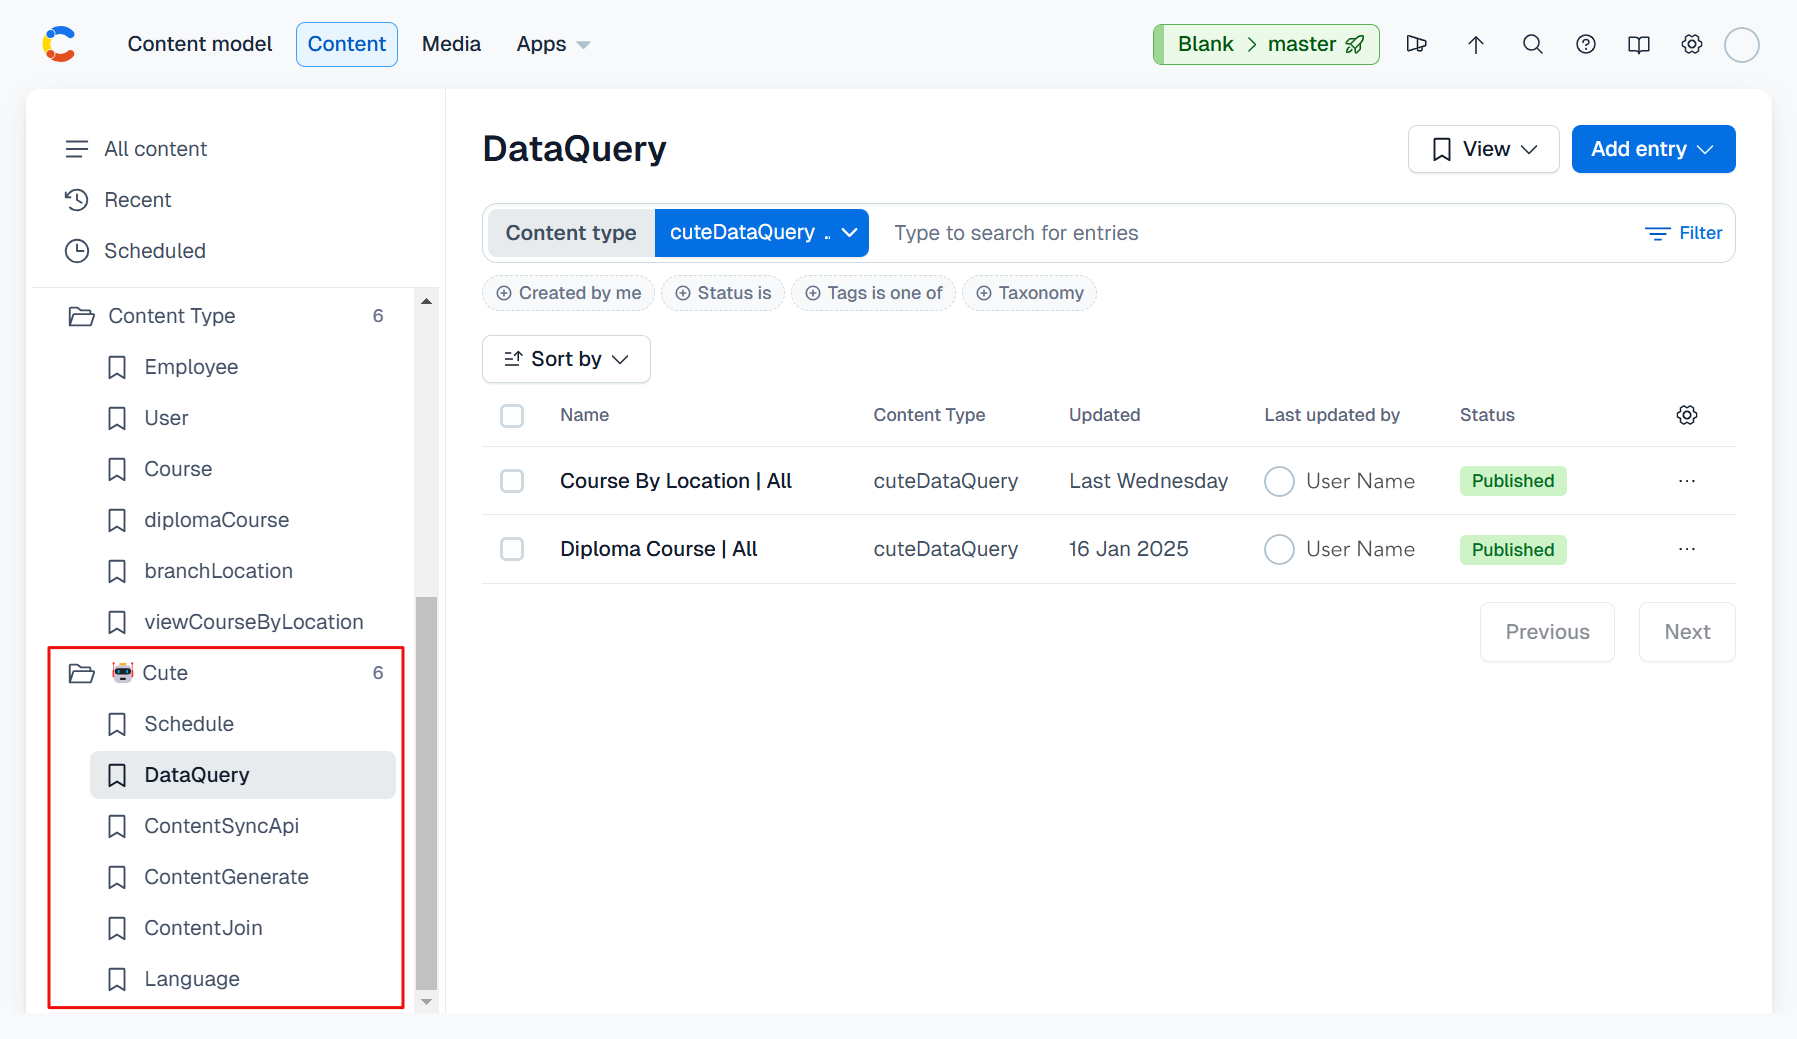
These queries are conveniently defined and persisted alongside your other content under the 🤖 Cute / DataQuery section of your Contentful space.
If it's the first time you're configuring a data query, you will need to define a cuteDataQuery content type in your Contentful space which is comprised of a key, title, query, jsonSelector and variablePrefix. See the attached screenshot below:
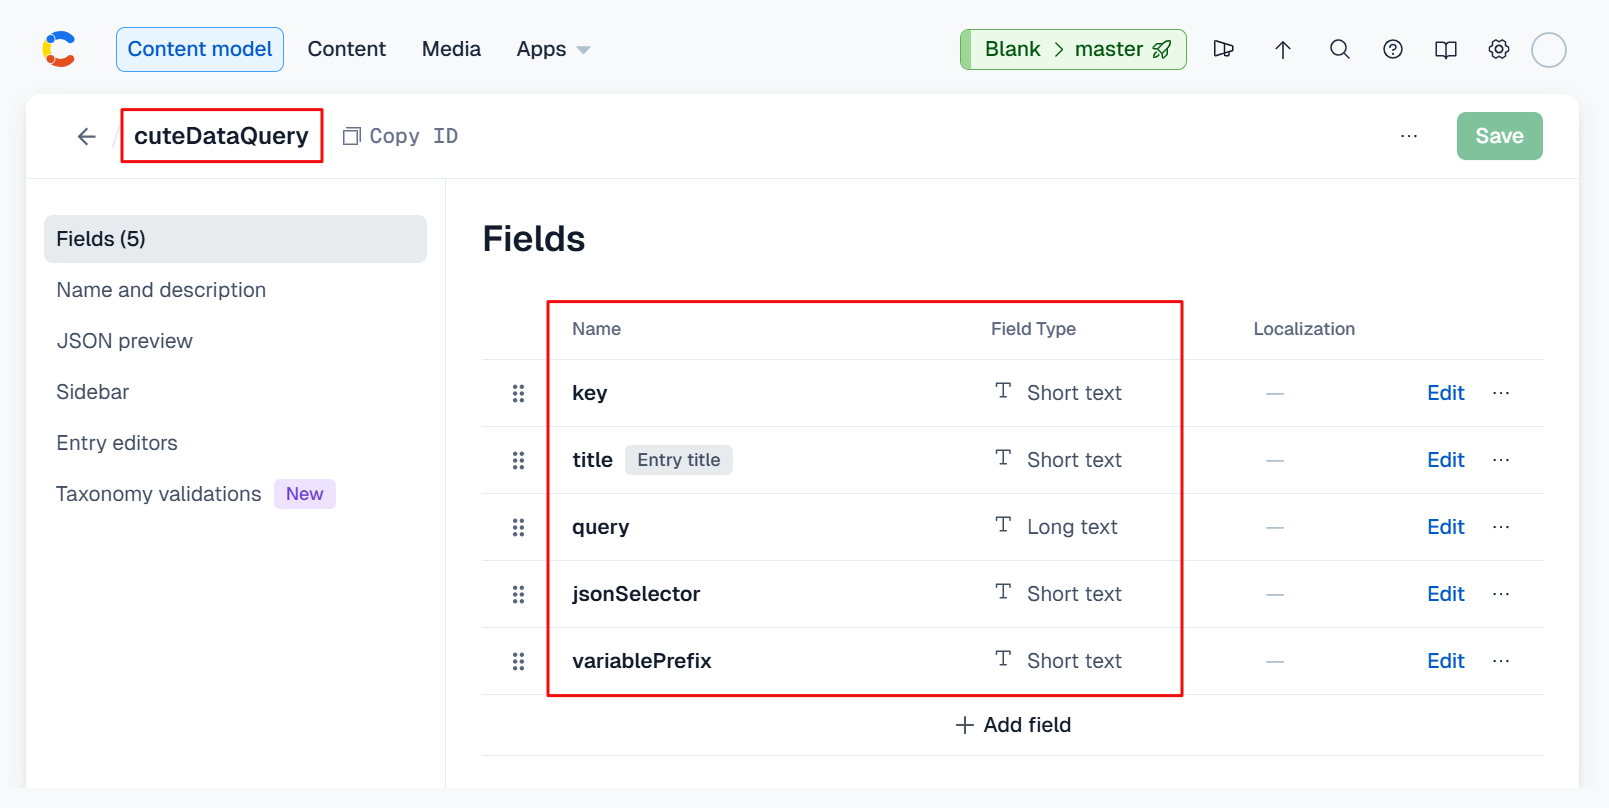
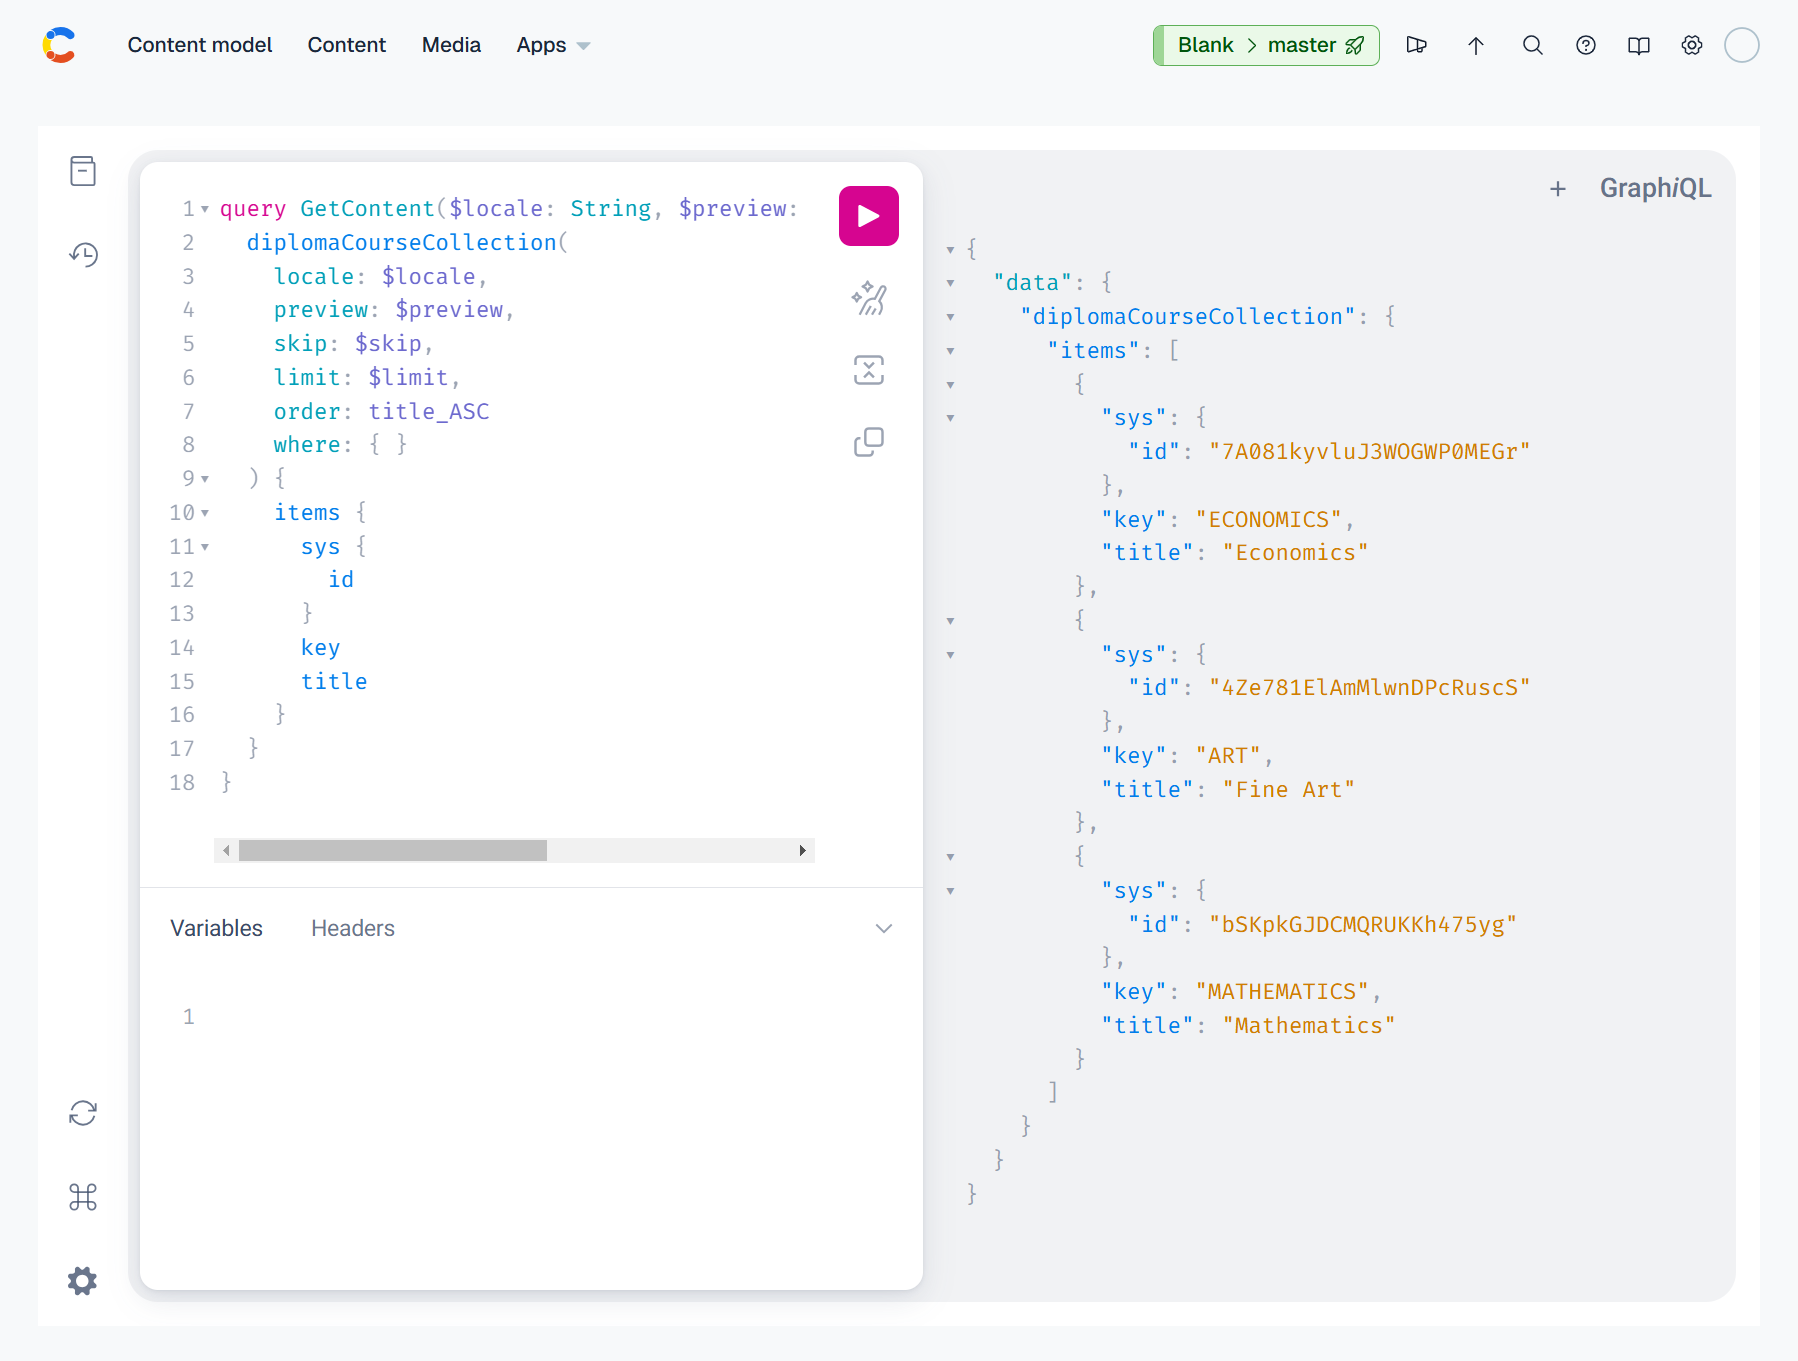
Our example below will query the diplomaCourse content type and return all entries.
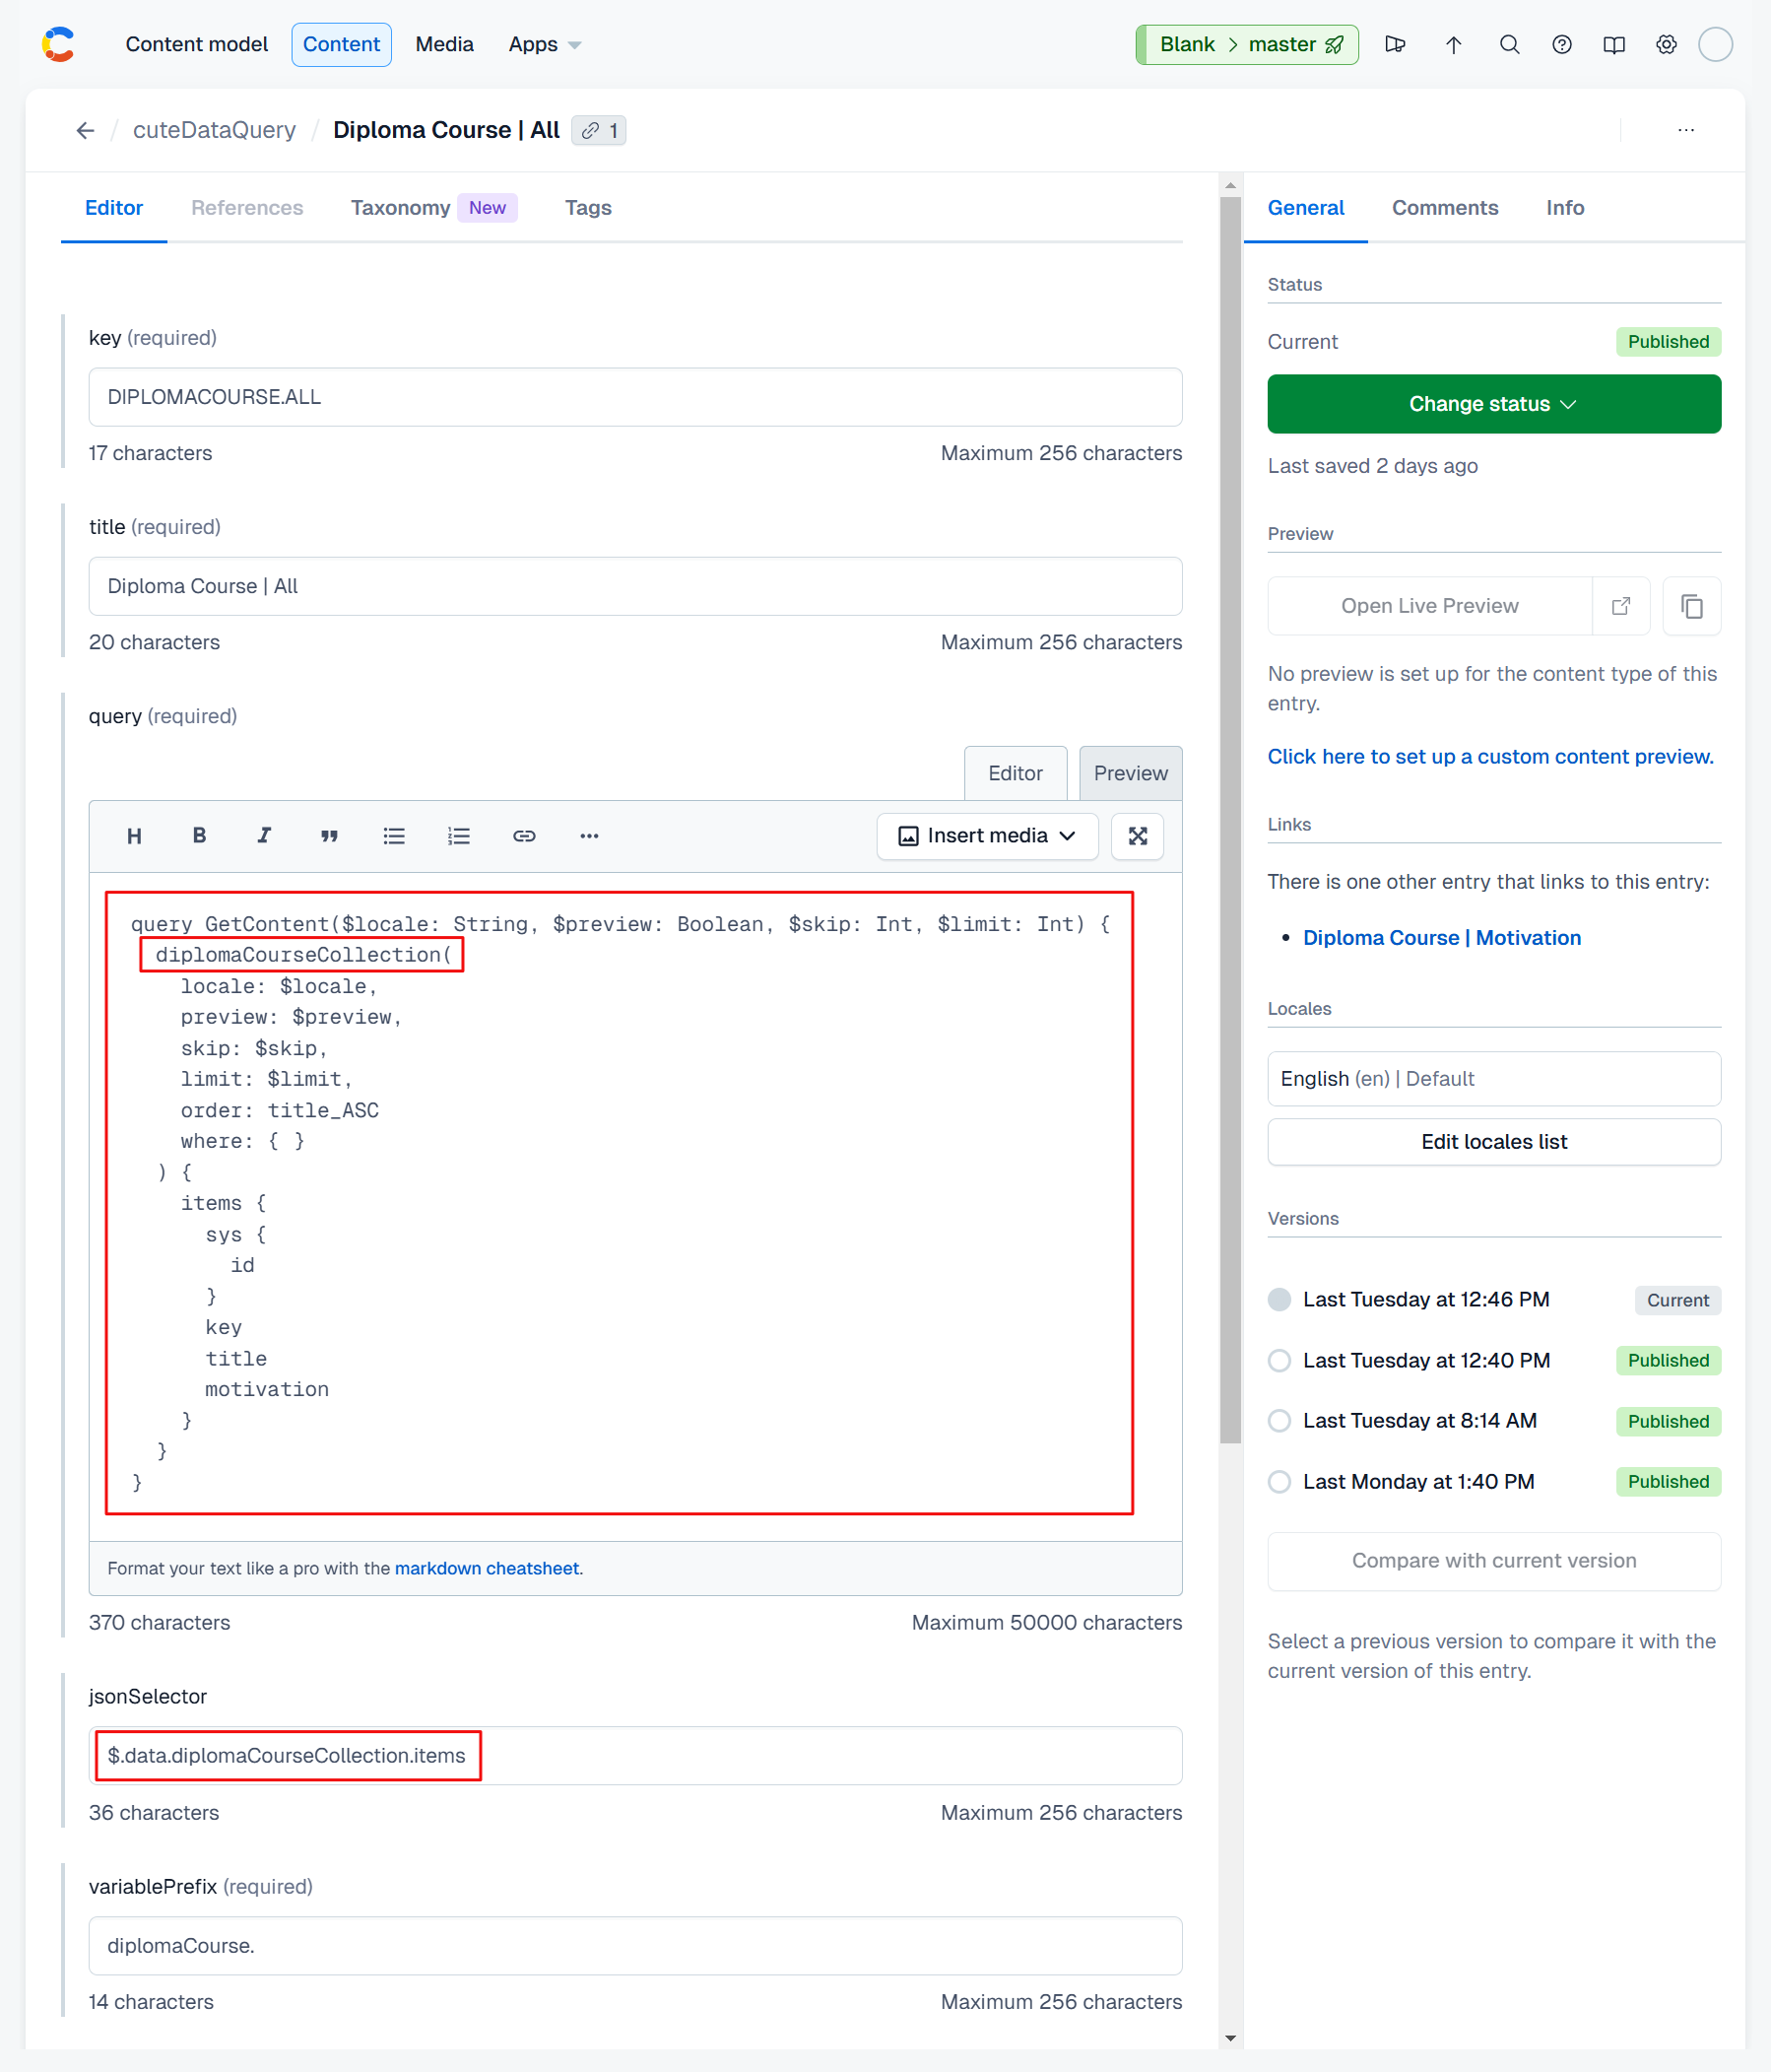
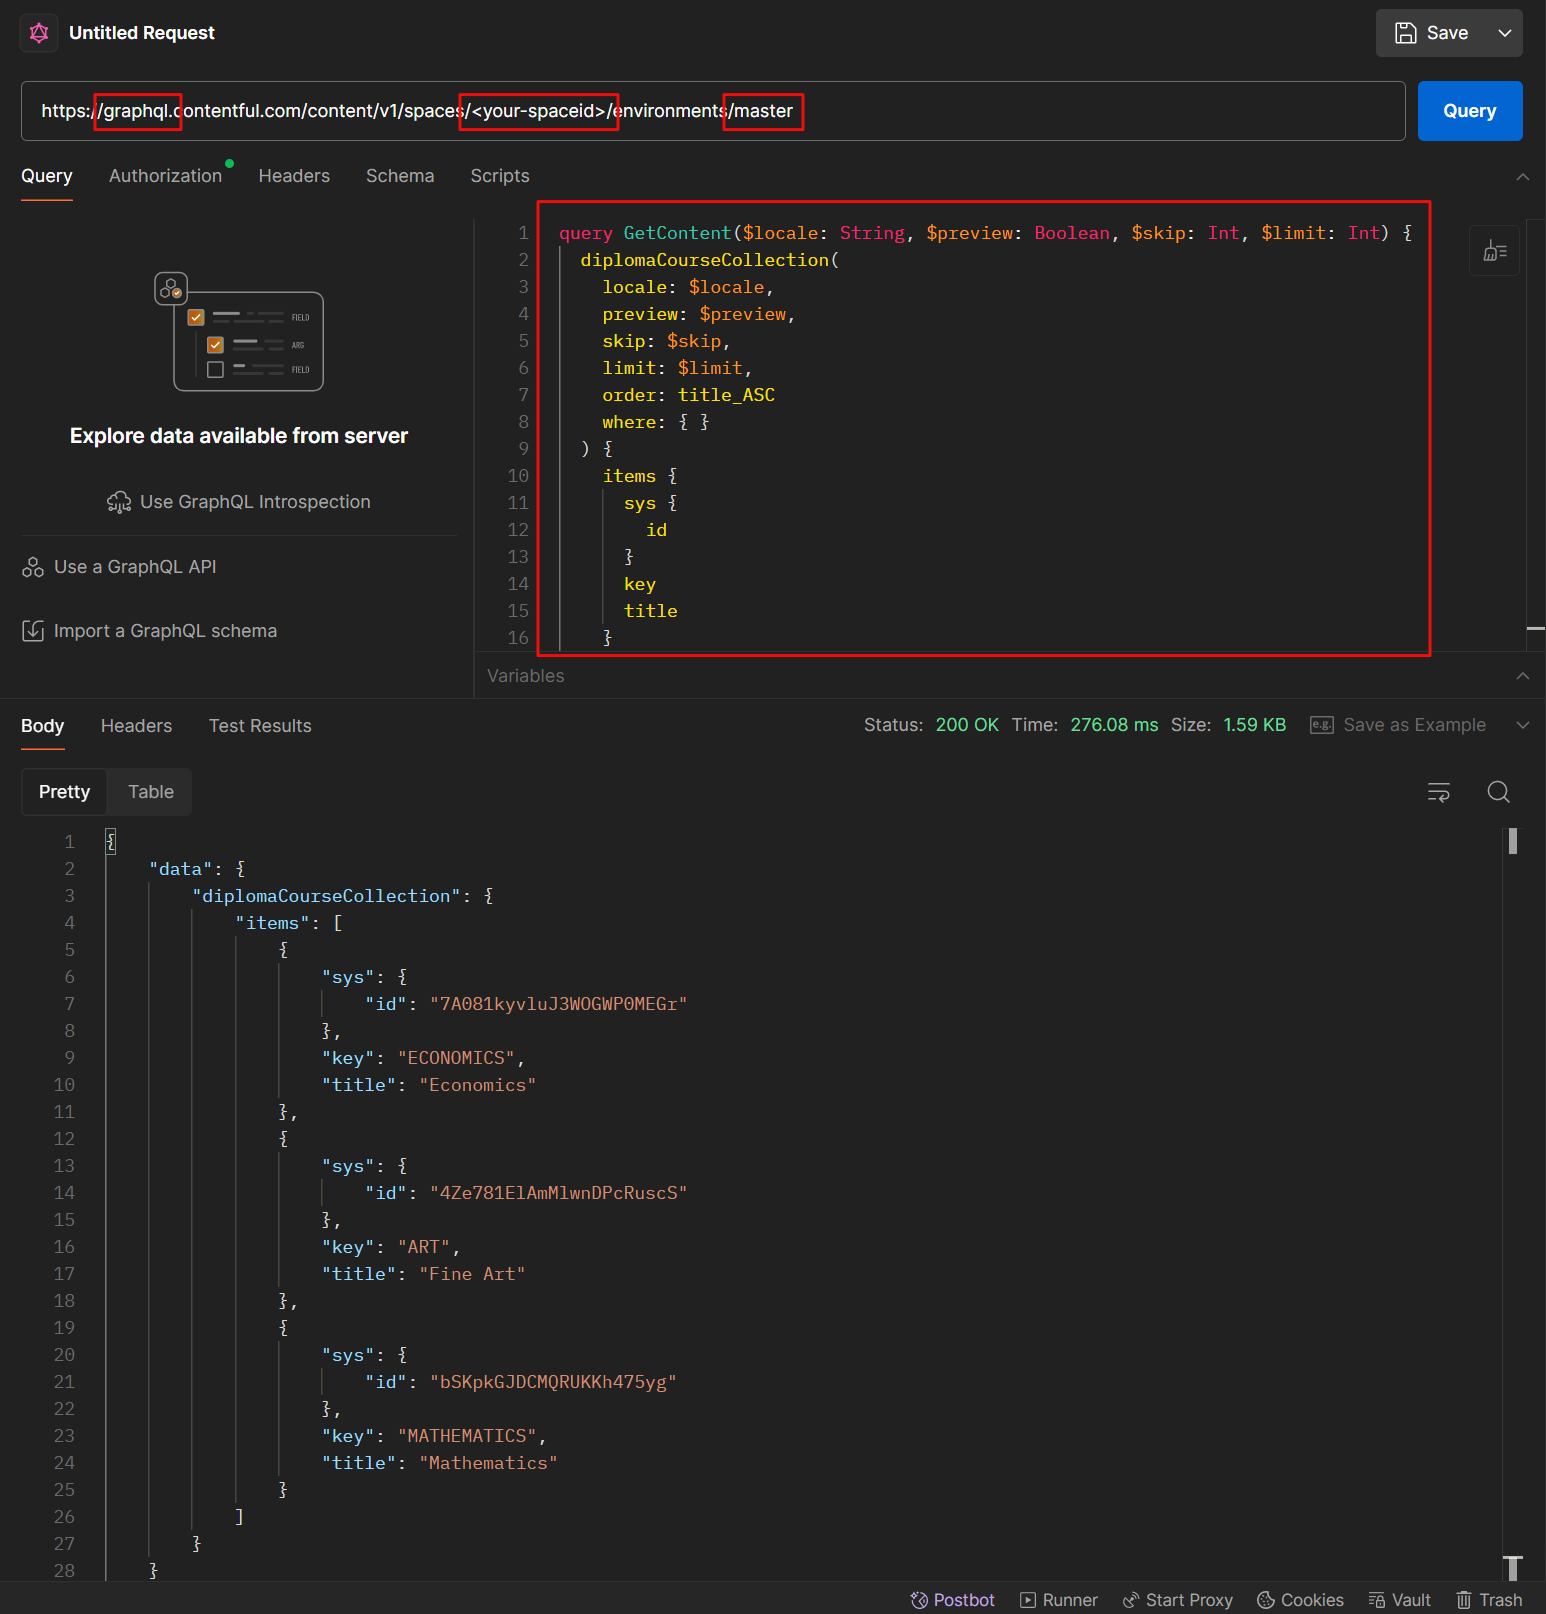
Your query should be a valid GraphQL query and can be validated prior to running your command using a method of your choosing.
You can validate your GraphQL query using Contentful's built-in GraphiQL playground which can be installed from the App sub-menu.
Alternatively, you could use a tool like Postman's GraphQL request feature.
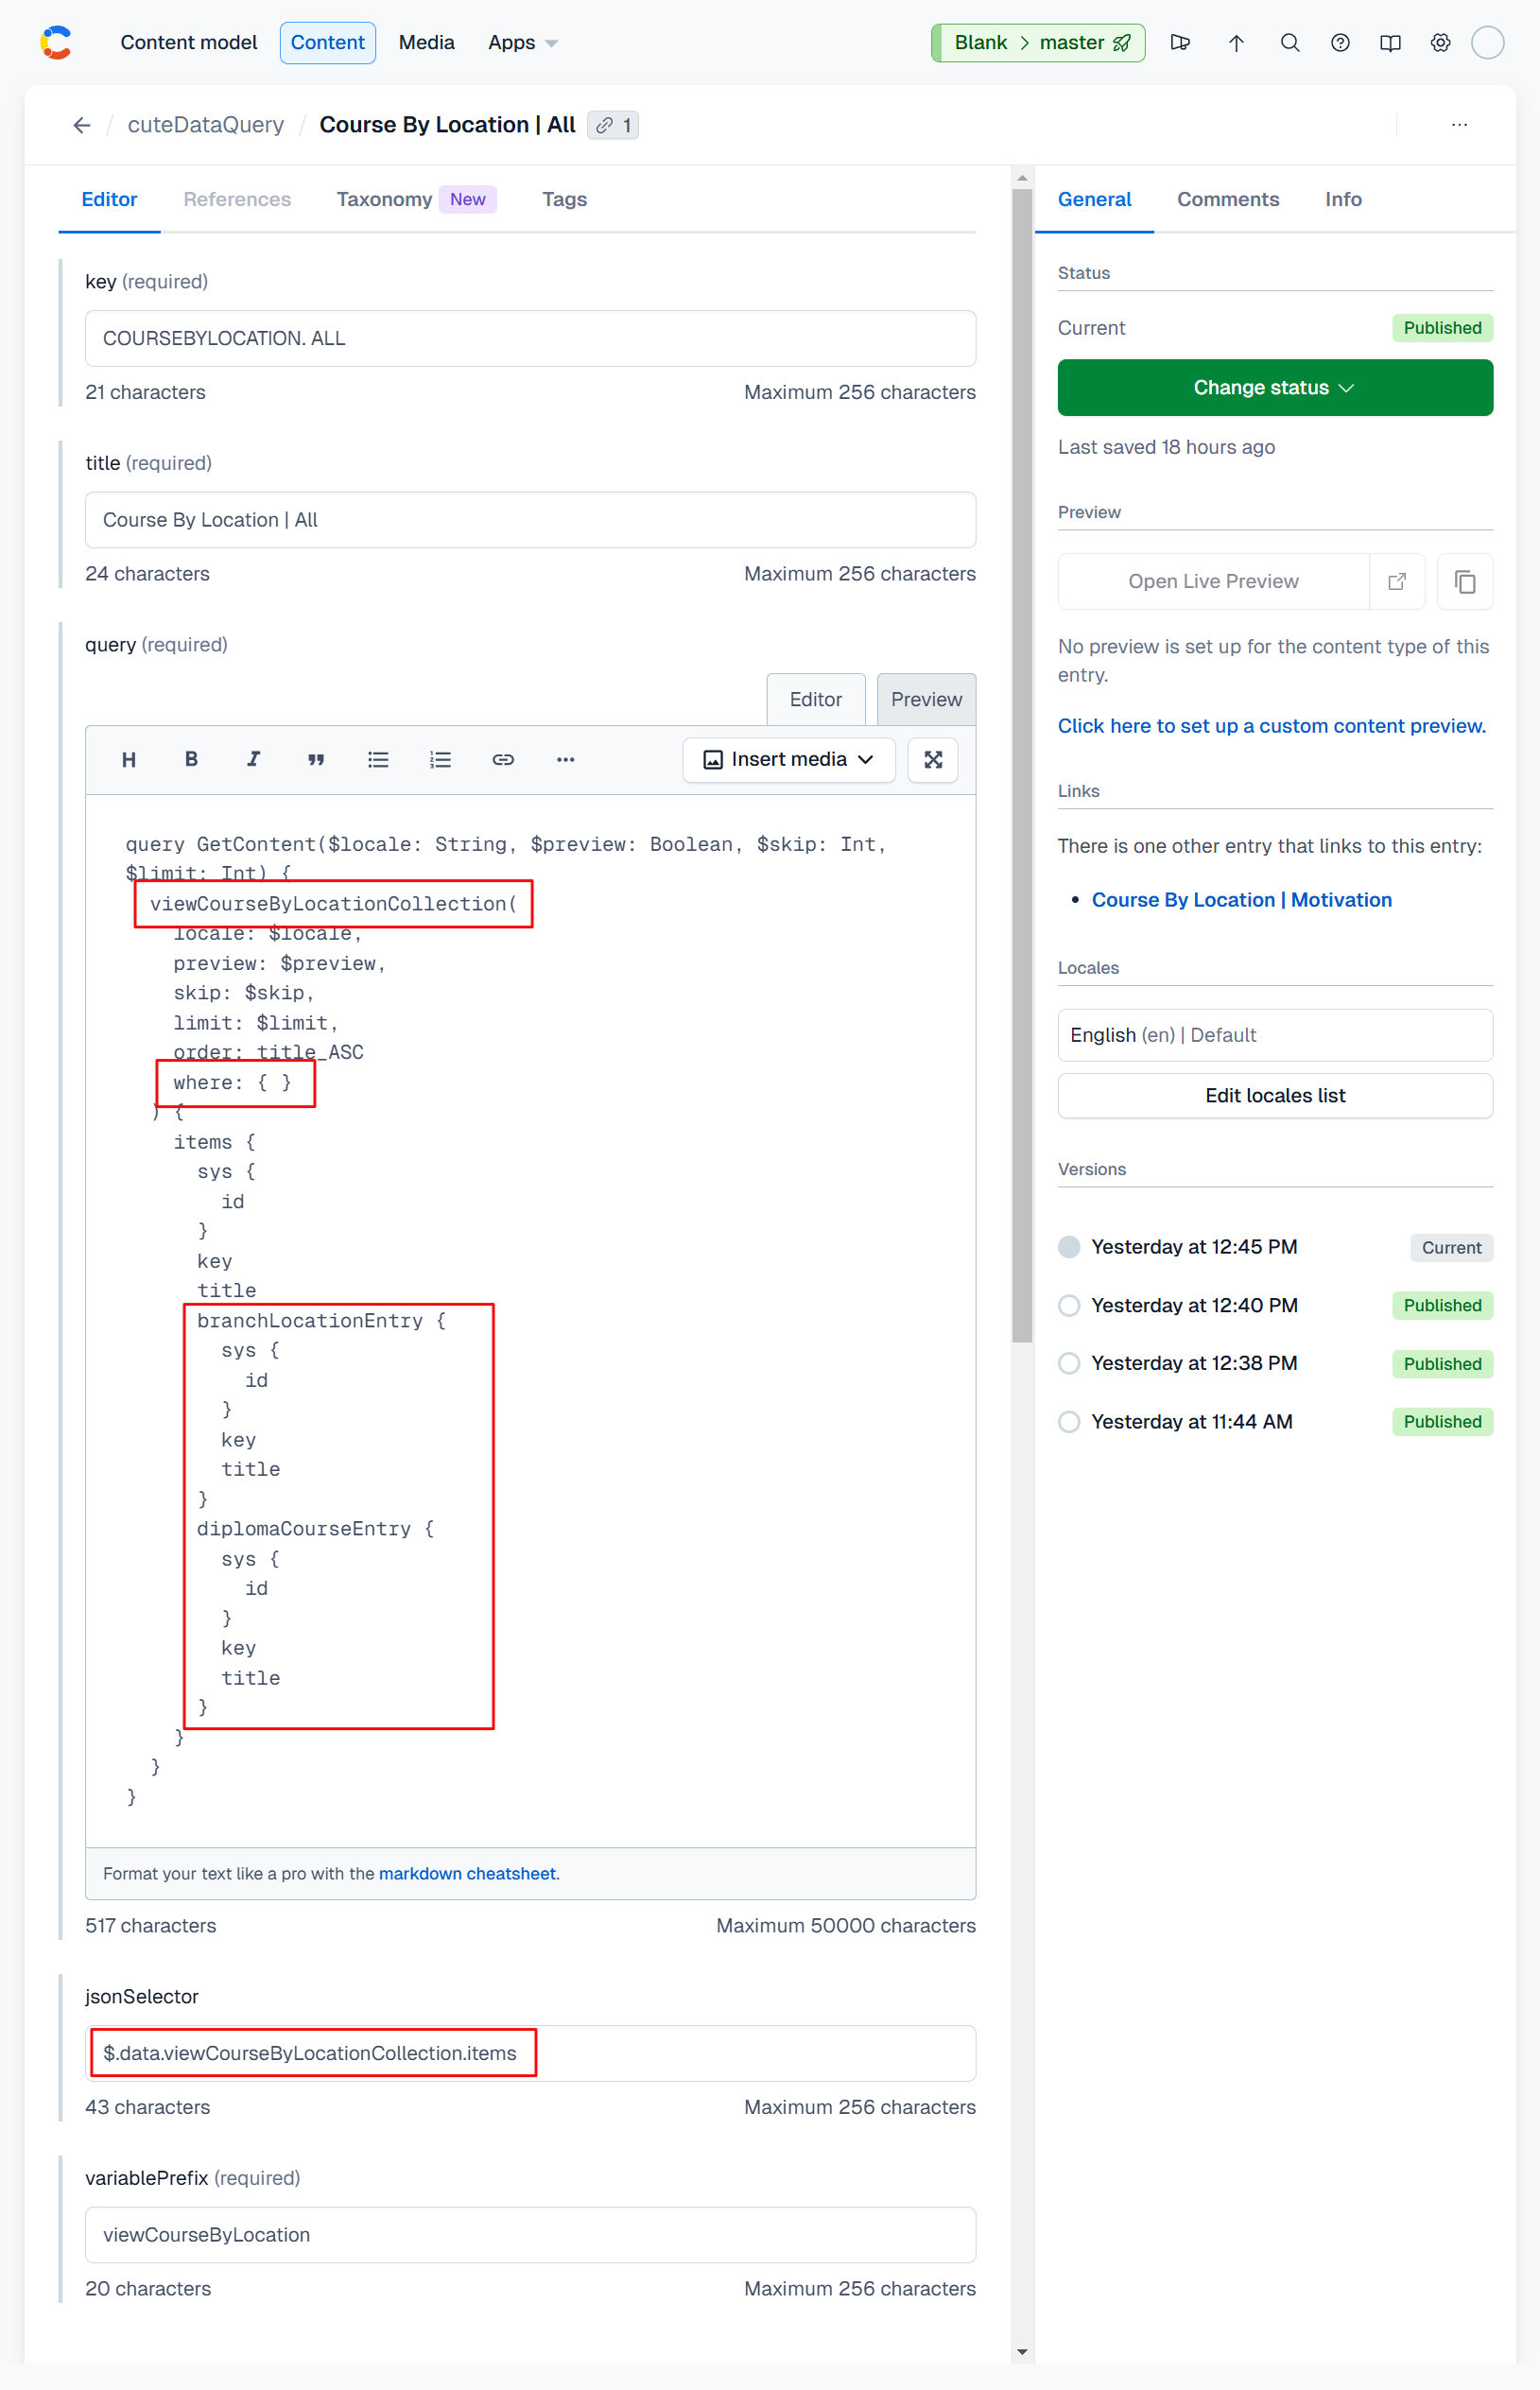
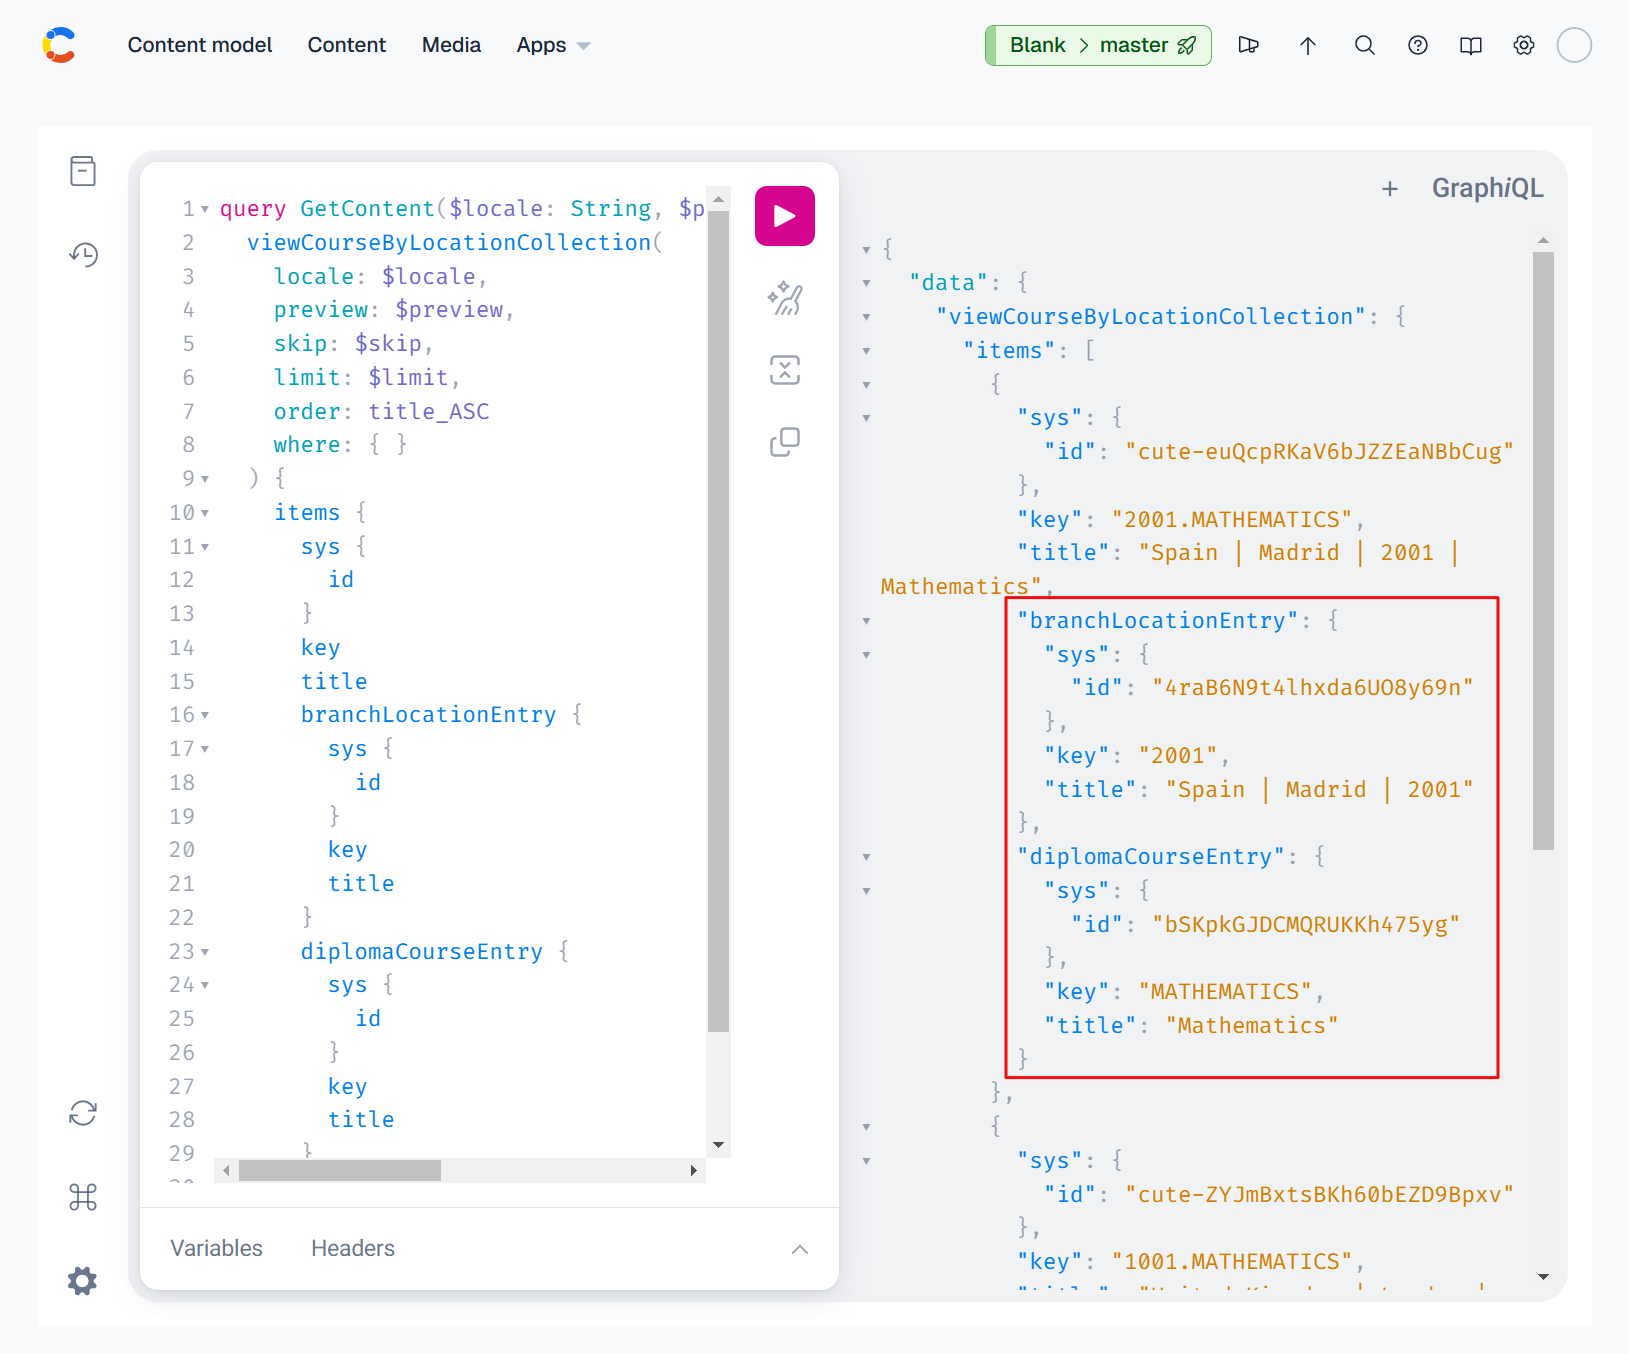
Our second example shows a slightly more complicated configuration where we query a content type which is an aggregate of the branchLocation and diplomaCourse content types. Pay specific attention to the GraphQL syntax used to include the additional data objects.
The where clause of the GraphQL query is empty and as a result all entries from the set will be returned.
Testing the query in Contentful's GraphiQL app yields the expected result:
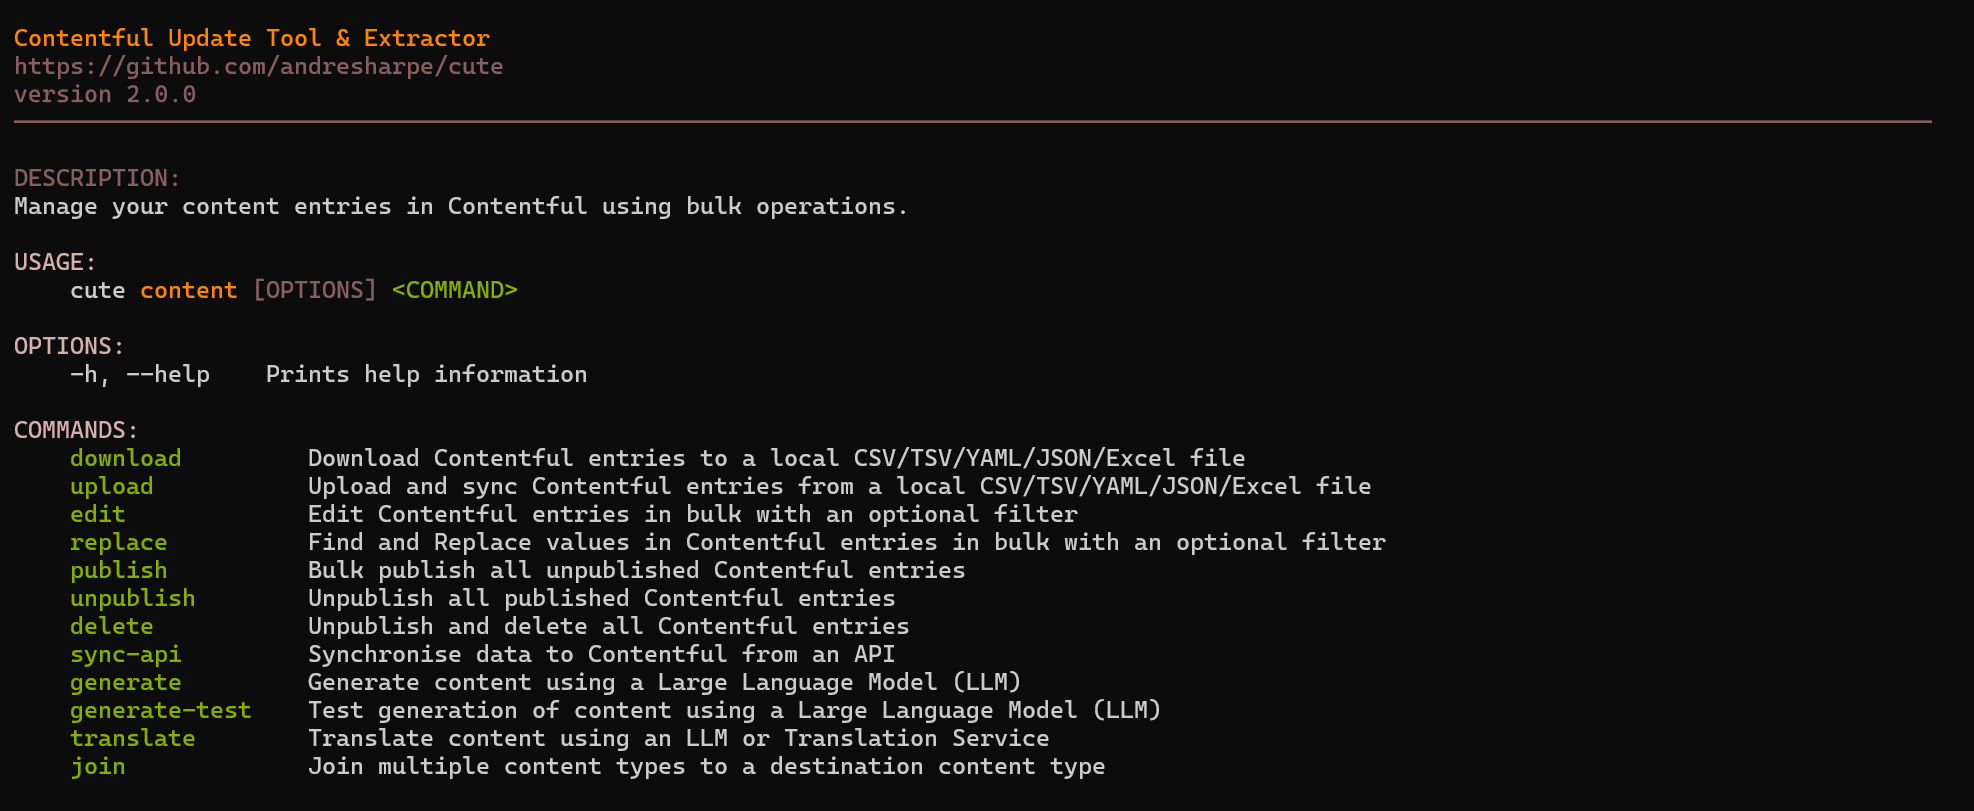
The full command structure for the usage of version 2 of cute can be found in this document.
We welcome community pull requests for bug fixes, enhancements, and documentation. See How to contribute for more information.