
My client is a student at a local school. After meeting with her (see Appendix A) I learned that very Monday morning at her advisory, she fills out the Komodo survey, a survey that checks the students' wellbeing at her school. However, she feels like the survey has too many questions, it is sometimes not accurate enough, and it does not allow her to express all her feelings. She would like to write a personal diary, but as she lives with 3 roommates, she thinks she would not have enough privacy. She would like to be able to write about her feelings every day, and then to have a way to organize the writings by category, according to what she is talking about. My client needs a cost effective, efficient, and more private way to track her emotions and write about them.
OOP is the programming paradigm.The application will have a sign up and login system with encrypted password, to increase security. The application will be minimalistic and simple for it to be user-friendly. Once the user has passed the login system, a main menu will appear. There, user will be able to select and emotion and write how she is feeling. She can also access past notes organised in folders by emotion. The tools I am using for this are Python, Kivy, and SQL. I chose Python because its codes can be easily written and executed much faster than other programming languages1. Python is an open source and has a lot of libraries to complement the code2, so there are multiple options of personalisation for fulfilling the client's necessities. Python is also good for the client, as it is free and my client will not need to buy a license3. I chose Kivy because it is also free and convenient for the client, as it can run in many platforms. Kivy is fresh, fast, flexible, and focused. If the client needed to sell her application in the future, doing that would be completely free and she would not have to pay anything to Kivy. 4 I chose SQLite because it is an easy and simple way to look and get all data. SQLite is lightweight, efficient, and easy to integrate in Python applications. It does not require a separate server process or system, and data can be stored in a single file, making it easy to manage. The use of Client/Server RDBMS would had been necessary for a high volume website, client/server app, very large databases, and high concurrency of simultaneous readers. 5 As my app does not have data separated from app by the networks, concurrent writers, or very big data, SQLite is a good option that will meet the client’s requirements. Overall, the combination of Python, Kivy, and SQLite provides a cost-effective, efficient, and user-friendly solution to the client's needs for a mood tracker application.
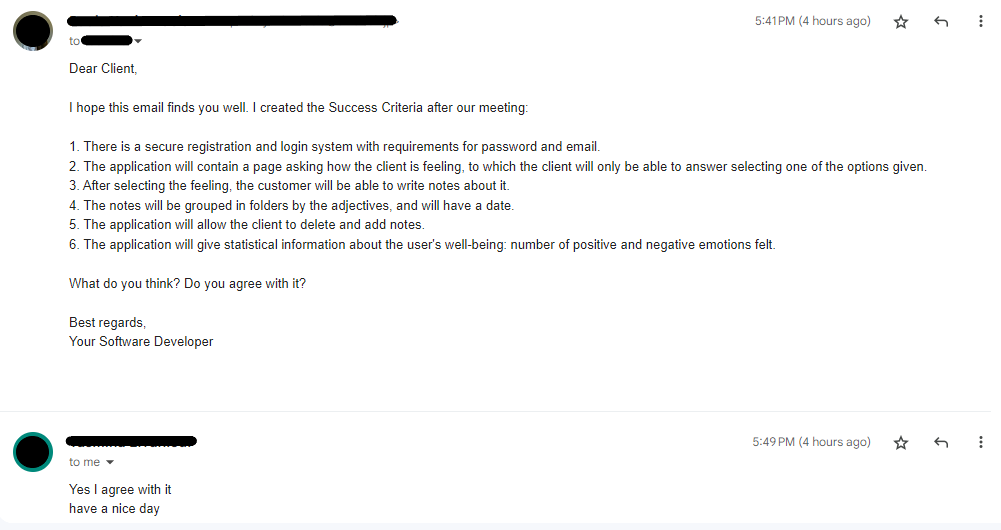
After meeting with the client ans sending her an email (See Appendix B), we agreed the following success criteria:
- There is a secure registration and login system with requirements for password and email.
- The application will contain a page asking how the client is feeling, to which the client will only be able to answer selecting one of the options given.
- After selecting the feeling, the customer will be able to write notes about it.
- The notes will be grouped in folders by the adjectives, and will have a date.
- The application will allow the client to delete and add notes.
- The application will give statistical information about the user's well-being: number of positive and negative emotions felt.
I will design and make an application for writing a mood diary for a client who is a student at UWC ISAK Japan. The program will consist on an application for being able to keep track of her mood every day, plus being able to write some notes and having them organized by feeling. It is constructed using the softwares Python, Kivy, and SQLite. It will take 3 weeks to make and will be evaluated according to the criteria A, B, C, and D.
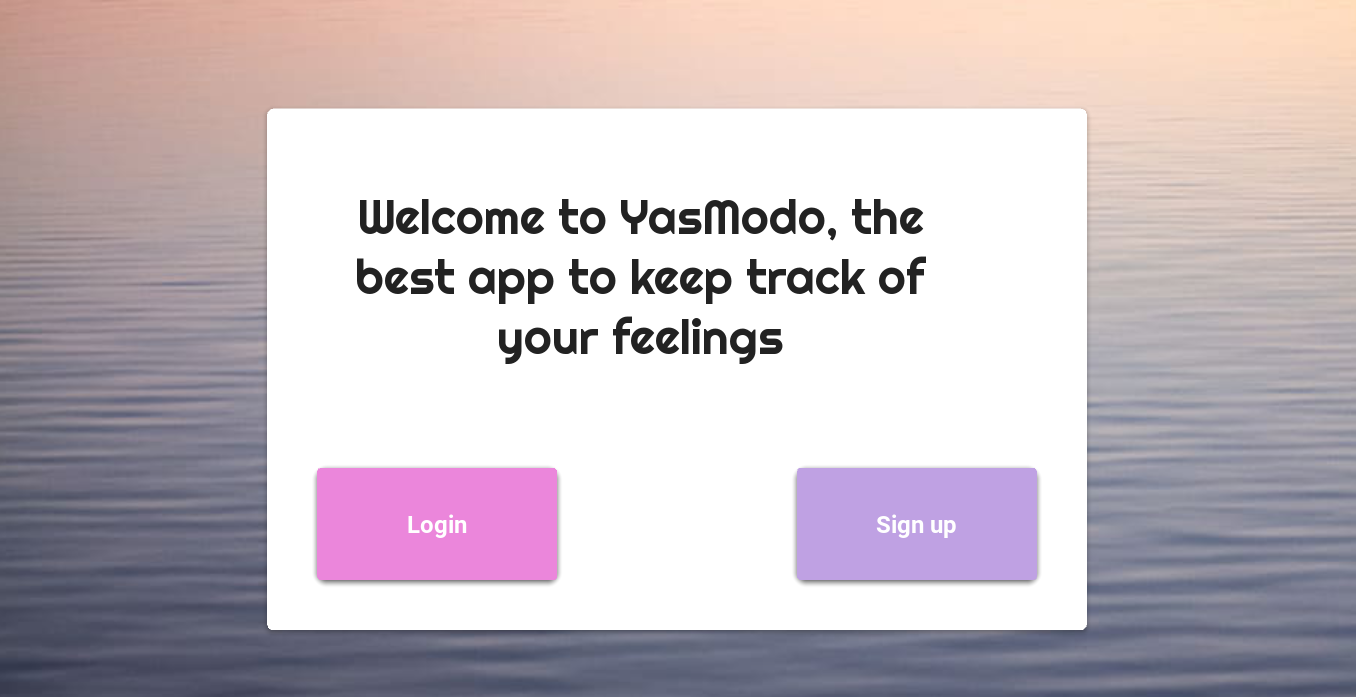
The app is called YasModo. It is a game of words between the name of the client and the application she uses every week, Komodo. Also because "modo" sounds like "mood" and "Yas" like "Yes" (YesMood).
The colour palette for this project is tones pink and purple, with some variations, as these are the favourite colours of the client, and ones that produce a lot of peace on her.
| TEST | DESCRIPTION | PROCEDURE | EXPECTED OUTPUT |
|---|---|---|---|
| Unit testing of sign up page (functional) | This test evaluates the sign up page. | User tries to sign up, not following the password and email requirements. For example, password="password" | An error will be shown in red just below, explaining why it is incorrect. For example, password does not have digits and uppercase |
| Unit testing of new note (functional) | This test is evaluating how the user add a new note into the notes database. | Click "How are ypu feeling" button, select an emotion, write about it. | The note with the emotion will be saved on the database. |
| Unit testing for buttons of feelings (functional) | Functionality of buttons related to emotions | Click on each button and verify. | The program will remember which button has just been pressed with a global variable. |
| Unit testing buttons of folders (functional) | Functionality of buttons related to folders of emotions. | Click on each button and verify. | The program will lead the user to read the notes that have been written by her and have the tag of the emotion selected. |
| Unit testing for deleting a note(functional) | Check if the notes can be deleted from database | Select a note in Folders, Mark the checkbox, Click delete | Note will be deleted from database. |
| Unit testing for statistics (functional) | Statistics appear in a text message in the user's screen. | Click the Statistics button | Statistics will appear and they will change when users enter new data in the notes section. |
| Quality of code review (non-functional) | Use of comments, tabs, and developer-friendly files and variable names | Check if the program is developer-friendly | Program will have comments on every step of the code, and variable names are easy to understand. |
| File organisation review (non-functional) | Are all files organised? Folders, files, etc | Check Pycharm folder and delete files that have not been used for the project. | On the project folder all files should have user-friendly names. All files are organised inside the folder. |
| Unit Test: Integration: whole login program | Check whole code | Run the program and enter all inputs that a user would put. | The program will not crash and will make its functions. |
Table 1: Test plan- showing the test plan for my application. The description, expected output, and procedure for each test is also shown.
Figure 1
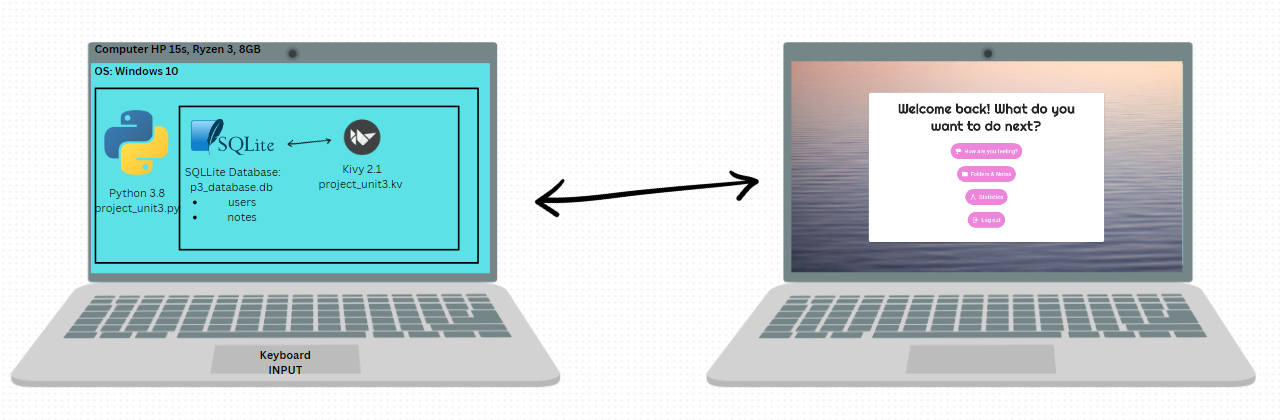 Figure 1: System diagram of my project
Fig.1 is the System Diagram. It shows the brand and type of the computer, with its specifications and the Operative System is has. The program runs in Python 3.8 and uses different codes (project_unit3.py, project_untit3.kv). Then, these codes connect with a database of sql files (p3_database.db).
Figure 1: System diagram of my project
Fig.1 is the System Diagram. It shows the brand and type of the computer, with its specifications and the Operative System is has. The program runs in Python 3.8 and uses different codes (project_unit3.py, project_untit3.kv). Then, these codes connect with a database of sql files (p3_database.db).
Figure 2:
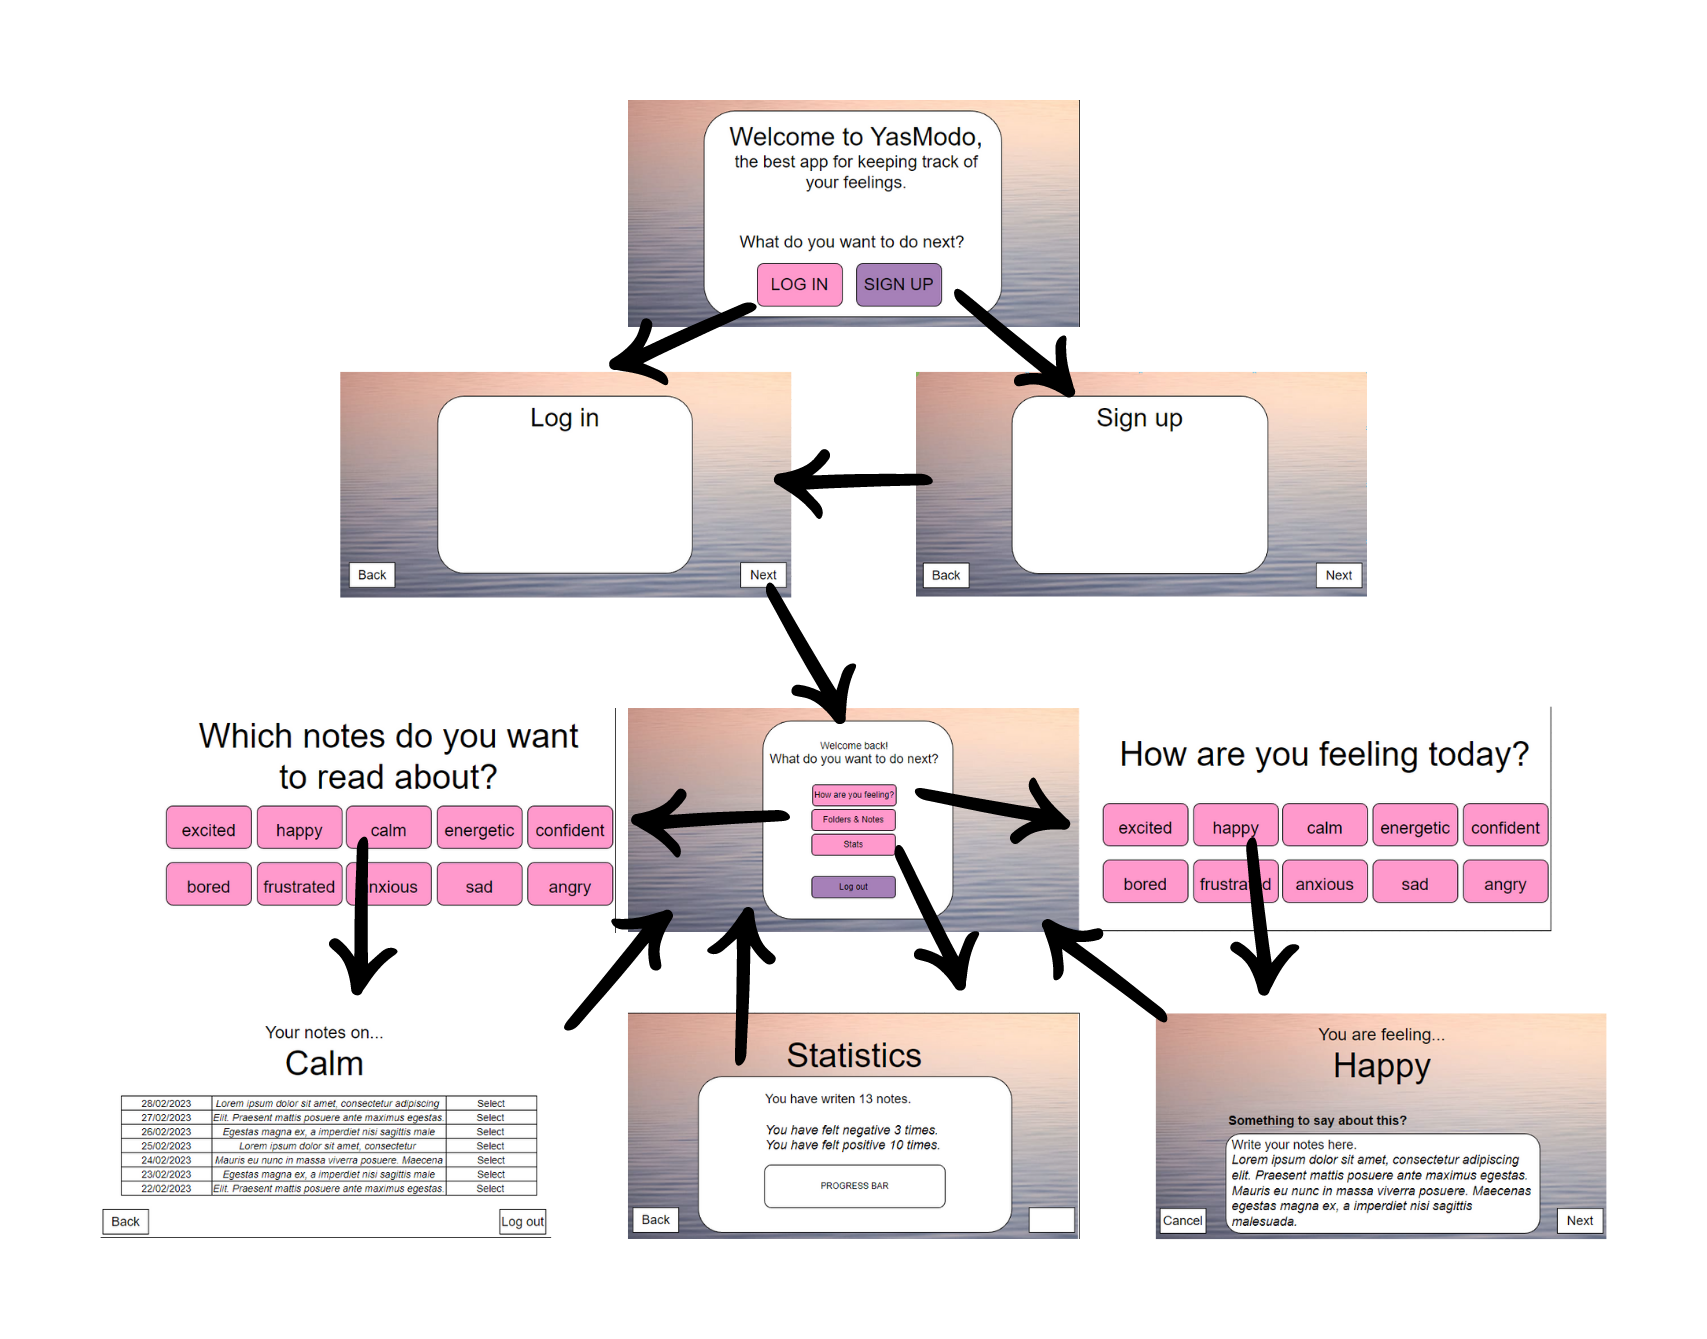
Fig.2 is the Wirefram Diagram for the program.
Figure 3:
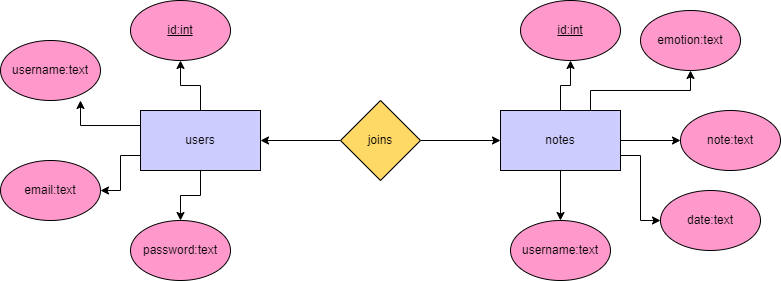
Fig. 3 is the ER diagram for the database that my program uses.
Figure 4:
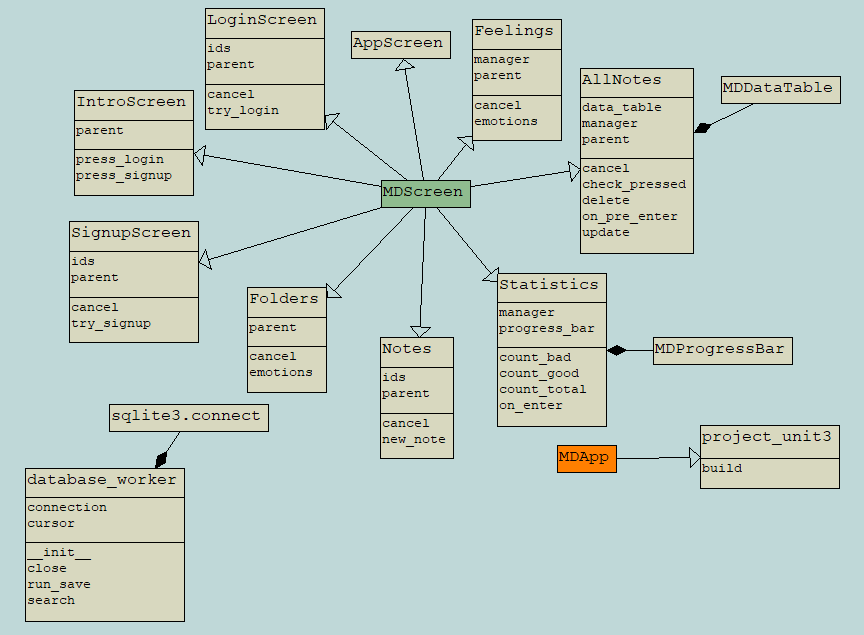
Fig. 4 is the UML diagram for the classes of my program.
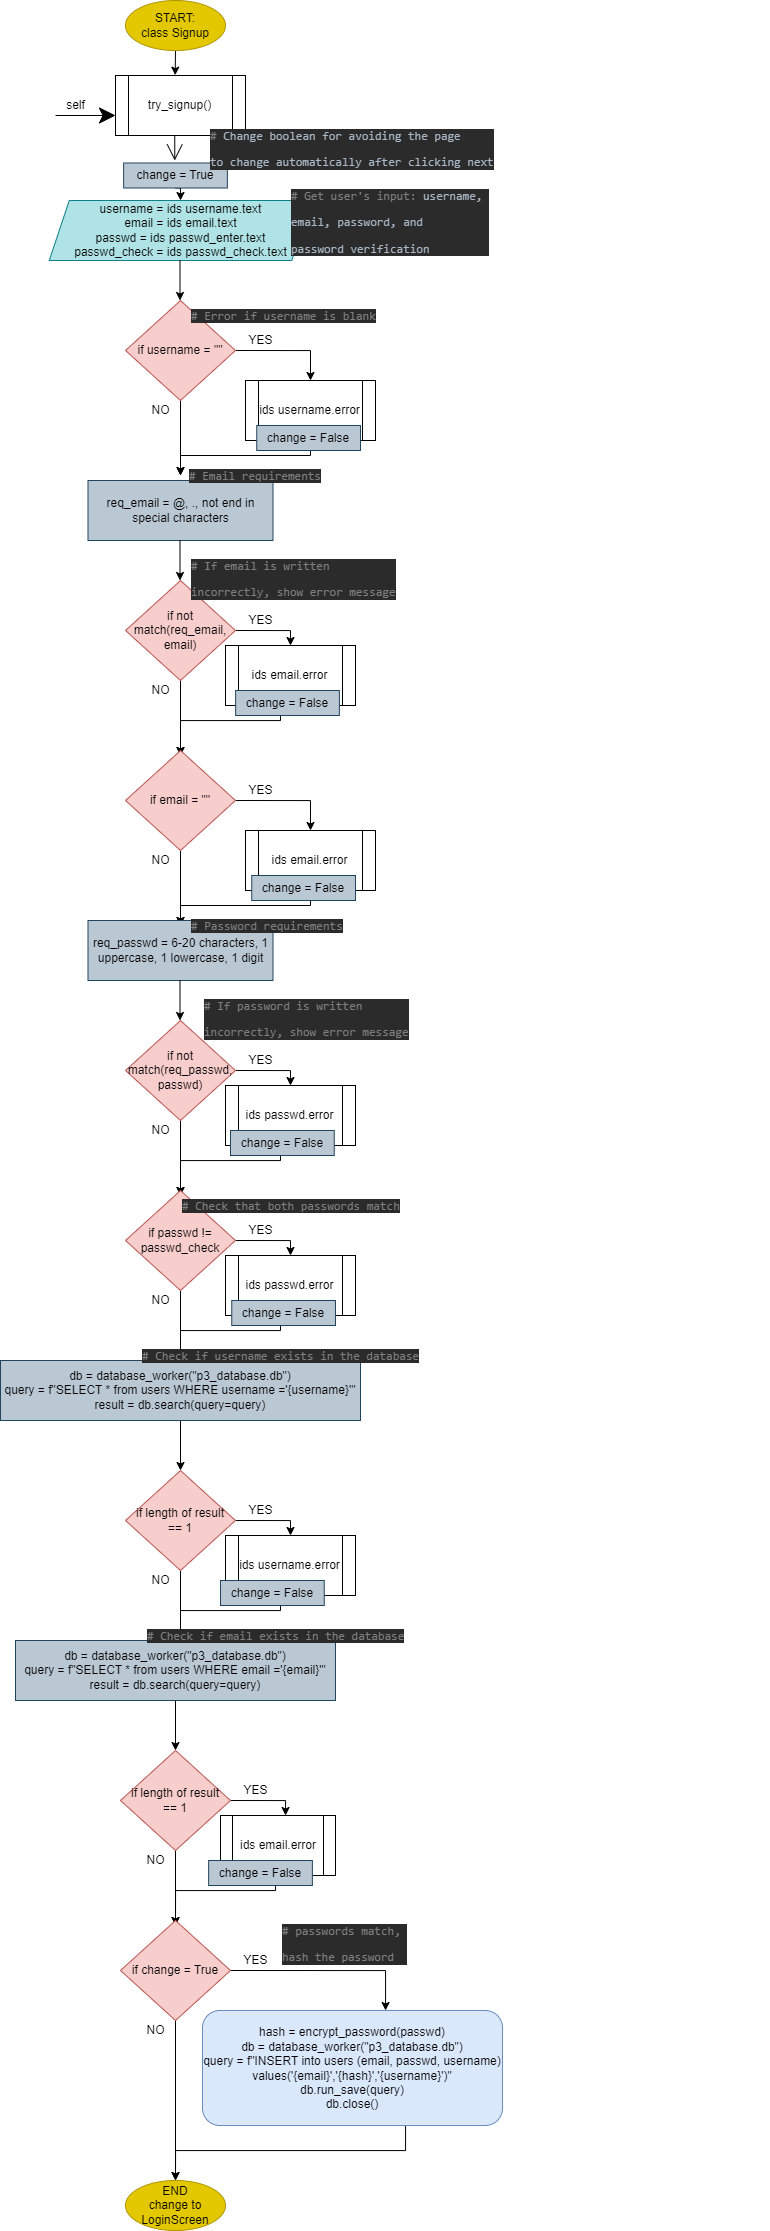
Fig. 5: Flow diagram of the sign up screen
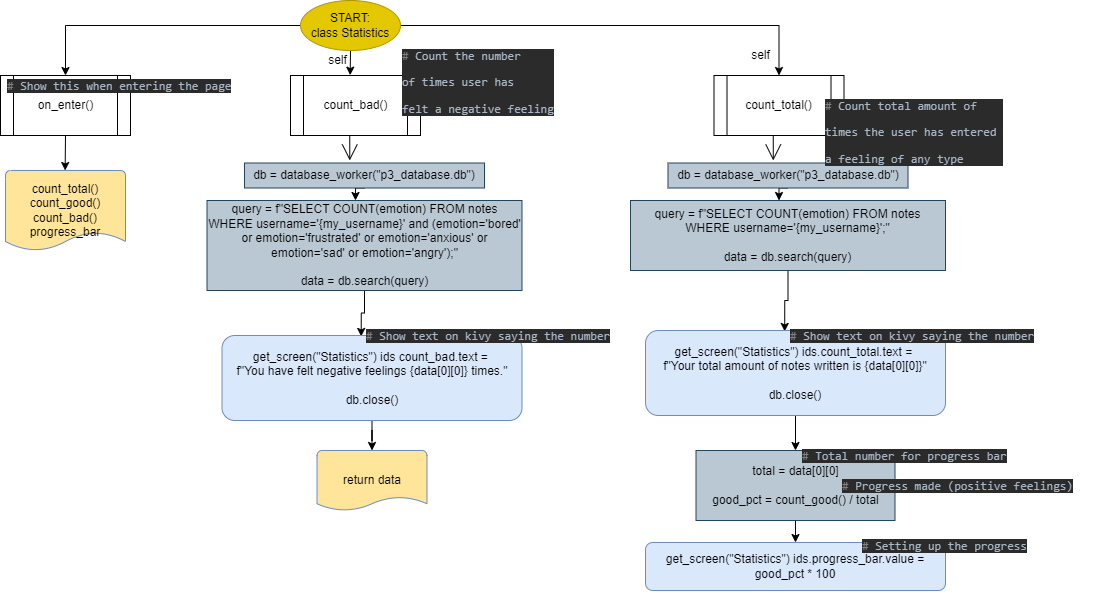
Fig. 6: Flow diagram of the Statistics class
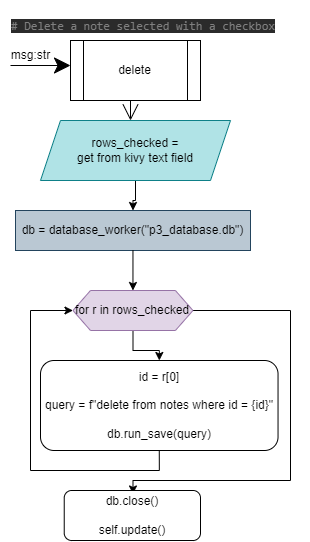
Fig. 7: Flow diagram of the delete function in the AllNotes class.
| Task No | Planned Action | Planned Outcome | Time estimate | Target completion date | Criterion |
|---|---|---|---|---|---|
| 1 | First meeting with client | Client described her requiremetns for the project | 10min | Feb 10 | A |
| 2 | Second meeting with client | Write Success Criteria and Client gives her agreeing | 10min | Feb 20 | A |
| 3 | Write the problem context | Problem definition | 10min | Feb 20 | A |
| 4 | Write proposed solution | Have a better understanding of what I have to do and write design statement | 15min | Feb 22 | A |
| 5 | Create first page | Code first page, which contains login and singup buttons | 45min | Feb 28 | C |
| 6 | Create sign up page | Code sign up and database | 1h | Feb 28 | C |
| 7 | Create log in page | Code log in and connect it to database | 1h | Feb 28 | C |
| 8 | Make prototype | Draw a digital protoype (Wireframe diagram) | 2h | Mar 1 | B |
| 9 | Third meeting with client | Progress Check and show digital prototype | 10min | Mar 2 | B |
| 10 | Flowchart | Make flowchart diagrams | 1h | Mar 5 | B |
| 11 | UML Diagram | Draw UML Diagram | 20min | Mar 5 | B |
| 12 | ER Diagram | Draw ER Diagram | 10min | Mar 5 | B |
| 13 | Sign up requirements | Add password and email requirements | 40min | Mar 6 | C |
| 14 | Make main page | Code main page of the program, with 4 buttons | 30min | Mar 6 | C |
| 15 | Make buttons feelings | Code the feelings buttons and connect to database | 1h | Mar 6 | C |
| 16 | Make folders buttons | Code the folders buttons based on the the feelings buttons | 10min | Mar 6 | C |
| 17 | Delete note | Code how to delete a note | 10min | Mar 6 | C |
| 18 | Cancel and back buttons | Code cancel and back buttons to put everywhere around the program | 15min | Mar 6 | C |
| 19 | SQL check | Make changes on names of tables and columns so it is more user-friendly | 15min | Mar 7 | C |
| 20 | Database check | Add username as a column of the notes table | 10min | Mar 7 | C |
| 21 | Design check | Check kivy program and adjust design to make it more user-friendly | 1h | Mar 7 | C |
| 22 | Code review | Make sure that there are comments everywhere | 30min | Mar 7 | C |
| 23 | Make statistics | Code statistics screen and add a progress bar | 1h | Mar 7 | C |
| 24 | Test plan | Try tests and write on GitHub | 30min | Mar 7 | B |
| 25 | Code in GitHub | Paste code on GitHub and explain it | 1h | Mar 8 | C |
| 26 | Sources | Get summary of all sources and put on repository | 10min | Mar 9 | C |
| 27 | Tools used | Write tools used for unit 3 | 5min | Mar 9 | C |
| 28 | Check functionality | Use the final app as a user, test it | 30min | Mar 9 | D |
| 29 | Video | Record video | 15min | Mar 10 | D |
| 30 | Flow diagram | Make flow diagram of the Sign Up screen | 1h | Mar 10 | B |
| 31 | Flow diagram | Make flow diagram of the Statistics class | 1h | Mar 10 | B |
Table 2: Record of Task- showing the planning and working process of the project. All the steps are related to Planning, Solution Overview analysis and Development, and Functionality (criterias A, B C, and D). The target completion date and the time estimate for each task is also shown.
- More details on the comments of the code
# FIRST PAGE: What do you want to do next? Chose Login or Sign Up
class IntroScreen(MDScreen):
    # Pressing Login button gets you to the Login Screen
    def press_login(self):
        self.parent.current = "LoginScreen"

    # Pressing Sign up button gets you to Sign up Screen
    def press_signup(self):
        self.parent.current = "SignupScreen"
<IntroScreen>
size: 500, 500
FitImage:
source: "relaxing-wallpaper.jpg"
MDCard:
size_hint: 0.6, .7
elevation: 2
orientation: "vertical"
pos_hint: {"center_x": .5, "center_y": .5}
padding: dp(50)
MDBoxLayout:
orientation: "vertical"
MDLabel:
text: "Welcome to YasModo, the best app to keep track of your feelings"
font_style: "H3"
font_name: 'Righteous-Regular'
size_hint: .9, .5
halign: "center"
spacing: dp(1)
MDBoxLayout:
size_hint: 1, .8
MDRaisedButton:
id: login
text: "[size=24][b]Login[/b][/size]"
on_press: root.press_login()
size_hint: .3, .6
md_bg_color: "#eb86db"
MDLabel:
size_hint: .3, 1
MDRaisedButton:
id: signup
text: "[size=24][b]Sign up[/b][/size]"
on_press: root.press_signup()
size_hint: .3, .6
md_bg_color: "#bfa1e3"This code defines a screen called "IntroScreen" using the MDScreen class. This screen has two methods called "press_login" and "press_signup" that change the parent widget's current screen to either "LoginScreen" or "SignupScreen" when the corresponding button is pressed. This is the first thing that user will see. It is also being made in kivy with Labels and Raised buttons, and with a user-friendly design. This helps my client because she wants to be able to login and register.
# LOG IN
class LoginScreen(MDScreen):
    # Log in option
    def try_login(self):
        # Change boolean for avoiding the page to change automatically after clicking next.
        change = True
        # Get user's input: username and password
        username = self.ids.username.text
        passwd = self.ids.passwd.text
        # Check existing usernames on database
        query = f"SELECT * from users WHERE username='{username}'"
        db = database_worker("p3_database.db")
        result = db.search(query=query)
        global my_username
        my_username = username
        db.close()

        # Idea -show visible password: https://www.youtube.com/watch?v=rIATjmj-Sb4&ab_channel=SBDeveloper

        # Match password and change screen
        if len(result) == 1:
            id, username, email, hashed = result[0]
            if check_password(user_password=passwd, hashed_password=hashed):
                self.parent.current = "AppScreen"
                # Delete text written
                self.ids.username.text = ""
                self.ids.passwd.text = ""

            # Incorrect password, show error message but do not change screen, stay there
            else:
                self.ids.passwd.error = True
                change = False
        # Incorrect username, show error message and delete both username and password written
        else:
            self.ids.username.error = True
            self.ids.username.text = ""
            self.ids.passwd.text = ""
            change = False

    # Cancel operation and go back to first page, IntroScreen
    def cancel(self):
        self.ids.username.text = ""
        self.ids.passwd.text = ""
        self.parent.current = "IntroScreen"
<LoginScreen>
size: 500, 500
FitImage:
source: "relaxing-wallpaper.jpg"
MDCard:
size_hint: 0.6, .7
elevation: 2
orientation: "vertical"
pos_hint: {"center_x": .5, "center_y": .5}
padding: dp(50)
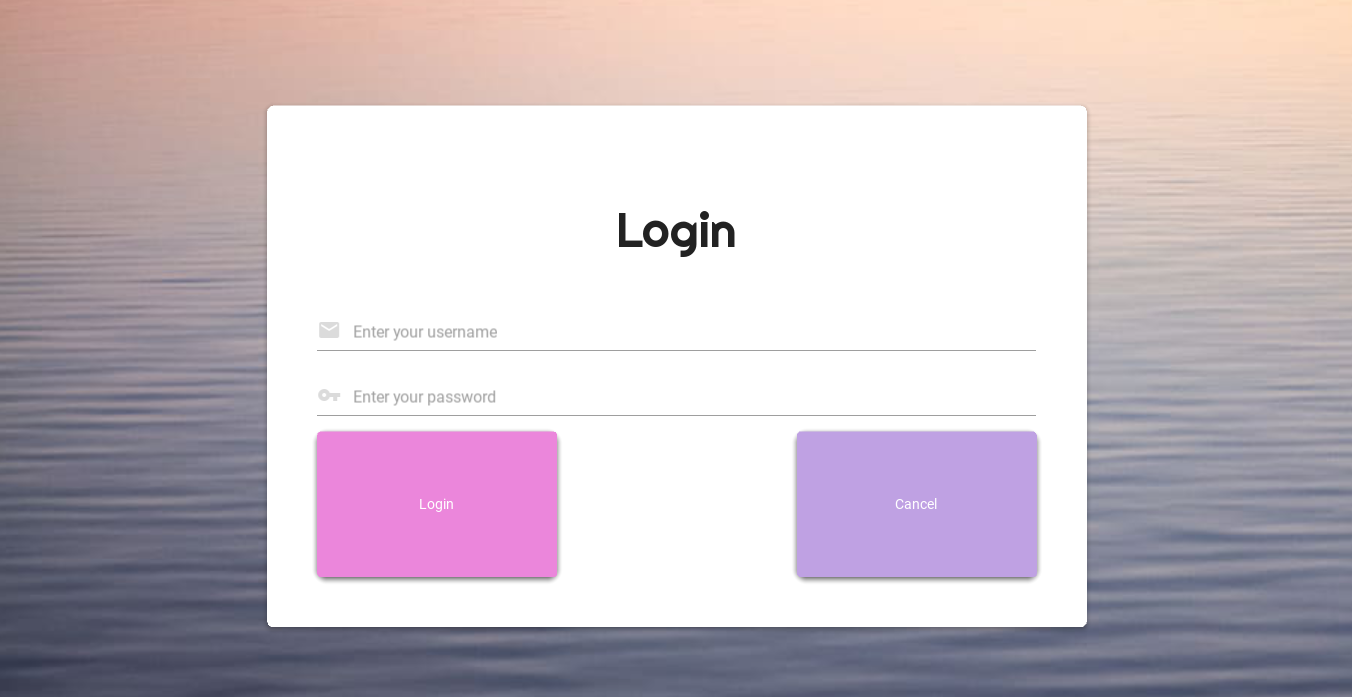
MDLabel:
text: "Login"
font_style: "H3"
font_name: 'Righteous-Regular'
size_hint: 1, .2
halign: "center"
pos_hint: {"center_x":.5, "center_y":.5}
MDTextField:
id: username
hint_text: "Enter your username"
icon_left: "email"
helper_text_mode: "on_error"
helper_text: "Incorrect username"
MDTextField:
id: passwd
hint_text: "Enter your password"
icon_left: "key"
password: True
helper_text_mode: "on_error"
helper_text: "Incorrect password"
MDBoxLayout:
size_hint: 1, .2
MDRaisedButton:
id: login
text: "Login"
on_press: root.try_login()
size_hint: .3, 1
md_bg_color: "#eb86db"
MDLabel:
size_hint: .3, 1
MDRaisedButton:
id: cancel
text: "Cancel"
on_press: root.cancel()
size_hint: .3, 1
md_bg_color: "#bfa1e3"
This code defines a LoginScreen class with two methods. The try_login() method is responsible for checking the username and password provided by the user against the existing usernames and passwords in the database. If the username and password match, the method changes the screen to "AppScreen". If the password is incorrect, the method shows an error message but does not change the screen. If the username is incorrect, the method shows an error message and deletes both the username and password written. The cancel() method is responsible for deleting both the username and password written and changing the screen to "IntroScreen".
The method try_login() works when the user tries to log in. It gets the user's input for their username and password, checks wheather the username exists in the database, and then compares the hashed password with the entered password to determine wheather they match. If the username and password are correct, the user is redirected to the main app screen. Otherwise, an error message is displayed.
The method cancel() works when the user cancels the login operation. It resets the text fields and returns the user to the first screen. The code connects with a database table named "users" with columns "id", "username", "email", and "hashed" and witht the check_password() function.
This helps my client because she wants to be able to login in a secure way. Once a user has entered the username, they will only be able to access the notes that they have written, so it is important to know your password and email. (Criteria 1)
# SIGN UP
class SignupScreen(MDScreen):
    # Sign up option
    def try_signup(self):
        # Get user's input: username, email, password, and password verification
        username = self.ids.username.text
        email = self.ids.email.text
        passwd = self.ids.passwd_enter.text
        passwd_check = self.ids.passwd_check.text
        # Change boolean for avoiding the page to change automatically after clicking next
        change = True

        # Error if username is blank, but do not change screen
        if username == "":
            self.ids.username.error = True
            change = False

        # Email requirements. Code based in: https://www.geeksforgeeks.org/check-if-email-address-valid-or-not-in-python/
        # Email needs to have a @ symbol, a . (point), and not other special characters.
        req_email = r'\b[A-Za-z0-9._%+-]+@[A-Za-z0-9.-]+\.[A-Z|a-z]{2,7}\b'

        # If email is written incorrectly, show error message
        if not (re.fullmatch(req_email, email)):
            self.ids.email.error = True
            return
        if email == "":
            self.ids.email.error = True
            change = False

        # Password requirements. Code based in: https://stackoverflow.com/questions/41117733/validation-of-a-password-python
        # Password needs to have between 6 and 20 characters, have a number, a lowercase, and an uppercase at least
        req_passwd = re.compile('^(?=\S{6,20}$)(?=.*?\d)(?=.*?[a-z])(?=.*?[A-Z])')

        # If password is written incorrectly, show error message
        if not re.match(req_passwd, passwd):
            self.ids.passwd_enter.error = True
            return

        # Check that both passwords match
        if passwd != passwd_check:
            self.ids.passwd_check.error = True
            change = False

        # Check if username exists in the database
        db = database_worker("p3_database.db")
        query = f"SELECT * from users WHERE username ='{username}'"
        result = db.search(query=query)
        # If username exists, show error message
        if len(result) == 1:
            self.ids.username.error = True
            change = False

        # Check if email exists
        db = database_worker("p3_database.db")
        query = f"SELECT * from users WHERE email ='{email}'"
        result = db.search(query=query)
        # If email exists, show error message
        if len(result) == 1:
            self.ids.email.error = True
            change = False

        # passwords match, hash the password
        if change:
            hash = encrypt_password(passwd)
            db = database_worker("p3_database.db")
            query = f"INSERT into users (email, passwd, username) values('{email}','{hash}','{username}')"
            db.run_save(query)
            db.close()
            username = ""
            email = ""
            passwd = ""
            passwd_check = ""
            self.parent.current = "LoginScreen"

    # Cancel operation, delete text written, go back to first page, IntroScreen
    def cancel(self):
        self.ids.username.text = ""
        self.ids.email.text = ""
        self.ids.passwd_enter.text = ""
        self.ids.passwd_check.text = ""
        self.parent.current = "IntroScreen"
<SignupScreen>
size: 500, 500
FitImage:
source: "relaxing-wallpaper.jpg"
MDCard:
size_hint: 0.7, .8
elevation: 2
orientation: "vertical"
pos_hint: {"center_x": .5, "center_y": .5}
padding: dp(50)
MDLabel:
text: "Sign up"
font_style: "H3"
font_name: 'Righteous-Regular'
size_hint: 1, .2
halign: "center"
pos_hint: {"center_x":.5, "center_y":.5}
MDTextField:
id: username
hint_text: "Enter username"
icon_left: "account"
size_hint: 1, .1
helper_text_mode: "on_error"
helper_text: "Username already exists or incorrect"
MDTextField:
id: email
hint_text: "Enter email"
icon_left: "email"
size_hint: 1, .1
helper_text_mode: "on_error"
helper_text: "Email already exists or incorrect"
MDTextField:
id: passwd_enter
hint_text: "Enter password"
icon_left: "key"
password: True
size_hint: 1, .1
helper_text_mode: "on_error"
helper_text: "Password must have 6-20 characters, 1 upcase, 1 lowcase, and 1 digit"
MDTextField:
id: passwd_check
size_hint: 1, .1
hint_text: "Confirm password"
icon_left: "key"
password: True
helper_text_mode: "on_error"
helper_text: "Password does not match"
MDBoxLayout:
size_hint: 1, .15
MDRaisedButton:
id: signup
text: "Submit"
on_press: root.try_signup()
size_hint: .3, 1
md_bg_color: "#eb86db"
MDLabel:
size_hint: .3, 1
MDRaisedButton:
id: signup
text: "Cancel"
on_press: root.cancel()
size_hint: .3, 1
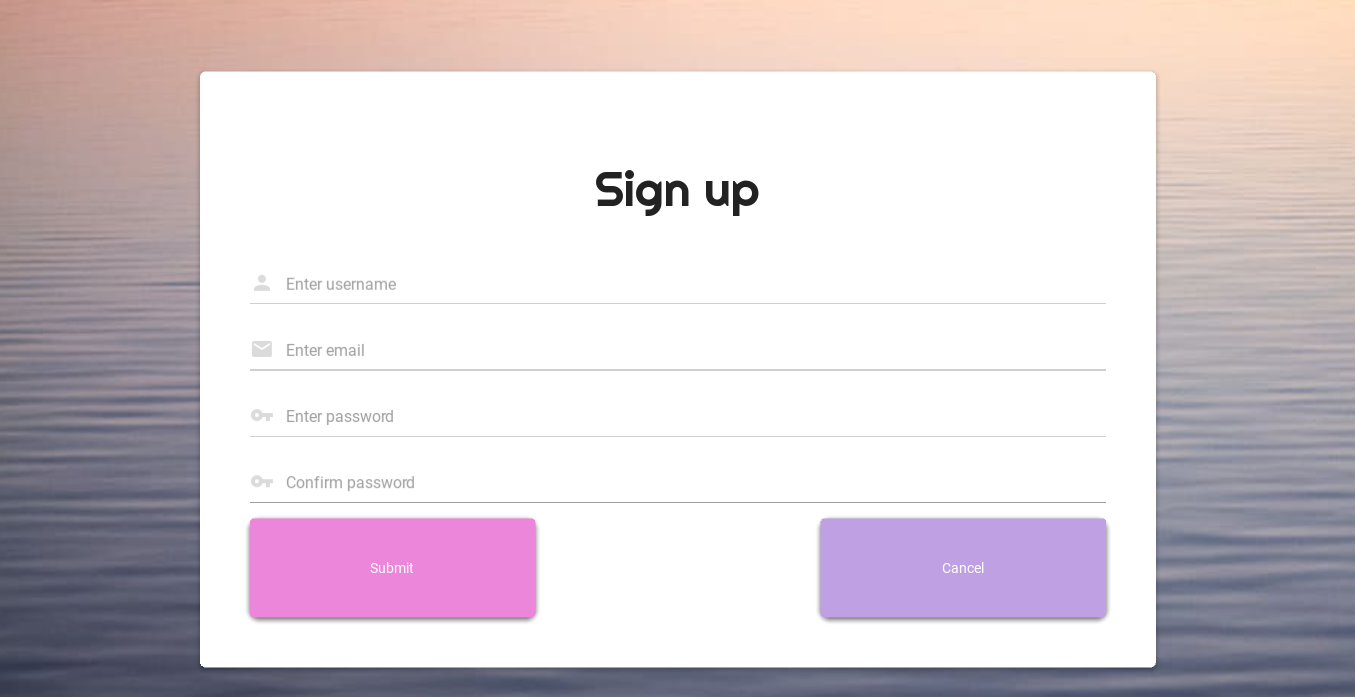
md_bg_color: "#bfa1e3"These functions are implementing the validations for both login and signup processes and interact with the database to check for existing users, create new users, and store hashed passwords. The try_signup() method is called when the user clicks a "Sign Up" button, the method gets the user's input from text fields for username, email, password, and password verification. There is validation on the input fields to ensure they meet certain criteria, like the email address being in the correct format and the password meeting some requirements. If any of the validation fails, an error message is displayed and the method returns, so the user can correct the input. If all the validation passes, the method hashes the user's password and inserts the user's information into a database. Finally, the method clears the input fields and changes the screen to a login screen. For the security requirement that the user asked for, the password is hashed.
This helps my client because she wants to be able to register following some requirements for email and password. Email will need to have "@" and "." and cannot end in special character, or have one. Password needs to have between 6 and 20 characters, with one uppercase, one lowercase, and one digit minimum. (Criteria 1)
# Main Screen of the App: HomePage with options
class AppScreen(MDScreen):
    pass
<AppScreen>
size: 500, 500
FitImage:
source: "relaxing-wallpaper.jpg"
MDCard:
size_hint: 0.6, .7
elevation: 2
orientation: "vertical"
pos_hint: {"center_x": .5, "center_y": .5}
padding: dp(50)
MDLabel:
text: "Welcome back! What do you want to do next?"
font_style: "H3"
font_name: 'Righteous-Regular'
size_hint: 1, .2
halign: "center"
pos_hint: {"center_x":.5, "center_y":.5}
MDScreen:
MDBoxLayout:
size_hint_y: .75
orientation: "vertical"
spacing: 25
MDFillRoundFlatIconButton:
text:"How are you feeling?"
font_style: "H6"
icon: "thought-bubble"
md_bg_color: "#eb86db"
pos_hint: {"center_x": .5, "center_y": .5}
padding: dp(15)
on_press: root.parent.current = "Feelings"
MDFillRoundFlatIconButton:
text:"Folders & Notes"
font_style: "H6"
icon: "folder"
md_bg_color: "#eb86db"
pos_hint: {"center_x": .5, "center_y": .5}
padding: dp(15)
on_press: root.parent.current = "Folders"
MDFillRoundFlatIconButton:
text: "Statistics"
font_style: "H6"
icon: "math-compass"
md_bg_color: "#eb86db"
pos_hint: {"center_x": .5, "center_y": .5}
padding: dp(15)
on_press: root.parent.current = "Statistics"
MDFillRoundFlatIconButton:
text:"Log out"
font_style: "H6"
icon: "logout"
md_bg_color: "#eb86db"
pos_hint: {"center_x": .5, "center_y": .5}
padding: dp(15)
on_press: root.parent.current = "IntroScreen"
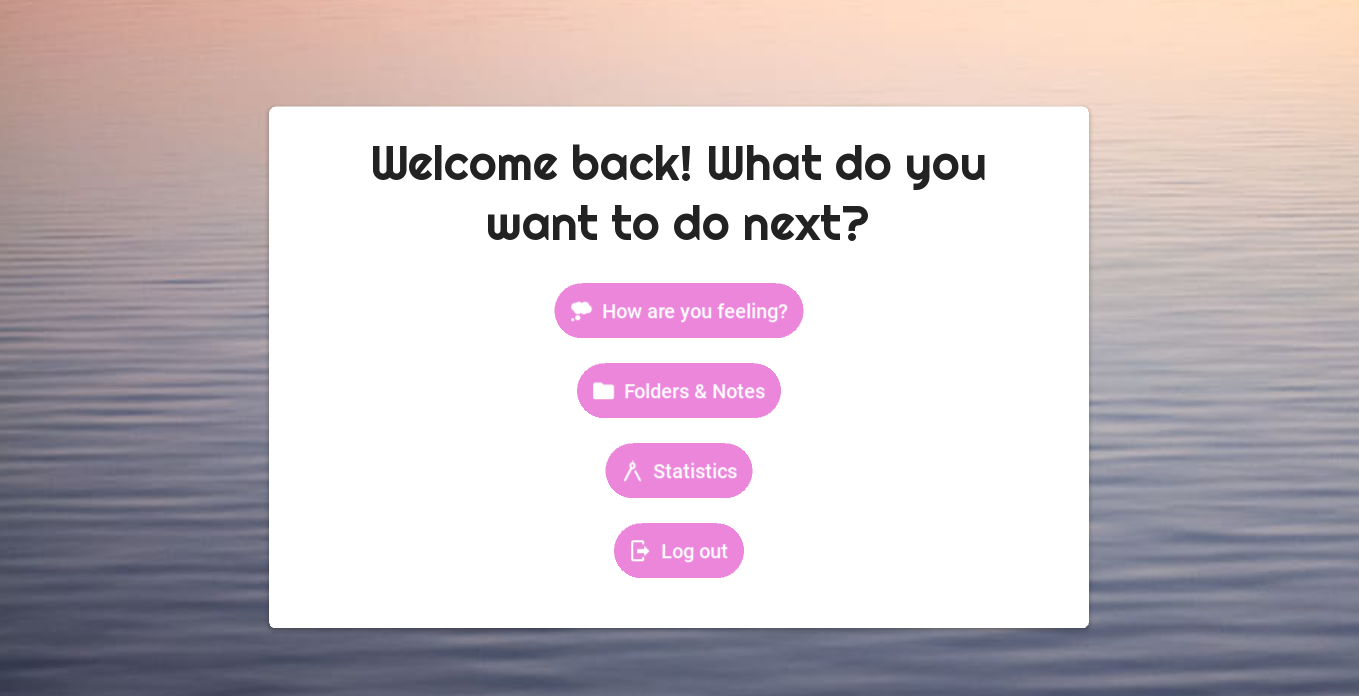
# code above based on (button types): https://kivymd.readthedocs.io/en/1.1.1/components/button/index.htmlThe main screen includes an image and a card with a welcome message and buttons to navigate to different parts of the app. The image displayed is a "FitImage" widget, which scales the image to fit the size of the widget. The card displayed is an "MDCard" widget, which has a specific size_hint and orientation. Inside the card, there is an "MDLabel" widget with text, font style, and size hint settings. Additionally, there is an "MDScreen" widget, which contains an "MDBoxLayout" widget with several "MDFillRoundFlatIconButton" widgets. These buttons have text, font style, icon, and color settings, as well as an "on_press" event that changes the screen to a different screen in the app.
This is helping my client in what she wants because this page will lead the users to other pages that follow the success criteria, like Statistics, How are you feeling, and Folders.
# Feelings: How are you feeling today?
class Feelings(MDScreen):
# Function for getting emotion selected on Kivy button
def emotions(self, emotion):
# Store emotion selected on global variable
global my_emotion
my_emotion = emotion
# Write text on Notes Screen using emotion selected
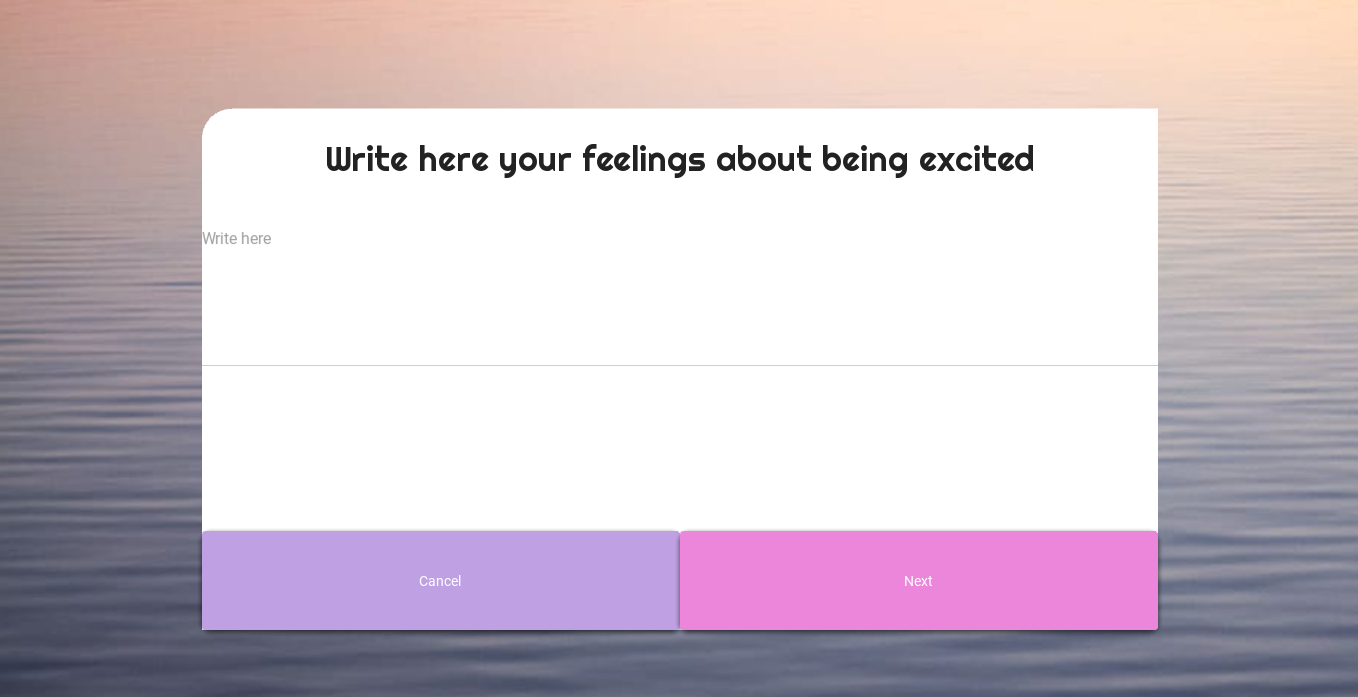
self.manager.get_screen("Notes").ids.notes_label.text = (f"Write here your feelings about being {emotion}")
return emotion
# Cancel operation and go back to the main AppScreen
def cancel(self):
self.parent.current = "AppScreen"<Feelings>
size: 500, 500
FitImage:
source: "relaxing-wallpaper.jpg"
MDCard:
size_hint: .7, .7
pos_hint: {"center_x":.5, "center_y":.5}
radius: 30, 0, 30, 0 #top-left, top-right, bottom-left, bottom-right
orientation: "vertical"
MDLabel:
text: "How are you feeling today?"
font_style: "H4"
font_name: 'Righteous-Regular'
size_hint: 1, .4
halign: "center"
MDGridLayout:
rows: 2
cols: 5
spacing: 10
MDRaisedButton:
text: "excited"
font_style: "H4"
size_hint: .1, .2
on_press:
root.emotions("excited")
root.parent.current = "Notes"
md_bg_color: "#bfa1e3"
MDRaisedButton:
text: "happy"
font_style: "H4"
size_hint: .1, .2
on_press:
root.emotions("happy")
root.parent.current = "Notes"
md_bg_color: "#bfa1e3"
MDRaisedButton:
text: "calm"
font_style: "H4"
size_hint: .1, .2
on_press:
root.emotions("calm")
root.parent.current = "Notes"
md_bg_color: "#bfa1e3"
MDRaisedButton:
text: "energetic"
font_style: "H4"
size_hint: .1, .2
on_press:
root.emotions("energetic")
root.parent.current = "Notes"
md_bg_color: "#bfa1e3"
MDRaisedButton:
text: "confident"
font_style: "H4"
size_hint: .1, .2
on_press:
root.emotions("confident")
root.parent.current = "Notes"
md_bg_color: "#bfa1e3"
MDRaisedButton:
text: "bored"
font_style: "H4"
size_hint: .1, .2
on_press:
root.emotions("bored")
root.parent.current = "Notes"
md_bg_color: "#bfa1e3"
MDRaisedButton:
text: "frustrated"
font_style: "H4"
size_hint: .1, .2
on_press:
root.emotions("frustrated")
root.parent.current = "Notes"
md_bg_color: "#bfa1e3"
MDRaisedButton:
text: "anxious"
font_style: "H4"
size_hint: .1, .2
on_press:
root.emotions("anxious")
root.parent.current = "Notes"
md_bg_color: "#bfa1e3"
MDRaisedButton:
text: "sad"
font_style: "H4"
size_hint: .1, .2
on_press:
root.emotions("sad")
root.parent.current = "Notes"
md_bg_color: "#bfa1e3"
MDRaisedButton:
text: "angry"
font_style: "H4"
size_hint: .1, .2
on_press:
root.emotions("angry")
root.parent.current = "Notes"
md_bg_color: "#bfa1e3"
MDRaisedButton:
size_hint: .1, .1
text: "Cancel"
md_bg_color: "#eb86db"
on_press: root.cancel()
This is the page for the emotions buttons. There is a kivy screen called "Feelings" and a Python class called Feelings that inherits from MDScreen. The screen consists of a background image and a card with a title label ("How are you feeling today?") and a grid of buttons with different emotions ("excited", "happy", "calm", etc.) and their corresponding colors. The buttons call the emotions function of the Feelings class when pressed, passing the emotion as an argument. The emotions function stores the selected emotion in a global variable called my_emotion and changes the text of a label called notes_label on the "Notes" screen to prompt the user to write their feelings about the selected emotion. The cancel function allows the user to cancel the operation and return to the main screen ("AppScreen").
This is helping my client because she wanted to be able to choose from a set amount of emotions, that we previously discussed. The design is also user-friendly and has a relaxing background to make the user be calm. (Criteria 2)

# Notes Page: Write about the emotion you selected
class Notes(MDScreen):
    # Create new note
    def new_note(self):
        # Get input from user and get current date with datetime library
        note = self.ids.note.text
        nowdate = datetime.datetime.now().date()
        # Add text written to database
        db = database_worker("p3_database.db")
        query = f"INSERT into notes (username, emotion, note, nowdate) values ('{my_username}', '{my_emotion}', '{note}','{nowdate}')"
        db.run_save(query)
        db.close()
        # Delete text written from widget so next time is blank and Change Screen
        self.ids.note.text = ""
        self.parent.current = "AppScreen"

    # Cancel operation and go back to the main page: AppScreen
    def cancel(self):
        self.ids.note.text = ""
        self.parent.current = "AppScreen"
<Notes>
size: 500, 500
FitImage:
source: "relaxing-wallpaper.jpg"
MDCard:
size_hint: .7, .7
pos_hint: {"center_x":.5, "center_y":.5}
radius: 30, 0, 30, 0 #top-left, top-right, bottom-left, bottom-right
orientation: "vertical"
MDLabel:
id: notes_label
text: "Write here your feelings about being"
font_style: "H4"
font_name: 'Righteous-Regular'
size_hint: 1, .4
halign: "center"
MDTextField:
id: note
size_hint: 1, .7
hint_text: "Write here"
multiline: True
MDBoxLayout:
MDRaisedButton:
size_hint: .1, .4
text: "Cancel"
md_bg_color: "#bfa1e3"
on_press: root.cancel()
MDRaisedButton:
size_hint: .1, .4
text: "Next"
md_bg_color: "#eb86db"
on_press: root.new_note()This is the Notes page that allows the user to write about their emotions and to save them to a database. The Notes screen consists of a background image, a card layout, and two buttons. The card layout contains a label asking the user to write their feelings, a multiline text field for inputting the note, and two buttons for canceling or saving the note.
The new_note() function is called when the user clicks the "Next" button. It gets the input text from the note field, gets the current date using the datetime library, and saves the data to the database using the database_worker function. The SQL query inserts the user's username, emotion, note, and current date into the notes table.
The cancel() function is called when the user clicks the "Cancel" button. It clears the note field and changes the screen back to the main AppScreen.
This helps my client because she wanted do be able to write notes about the feeling she selected (Criteria 3)
# Read Notes according to emotion selected on previous page
class AllNotes(MDScreen):
    data_table = None
    # Get data from database
    def update(self):
        # Global variable to connect with emotion selected in class Folders
        global my_emotion
        emotion = my_emotion
        # Show text on label
        self.manager.get_screen("AllNotes").ids.table_label.text = (f"Your notes: {emotion}")
        # Get notes from database where the emotion is the one selected
        db = database_worker("p3_database.db")
        query = f"SELECT * FROM notes WHERE emotion='{my_emotion}' AND username='{my_username}'"
        data = db.search(query)
        db.close()
        self.data_table.update_row_data(None, data)

    # Delete a note selected with a checkbox
    def delete(self):
        rows_checked = self.data_table.get_row_checks()
        db = database_worker("p3_database.db")
        for r in rows_checked:
            id = r[0]
            query = f"delete from notes where id = {id}"
            print(query)
            db.run_save(query)
        db.close()
        self.update()

    # Cancel operation and go back to AppScreen
    def cancel(self):
        self.parent.current = "AppScreen"

    # Before the screen is shown, this code runs
    def on_pre_enter(self, *args):
        self.data_table = MDDataTable(
            size_hint = (.9, .7),
            pos_hint = {"center_x":.5, "center_y":.5},
            use_pagination = True,
            check = True,
            column_data = [("ID", 25), ("Username", 30), ("Emotion", 30),
                           ("Note",120), ("Date", 30)]
        )
        # add table and checkbox
        self.data_table.bind(on_check_press=self.check_pressed)
        self.add_widget(self.data_table)
        self.update()

    # Check row
    def check_pressed(self, table, current_row):
        print("a row was pressed ", current_row)
<AllNotes>
size: 500, 500
FitImage:
source: "relaxing-wallpaper.jpg"
MDBoxLayout:
orientation:"vertical"
MDLabel:
id: table_label
text: "All your notes"
font_name: 'Righteous-Regular'
halign: "center"
font_size: 50
size_hint: 1, .1
MDBoxLayout:
id: container
orientation: "horizontal"
size_hint: 1, .9
MDBoxLayout:
id: side_panel
orientation: "horizontal"
size_hint: .3, 1
MDRaisedButton:
text: "Delete"
size_hint: .1, .1
md_bg_color: "#bfa1e3"
on_press: root.delete()
MDRaisedButton:
size_hint: .1, .1
text: "Back"
md_bg_color: "#eb86db"
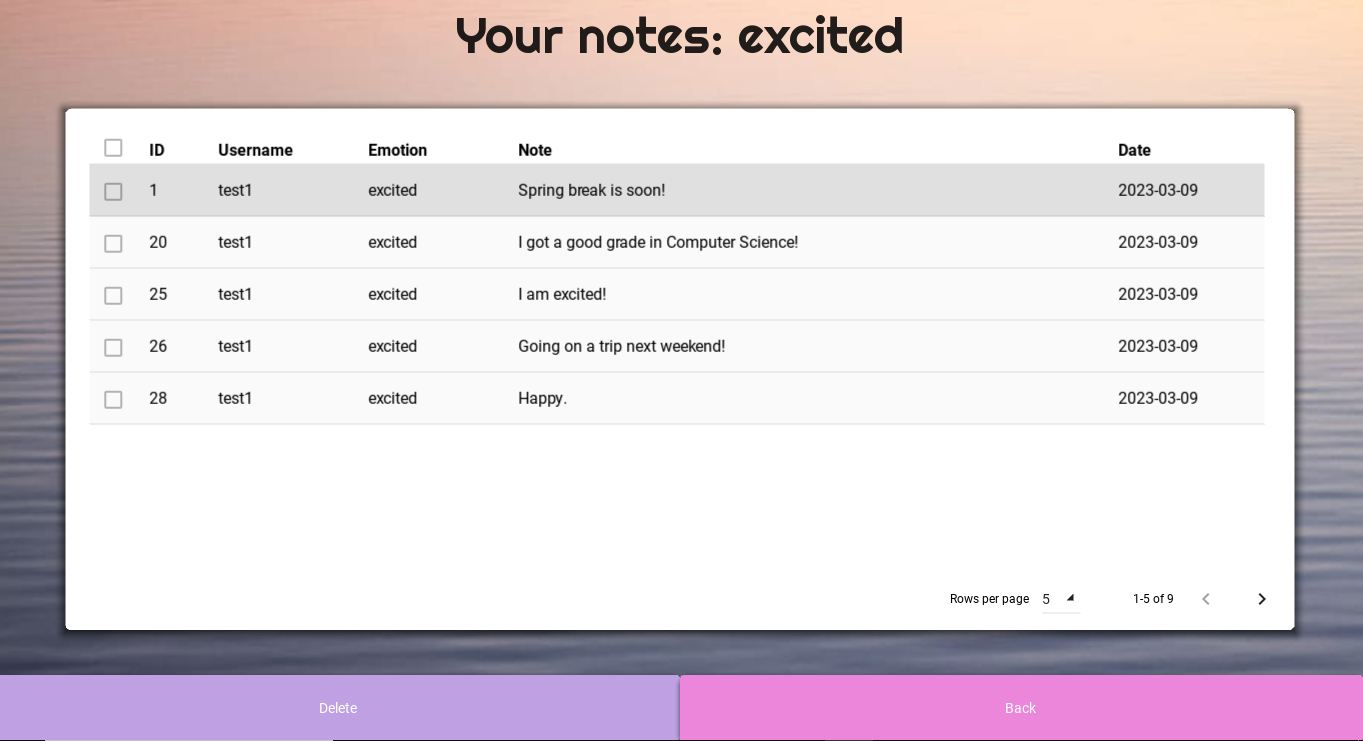
on_press: root.cancel()This is the "AllNotes" screen in Python Kivy. This screen displays a list of notes that were previously saved by the user, filtered by the emotion selected in the previous "Folders" screen.
The AllNotes class defines several methods for interacting with the notes database. The update() method gets all notes from the database with the selected emotion and displays them in a MDDataTable widget. The delete() method deletes all notes that were checked by the user using the MDDataTable checkbox. The cancel() method returns to the previous screen. The on_pre_enter() method is called before the screen is shown and creates the MDDataTable widget.
The corresponding .kv file defines the UI layout of the "AllNotes" screen. It includes a header label, a container box for the MDDataTable widget and two buttons: one for deleting checked notes and one for returning to the previous screen.
This helps my client because she wanted to be able to read the notes she had written organised by cateogory (Criteria 4), and to be able to delete them (Criteria 5).
# Statistics: show basic data about user's well-being
class Statistics(MDScreen):
    # Count the number of time user has felt a negative feeling
    def count_bad(self):
        db = database_worker("p3_database.db")
        query = f"SELECT COUNT(emotion) FROM notes WHERE username='{my_username}' and (emotion='bored' or emotion='frustrated' or emotion='anxious' or emotion='sad' or emotion='angry');"
        data = db.search(query)
        # Show text on kivy saying the number
        self.manager.get_screen("Statistics").ids.count_bad.text = f"You have felt negative feelings {data[0][0]} times."
        db.close()
        return data[0][0]

    # Count the number of time user has felt a positive feeling
    def count_good(self):
        db = database_worker("p3_database.db")
        query = f"SELECT COUNT(emotion) FROM notes WHERE username='{my_username}' and (emotion='excited' or emotion='happy' or emotion='calm' or emotion='energetic' or emotion='confident');"
        data = db.search(query)
        # Show text on kivy saying the number
        self.manager.get_screen("Statistics").ids.count_good.text = f"You have felt positive feelings {data[0][0]} times."
        db.close()
        return data[0][0]

    # Count total amount of times the user has entered a feeling of any type
    def count_total(self):
        db = database_worker("p3_database.db")
        query = f"SELECT COUNT(emotion) FROM notes WHERE username='{my_username}';"
        data = db.search(query)
        # Show text on kivy saying the number
        self.manager.get_screen("Statistics").ids.count_total.text = f"Your total amount of notes written is {data[0][0]}"
        db.close()

        # Setting up the progress
        total = data[0][0]      # Total number for progress bar
        good_pct = self.count_good() / total     # Progress made (positive feelings)
        self.manager.get_screen("Statistics").ids.progress_bar.value = good_pct * 100

    # Show this when entering the page
    def on_enter(self):
        self.count_total()      # Total emotions felt
        self.count_good()       # Positive emotions felt
        self.count_bad()        # Negative emotions felt

        # Add progress bar
        self.progress_bar = MDProgressBar(max=100, value=0, size_hint=(0.8, None), height="20dp", pos_hint={"center_x": 0.5, "center_y": 0.3})
        self.manager.get_screen("Statistics").add_widget(self.progress_bar)
<Statistics>
size: 500, 500
FitImage:
source: "relaxing-wallpaper.jpg"
MDCard:
size_hint: 0.6, .7
elevation: 2
orientation: "vertical"
pos_hint: {"center_x": .5, "center_y": .5}
padding: dp(50)
MDBoxLayout:
orientation: "vertical"
MDLabel:
text: "Statistics"
font_style: "H3"
font_name: 'Righteous-Regular'
size_hint: .9, .5
halign: "center"
spacing: dp(1)
MDLabel:
id: count_total
text: "Your total amount of notes written is 1"
font_style: "H6"
size_hint: .9, .5
halign: "center"
spacing: dp(1)
MDLabel:
id: count_good
text: "You have felt good 0 times."
font_style: "H6"
size_hint: .9, .5
halign: "center"
spacing: dp(1)
MDLabel:
id: count_bad
text: "You have felt bad 0 times."
font_style: "H6"
size_hint: .9, .5
halign: "center"
spacing: dp(1)
MDProgressBar:
id: progress_bar
value: 0
color: app.theme_cls.accent_color
pos_hint: {"center_x": 0.5, "center_y": 0.3}
MDRaisedButton:
id: back
text: "Back"
on_press: root.parent.current = "AppScreen"
size_hint: .2, .1
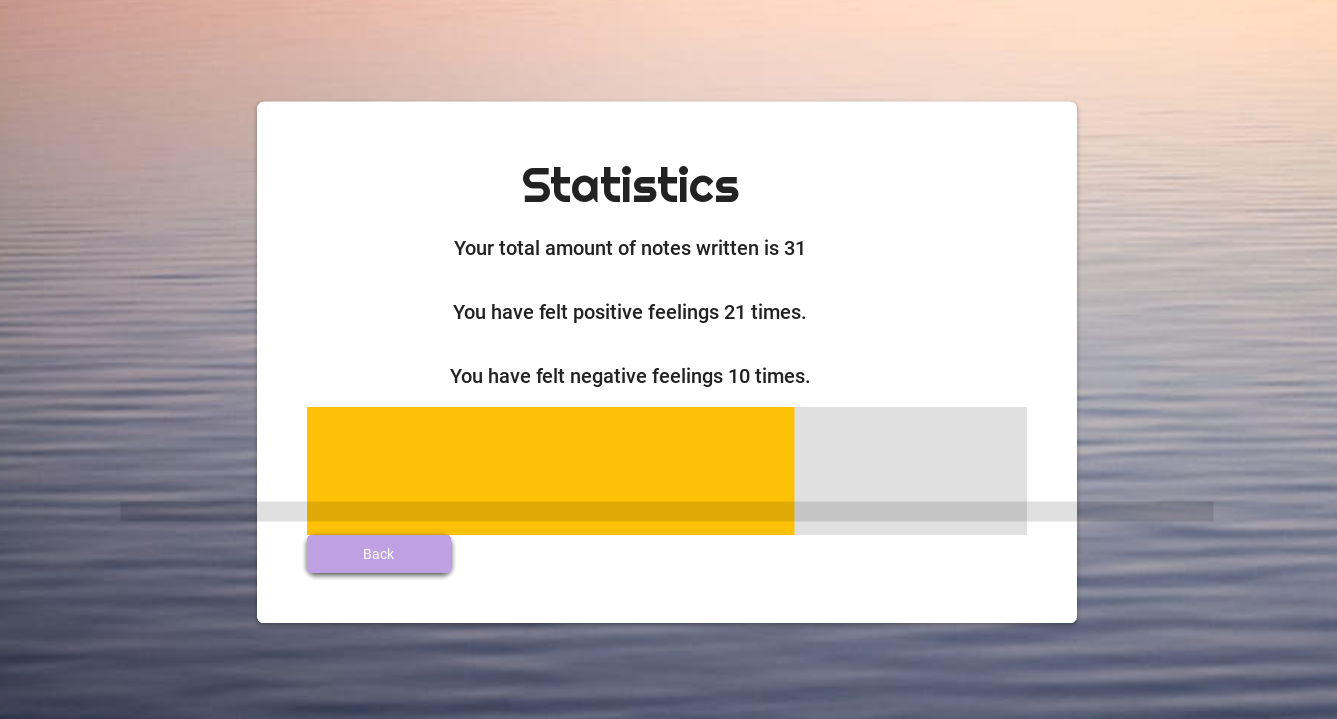
md_bg_color: "#bfa1e3"The screen "Statistics" displays basic data about the user's well-being. There are three labels that display the number of times the user has felt negative feelings, positive feelings, and the total amount of notes written. These labels are updated by calling the count_bad(), count_good(), and count_total() methods, respectively. These are methods on Python. The count_bad() counts the number of times the user has felt a negative feeling by querying a SQLite database and displaying the result on a Kivy Label with the id count_bad. The count_good() counts the number of times the user has felt a positive feeling by querying a SQLite database and displaying the result on a Kivy Label with the id count_good. The count_total() counts the total amount of times the user has entered a feeling of any type by querying a SQLite database and displaying the result on a Kivy Label with the id count_total. Additionally, it sets up a progress bar widget by calculating the percentage of positive feelings in relation to the total amount of notes and updating the value of a Kivy ProgressBar with the id progress_bar. The on_enter() method is called when the Statistics screen is entered. It calls the count_total(), count_good(), and count_bad() methods and creates and adds a MDProgressBar widget to the screen with the id progress_bar.
The Kivy code defines a screen with a background image and a MDCard widget with a MDBoxLayout containing several MDLabel widgets and a MDProgressBar widget with the id progress_bar. The MDCard widget also has a MDRaisedButton with the id back that takes the user back to the AppScreen screen when pressed. The MDLabel widgets display the results of the queries made in the Statistics class methods.
There is also a progress bar that shows the user's progress in feeling positive emotions. This progress bar is updated by calling the count_good() and count_total() methods to calculate the percentage of positive emotions felt by the user. Also, a "Back" button that allows the user to go back to the previous screen.
This helps my client because she wanted the application to give statistical information about the user's well-being, like number of positive and negative emotions felt. (Criteria 6)
# SQL queries for creating table users
query = """CREATE TABLE if not exists users(
id integer primary key,
username text,
email text,
passwd text
)"""
db = database_worker("p3_database.db")
db.run_save(query)
# SQL queries for creating table notes
query = """CREATE TABLE if not exists notes(
id integer primary key,
username text,
emotion text,
note text,
nowdate text
)"""
db.run_save(query)
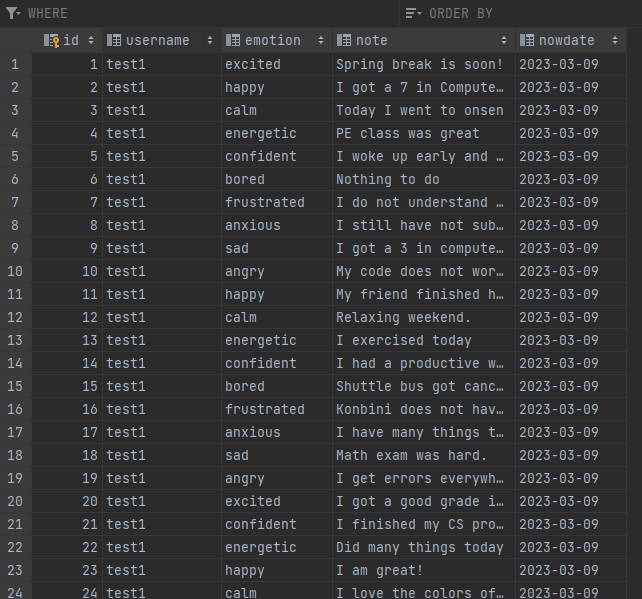
db.close()This code creates two separate tables in an SQLite database named "p3_database.db".
The first table is called "users" and has four columns:
"id" which is an integer and the primary key
"username" which is a text field
"email" which is a text field
"passwd" which is a text field
The second table is called "notes" and has five columns:
"id" which is an integer and the primary key
"username" which is a text field
"emotion" which is a text field
"note" which is a text field
"nowdate" which is a text field
Both tables use the "if not exists" syntax to avoid creating a table if it already exists. The tables are created using the "CREATE TABLE" SQL statement followed by the name of the table, its columns, and any constraints on those columns.
The code uses a database_worker class to execute the SQL queries and create the tables.
This is helping my client because using a SQLite database I am managing her program, the notes she writes, and the usernames there are.

- StackOverFlow.com
- YouTube.com
- kivy.org/doc/stable/
- Chat GPT
- Functions
- For/while loops
- Input Validation
- If statements
- Encryption
- OOP paradigm
- KivyMD Library
- Relational databases
- SQLite, ORM
- Others
https://drive.google.com/file/d/15uBFJJsWgiyDIDAHGMM9TPk85QTE450Q/view?usp=sharing
Pending discover how to convert the Python and Kivy files into an exportable app to use in multiple devices.
My client and me reunited in a 10-minute meeting. She wants a mood tracker app. Log in and register Main page with a box asking what is your mood today? You can only answer with one word: Sad, happy, anxious, excited. List of options, you click one. Notes screen. Every adjective has a different folder in which she writes. She writes in the page she has the feeling. Delete and add notes options.
Footnotes
-
“Advantages of Python over Other Programming Languages.” Vilmate, 2019, https://vilmate.com/blog/python-vs-other-programming-languages/. ↩
-
“About Python.” Python.org, https://www.python.org/about/. ↩
-
Citation needed ↩
-
“Philosophy”, https://kivy.org/doc/stable/philosophy.html ↩
-
“Appropriate Uses For SQLite”, https://www.sqlite.org/whentouse.html ↩