
➡️ Download the latest release for Windows, macOS, or Linux.
A graphical user interface application for launching and managing Omniboard instances to visualize and track MongoDB-backed experiments from the DREAM/Altar ecosystem.
- Features
- Installation
- Usage
- Development
- Architecture
- Contributing
- Troubleshooting
- Versioning
- License
- MongoDB Connection Management: Connect to local, remote, or Atlas MongoDB instances (port or full URI)
- Database Discovery: Automatically list available databases
- One-Click Omniboard Launch: Deploy Omniboard in isolated Docker containers
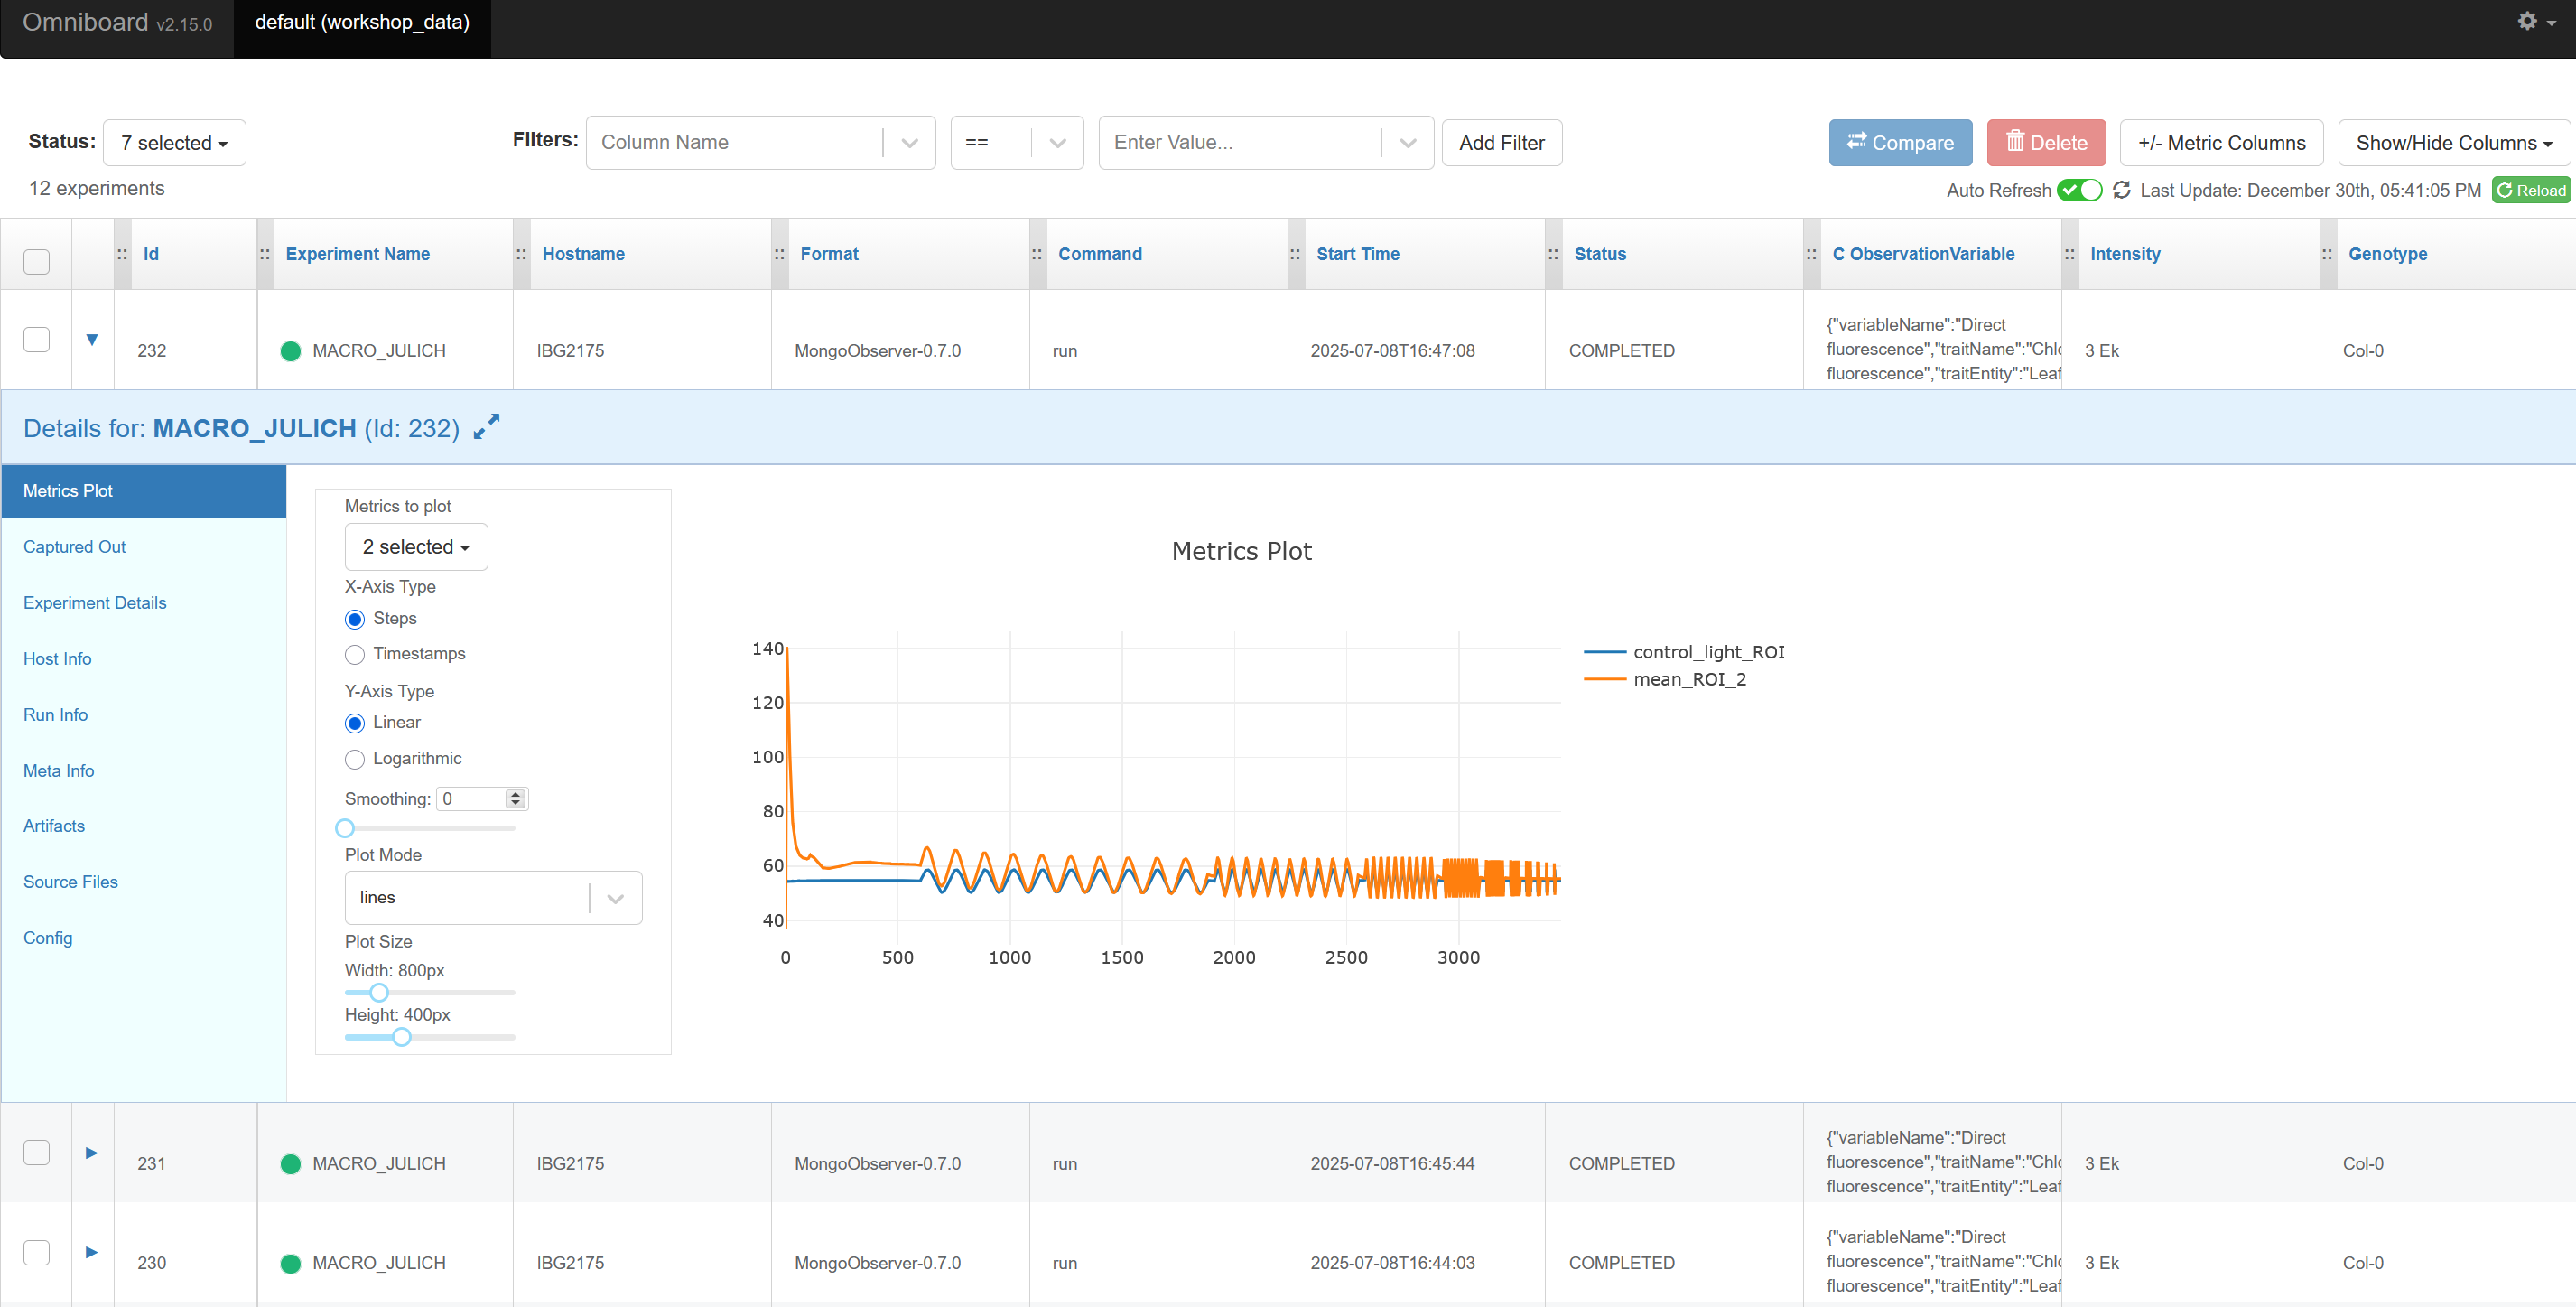
- Web UI: Dash-based web application served in your browser
- Docker Integration: Automatic container management and cleanup
- Multi-Instance Support: Run multiple Omniboard instances on different ports
- Deterministic Port Assignment: Hash-based port generation preserves browser cookies per database
- Container Cleanup: Easy removal of all Omniboard containers
You can use any of these options:
Prebuilt executables for Windows, macOS, and Linux are attached to each GitHub Release (built by our GitHub Actions workflow).
- Download
- Go to the repository's Releases page
- Under the latest release, download the asset for your OS/architecture. The filename typically contains the OS name, for example:
- Windows: contains
windowsorwinand ends with.exe - macOS: contains
macosordarwin(may be a.zipthat contains the app/binary) - Linux: contains
linux(often an ELF binary or a tarball)
- Windows: contains
- Run
-
Windows (PowerShell):
# If you downloaded a zip, extract it first
.\AltarViewer.exe
First run: If you see Windows SmartScreen, click “More info” → “Run anyway”. If the file is blocked, right‑click → Properties → check “Unblock”.
-
macOS (Terminal):
# If you downloaded a zip, extract it first
chmod +x ./AltarViewer-Linux   # may already be executable
./AltarViewer-Linux
First run: If Gatekeeper blocks the app, open it via System Settings → Privacy & Security → “Open Anyway”, or right‑click the app → Open.
-
Linux (Terminal):
# If you downloaded a tar/zip, extract it first
chmod +x ./AltarViewer
./AltarViewer
Notes: You may need a recent glibc (on older distros). If you see a “permission denied” on a mounted filesystem, copy the binary into your home directory and try again.
- Optional CLI usage
- You can also run the executable from a terminal to capture logs. The GUI guides you through connecting to MongoDB and launching Omniboard.
git clone https://github.com/DreamRepo/Altar.git
cd Altar/AltarViewer
python -m venv venv

# Activate the venv (one of these)
venv\Scripts\activate      # Windows
source venv/bin/activate    # macOS/Linux

pip install -r requirements.txt
python -m src.main
Alternatively, clone this repository directly if you only need the Viewer:
git clone https://github.com/DreamRepo/AltarViewer.git
cd AltarViewer
python -m venv venv
source venv/bin/activate    # or venv\Scripts\activate on Windows
pip install -r requirements.txt
python -m src.main- Start docker desktop
-
For windows: launch docker desktop executable.
-
For Linux:
systemctl --user start docker-desktop
-
Launch the application (using any install option above)
-
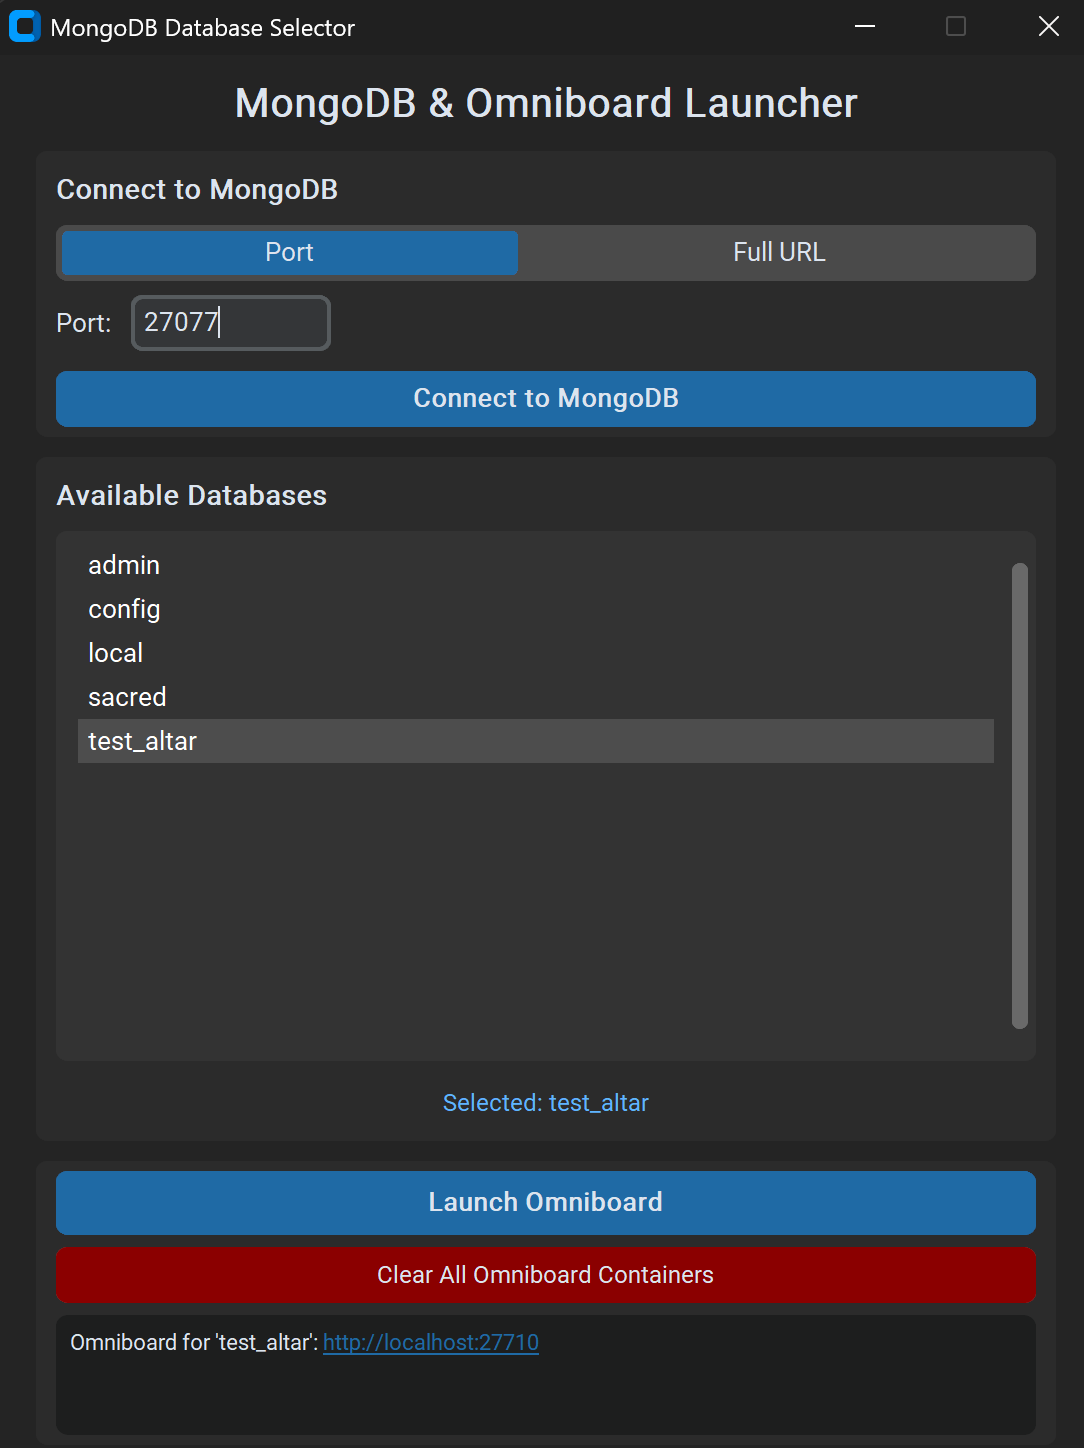
Connect to MongoDB
- Choose a connection mode:
- Port: enter your MongoDB port (default:
27017for localhost) - Full URI: paste a full MongoDB connection URI (works with Atlas, remote VMs, authentication, TLS and options)
- Security note: do not paste passwords here. Prefer the "Credential URI" tab to avoid storing secrets in plain text.
- Credential URI: paste a credential-less URI (e.g.,
mongodb://host:27017/yourdb) and enter username/password/auth_source separately from the following schemes:mongodb+srv://user:pass@my-cluster.mongodb.net/?retryWrites=true&w=majority,mongodb://username:password@host:27017/?authsource=db_name- Optionally save your password securely using the OS keyring
- Port: enter your MongoDB port (default:
- Click "Connect" to list available databases
- Choose a connection mode:
-
Select a database
- Choose a database from the dropdown list
- Click "Launch Omniboard"
-
Access Omniboard
- A clickable link will appear in the interface
- Omniboard opens automatically in your default browser
- Connection Modes:
- Port: quick local development; launches Omniboard with
-m host:port:database- If you connect to
localhostor127.0.0.1, the app maps it so the Docker container can reach your host MongoDB:- Windows/macOS:
host.docker.internal - Linux:
172.17.0.1(Docker bridge gateway)
- Windows/macOS:
- If you connect to
- Full URI: recommended for Atlas/remote; launches Omniboard with
--mu <uri-with-db>- The selected database is injected into the URI path before launching Omniboard, while preserving credentials and query parameters.
- Example constructed argument:
--mu "mongodb+srv://user:pass@MONGO_IP/DB_NAME?authsource=DB_NAME"
- For security, the app does not persist Full URI values between sessions.
- Credential URI: enter a credential-less URI and provide username/password separately
- Passwords are stored only in the OS keyring if you opt in; they are never written to disk
- Port: quick local development; launches Omniboard with
- Default Port: 27017
- Authentication: Supply credentials in your URI for Full URI mode
- Deterministic Port Assignment: Ports are generated using a hash of the database name (base: 20000, range: 10000)
- Browser Cookie Preservation: The same database always gets the same port, preserving Omniboard customizations and cookies in your browser
- Automatic Conflict Resolution: If the preferred port is unavailable, the next free port is automatically selected
- Port Range: 20000-29999 (based on SHA-256 hash of database name)
-
Clone and setup
git clone https://github.com/DreamRepo/Altar.git
cd Altar/AltarViewer
python -m venv venv
source venv/bin/activate  # or venv\Scripts\activate on Windows
-
Install development dependencies
pip install -r requirements.txt
pip install -r requirements-dev.txt
# Run all tests
pytest

# Run with coverage
pytest --cov=src --cov-report=html

# Run specific test file
pytest tests/test_mongodb.py

# Run with verbose output
pytest -vBuild a standalone executable using PyInstaller:
# Install PyInstaller (if not in requirements-dev.txt)
pip install pyinstaller

# Build executable
pyinstaller AltarViewer.spec

# Output will be in dist/ directoryEdit AltarViewer.spec to customize:
- Application name and icon
- Bundled data files
- Hidden imports
- Build options
AltarViewer/
├── src/
│   ├── main.py          # Application entry point
│   ├── gui.py           # GUI implementation (CustomTkinter)
│   ├── mongodb.py       # MongoDB connection logic
│   ├── omniboard.py     # Docker/Omniboard management
│   └── prefs.py         # Secure preferences (JSON + OS keyring)
├── tests/
│   ├── conftest.py      # Pytest configuration
│   ├── test_mongodb.py  # MongoDB tests
│   └── test_omniboard.py # Omniboard tests
├── assets/              # Images and resources
├── requirements.txt     # Production dependencies
├── requirements-dev.txt # Development dependencies
└── AltarViewer.spec # PyInstaller specification
- GUI Layer (gui.py): CustomTkinter-based interface
- MongoDB Layer (mongodb.py): Database connection and queries
- Omniboard Layer (omniboard.py): Docker container management with hash-based port assignment
- Main Controller (main.py): Application orchestration
The application uses a deterministic hash-based port assignment:
port = 20000 + (SHA256(database_name) % 10000)This ensures:
- Consistency: Same database → same port
- Browser Persistence: Cookies and customizations are preserved
- Conflict Handling: Automatic fallback to next available port if needed
We welcome contributions! Please follow these guidelines:
- Fork the repository on GitHub
- Clone your fork locally
git clone https://github.com/YOUR_USERNAME/Altar.git cd Altar/AltarViewer - Create a feature branch
git checkout -b feature/your-feature-name
-
Make your changes
- Follow PEP 8 style guidelines
- Add tests for new features
- Update documentation as needed
-
Run tests and linting
pytest
-
Commit your changes
git add .
git commit -m "feat: add your feature description"
Use Conventional Commits:
feat:New featurefix:Bug fixdocs:Documentation changestest:Test additions or changesrefactor:Code refactoringchore:Maintenance tasks
-
Push to your fork
git push origin feature/your-feature-name
-
Create a Pull Request
- Provide a clear description of changes
- Reference any related issues
- Ensure all tests pass
Problem: "Connection Error" when connecting to MongoDB
Solutions:
- Ensure MongoDB is running:
mongoshormongo - Check the port number (default: 27017)
- Verify firewall settings allow connections
- Check MongoDB logs for authentication issues
Problem: Docker-related errors when launching Omniboard
Solutions:
- Verify Docker Desktop is running:
docker ps - Check Docker has sufficient resources allocated
- Ensure port 9005+ are not in use by other applications
- Try clearing old containers: Use the cleanup button in the app
- If using the packaged EXE, ensure the Docker CLI is on PATH or installed in the default location. The app resolves common Docker paths but may fail if the CLI is missing.
- On slower machines, Docker initialization can take >30s after launch; the app now waits up to 60s, but if you still see “Docker not running”, retry once Docker is fully ready.
- The app does not auto-start Docker on any OS. Please start Docker Desktop (or the Docker service) manually, wait for it to be ready, and then launch Omniboard.
Note: In Port mode, the app automatically maps localhost/127.0.0.1 so containers can reach MongoDB running on the host:
- Windows/macOS:
host.docker.internal - Linux:
172.17.0.1
Common causes:
- The connection string used inside the container is missing the selected database
localhostfrom the host OS is unreachable from inside Docker (Windows/macOS)- Authentication failure or insufficient permissions on the selected database
What the app does:
- In Full URI mode, it injects the selected database into the URI and uses
--mu, preserving credentials/options
What to check:
- Validate your URI with
mongoshand ensure it has read access to the selected DB - Confirm the container is running, or use the cleanup button and relaunch
- Give the container a few seconds after launch to initialize
Some deployments (e.g., MongoDB Atlas or non-admin users) do not allow the listDatabases command. In that case, the app falls back to the database present in your connection URI so you can still launch Omniboard for it.
Problem: "Port already in use" errors
Solutions:
- The application automatically finds the next available port if the preferred port is busy
- Use the "Clear Omniboard Docker Containers" button to remove old containers
- Manually check and stop containers:
docker ps
docker stop <container_id>
- Check for other applications using ports 20000-29999
Note: Each database consistently uses the same port (hash-based), allowing your browser to remember Omniboard customizations and preferences per database
Problem: Missing module errors when running from source
Solutions:
- Reinstall dependencies:
pip install -r requirements.txt - Ensure virtual environment is activated
- Check Python version compatibility (3.8+)
If the "Save password securely" option is disabled or your password does not reappear:
- Ensure the
keyringpackage is installed in your environment:pip install keyring - On Linux, ensure you have a supported keyring backend (e.g., gnome-keyring/Secret Service or KWallet) and a running session
- The app never writes passwords to disk; they are stored only in the OS keychain when this option is enabled
Older versions saved preferences at ~/.altarviewer_config.json, which could be affected if the HOME environment variable was overridden (e.g., by certain shells/tools) while running inside a repository folder. The app now stores preferences in the standard OS config location (e.g., %APPDATA%\AltarViewer\config.json on Windows) using platformdirs, so it no longer depends on the current working directory or HOME. Existing legacy configs are read for compatibility but new saves go to the stable location.
- Check existing GitHub Issues
- Review Omniboard documentation
- Contact the DREAM/Altar team
We use Semantic Versioning (SemVer) for AltarViewer. The latest version is shown by the Release badge at the top of this README. See the Releases page for notes and downloadable artifacts.
- Update version where applicable (e.g., badges or app metadata if needed)
- Create and push a tag (use the next SemVer):
git tag -a vX.Y.Z -m "Release vX.Y.Z"git push origin vX.Y.Z
- GitHub Actions builds platform-specific binaries and uploads them to the Release
- Publish the Release when artifacts are validated
This project is licensed under the GNU General Public License v3.0 - see the LICENSE file for details.